Technical SEO Audit: Fix Issues & Improve Rankings

Your business website is looking immaculate.
The blog is stacked with high-quality content. Every product description is finely tuned for search performance. You’ve even added alt text to your images and optimized your media for loading speed. Bravo.
So, why are you not crushing your opponents in the search results?
It might be because your site has some unseen issues that make it more complicated for search engines to crawl your site or access your content.
Oh no. This sounds like a whole heap of headache to fix.
Actually, it’s not. Running a technical SEO audit can help you find and fix the flaws pretty quickly.
And you’re in the best place to learn how to audit your site.
What Is a Technical SEO Audit, Anyway?
A technical SEO audit is essentially a website health check. This testing process can reveal technical issues that might prevent search engines from crawling and indexing your site.
Performing a technical SEO audit on your website is important for business, because it directly affects your search ranking.
Fixing the problems means more clicks, hopefully leading to more sales…leading to more money, money, money.
When To Run a Technical Audit
If you’ve never performed a site audit, there’s no time like the present. The same goes for any new website you set up, including when you redesign your existing site.
It’s also a good idea to review the technical aspects of your site every so often — perhaps quarterly, or every year if that sounds like a hassle.
Using Technical Audit Tools
While it’s possible to check certain aspects of your site by hand, there’s no need. Specialized tools are the way to go.
You can perform a solid audit using the following free tools from Google. We’ll be introducing these throughout the post.
The only issue is that you have to work across multiple platforms to find the data you need. And it’s not always obvious where to find it.
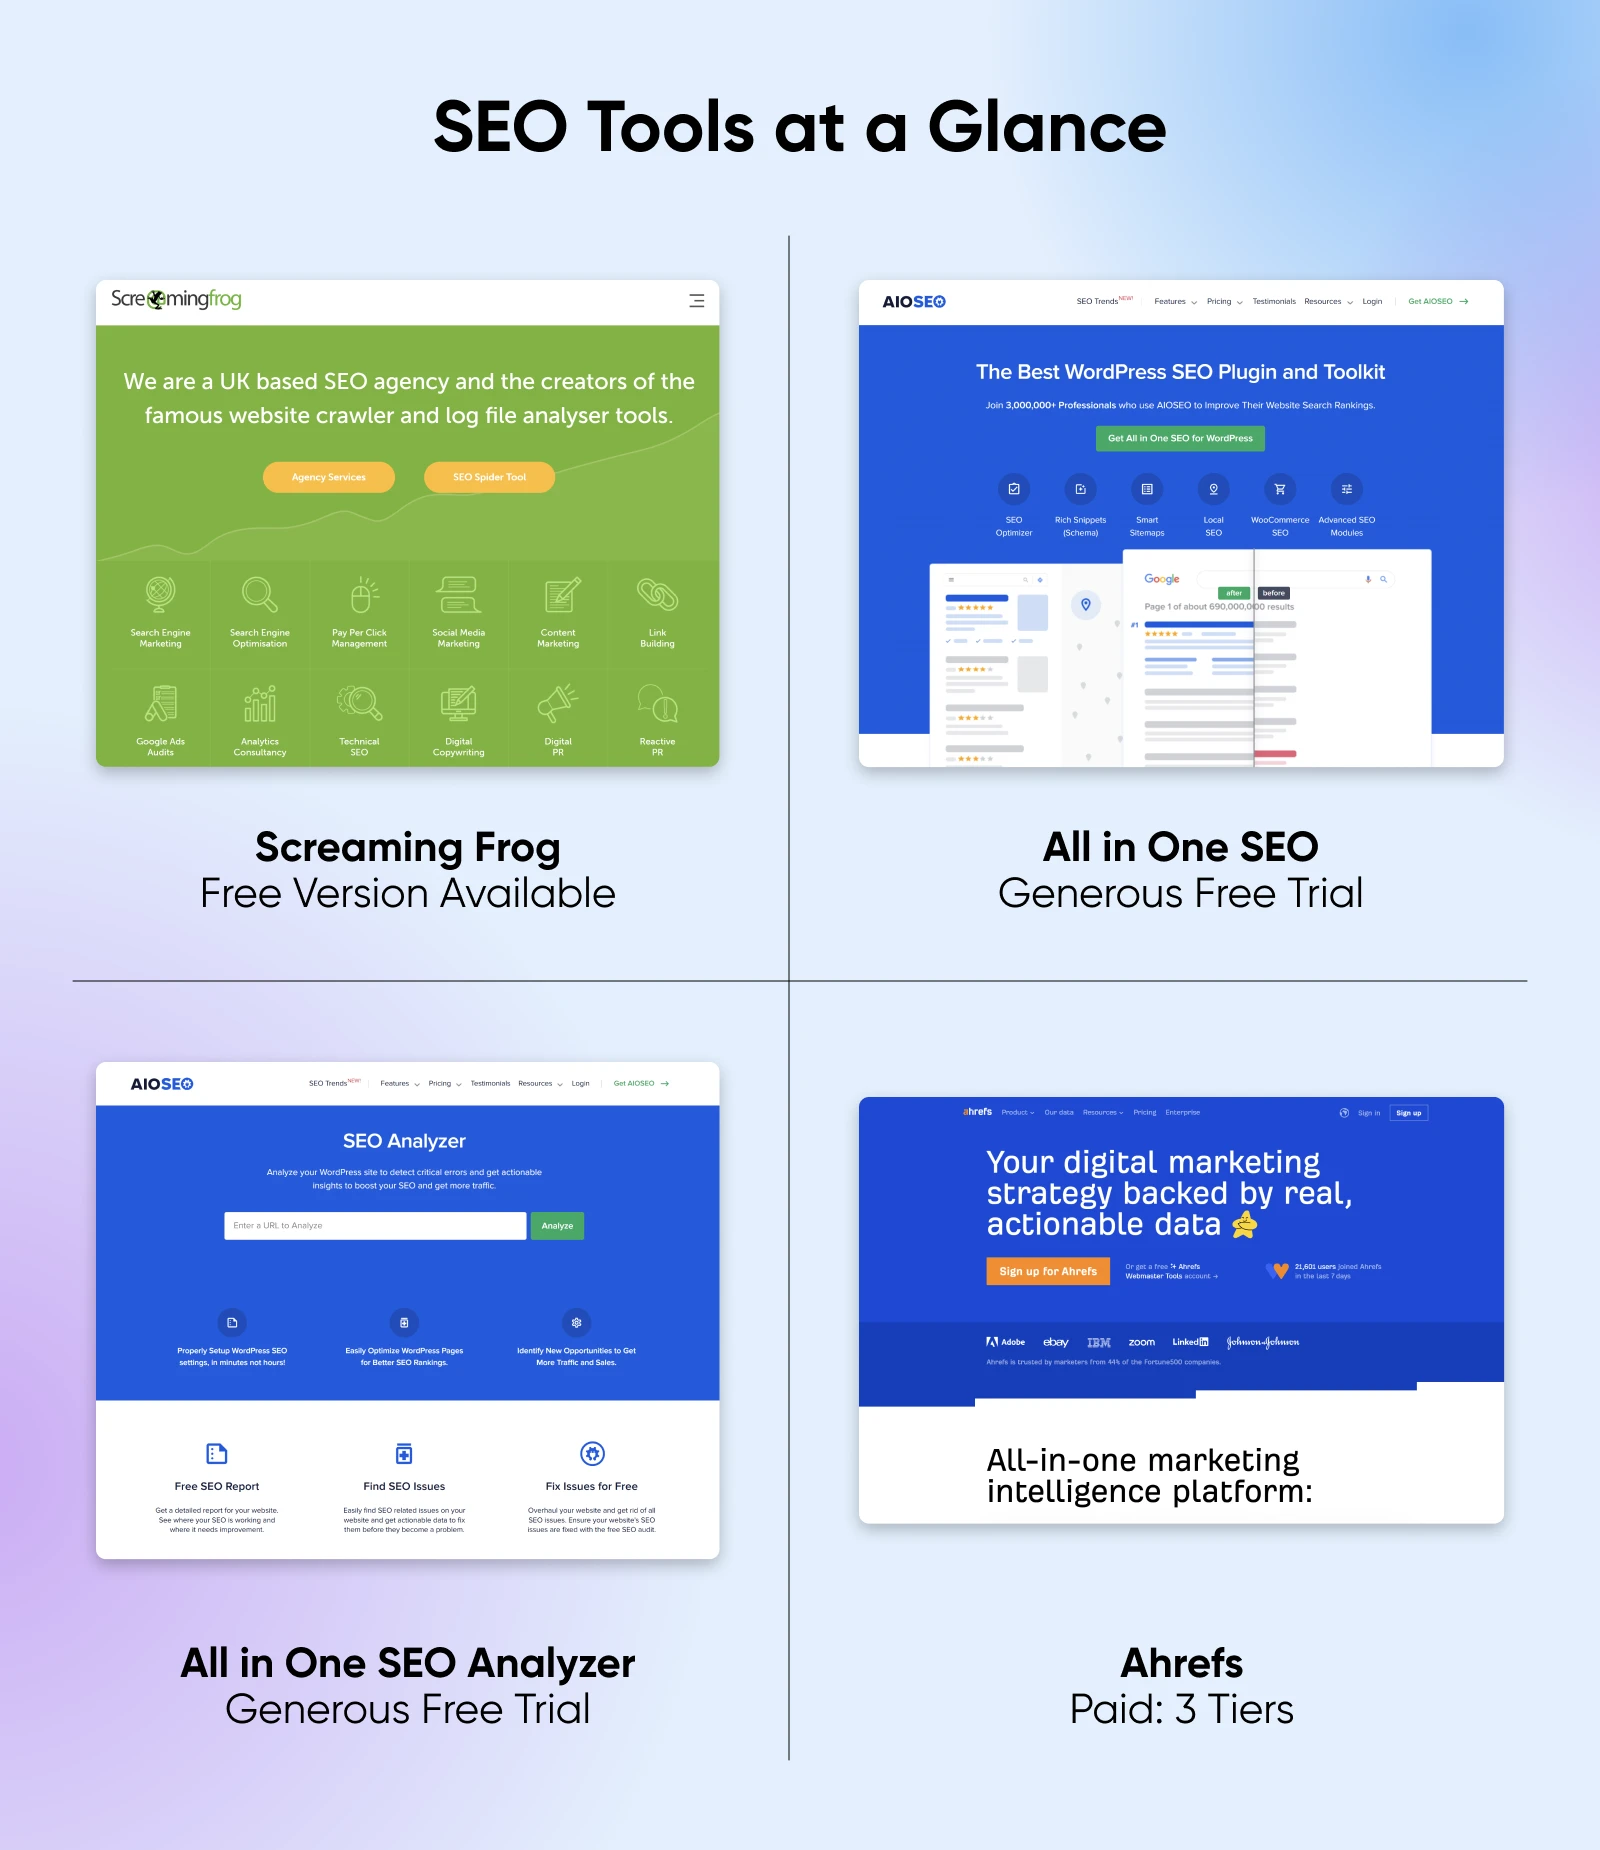
So, it might be worth grabbing one of these dedicated SEO tools.
- Screaming Frog (Freemium): The OG of technical auditing. It offers a generous free crawl budget, allowing you to scan up to 500 URLs. That’s plenty enough for many SMB websites.
- All in One SEO (Freemium): Our favorite SEO plugin for WordPress. It’s made more for technical maintenance than for auditing, but you can definitely still perform the checks.
- All in One SEO Analyzer (Freemium): Don’t have WordPress? This Chrome extension gives you access to many of the same features.
- Ahrefs (Paid): If you want a deep dive into your site’s SEO performance, there’s no better tool.
Performing a Technical SEO Audit: Your 7-Step Checklist
Despite the name, you don’t actually need tech skills to run a technical SEO audit.
But like a mechanic doing a vehicle inspection test, you will need to follow a methodical process, just to make sure the wheels don’t fall off.
Not sure where to start? To help you cover all bases, we’ve prepared the perfect audit checklist — ordered by priority.
(Don’t fancy wading through the whole thing? Skip to the end for a TL;DR version!)
Step 1: Check That Your Site Is Crawlable
Hmm, crawlability. Sounds like how spiders would rate your bathroom. But it’s actually about whether search engines can fully access your website.
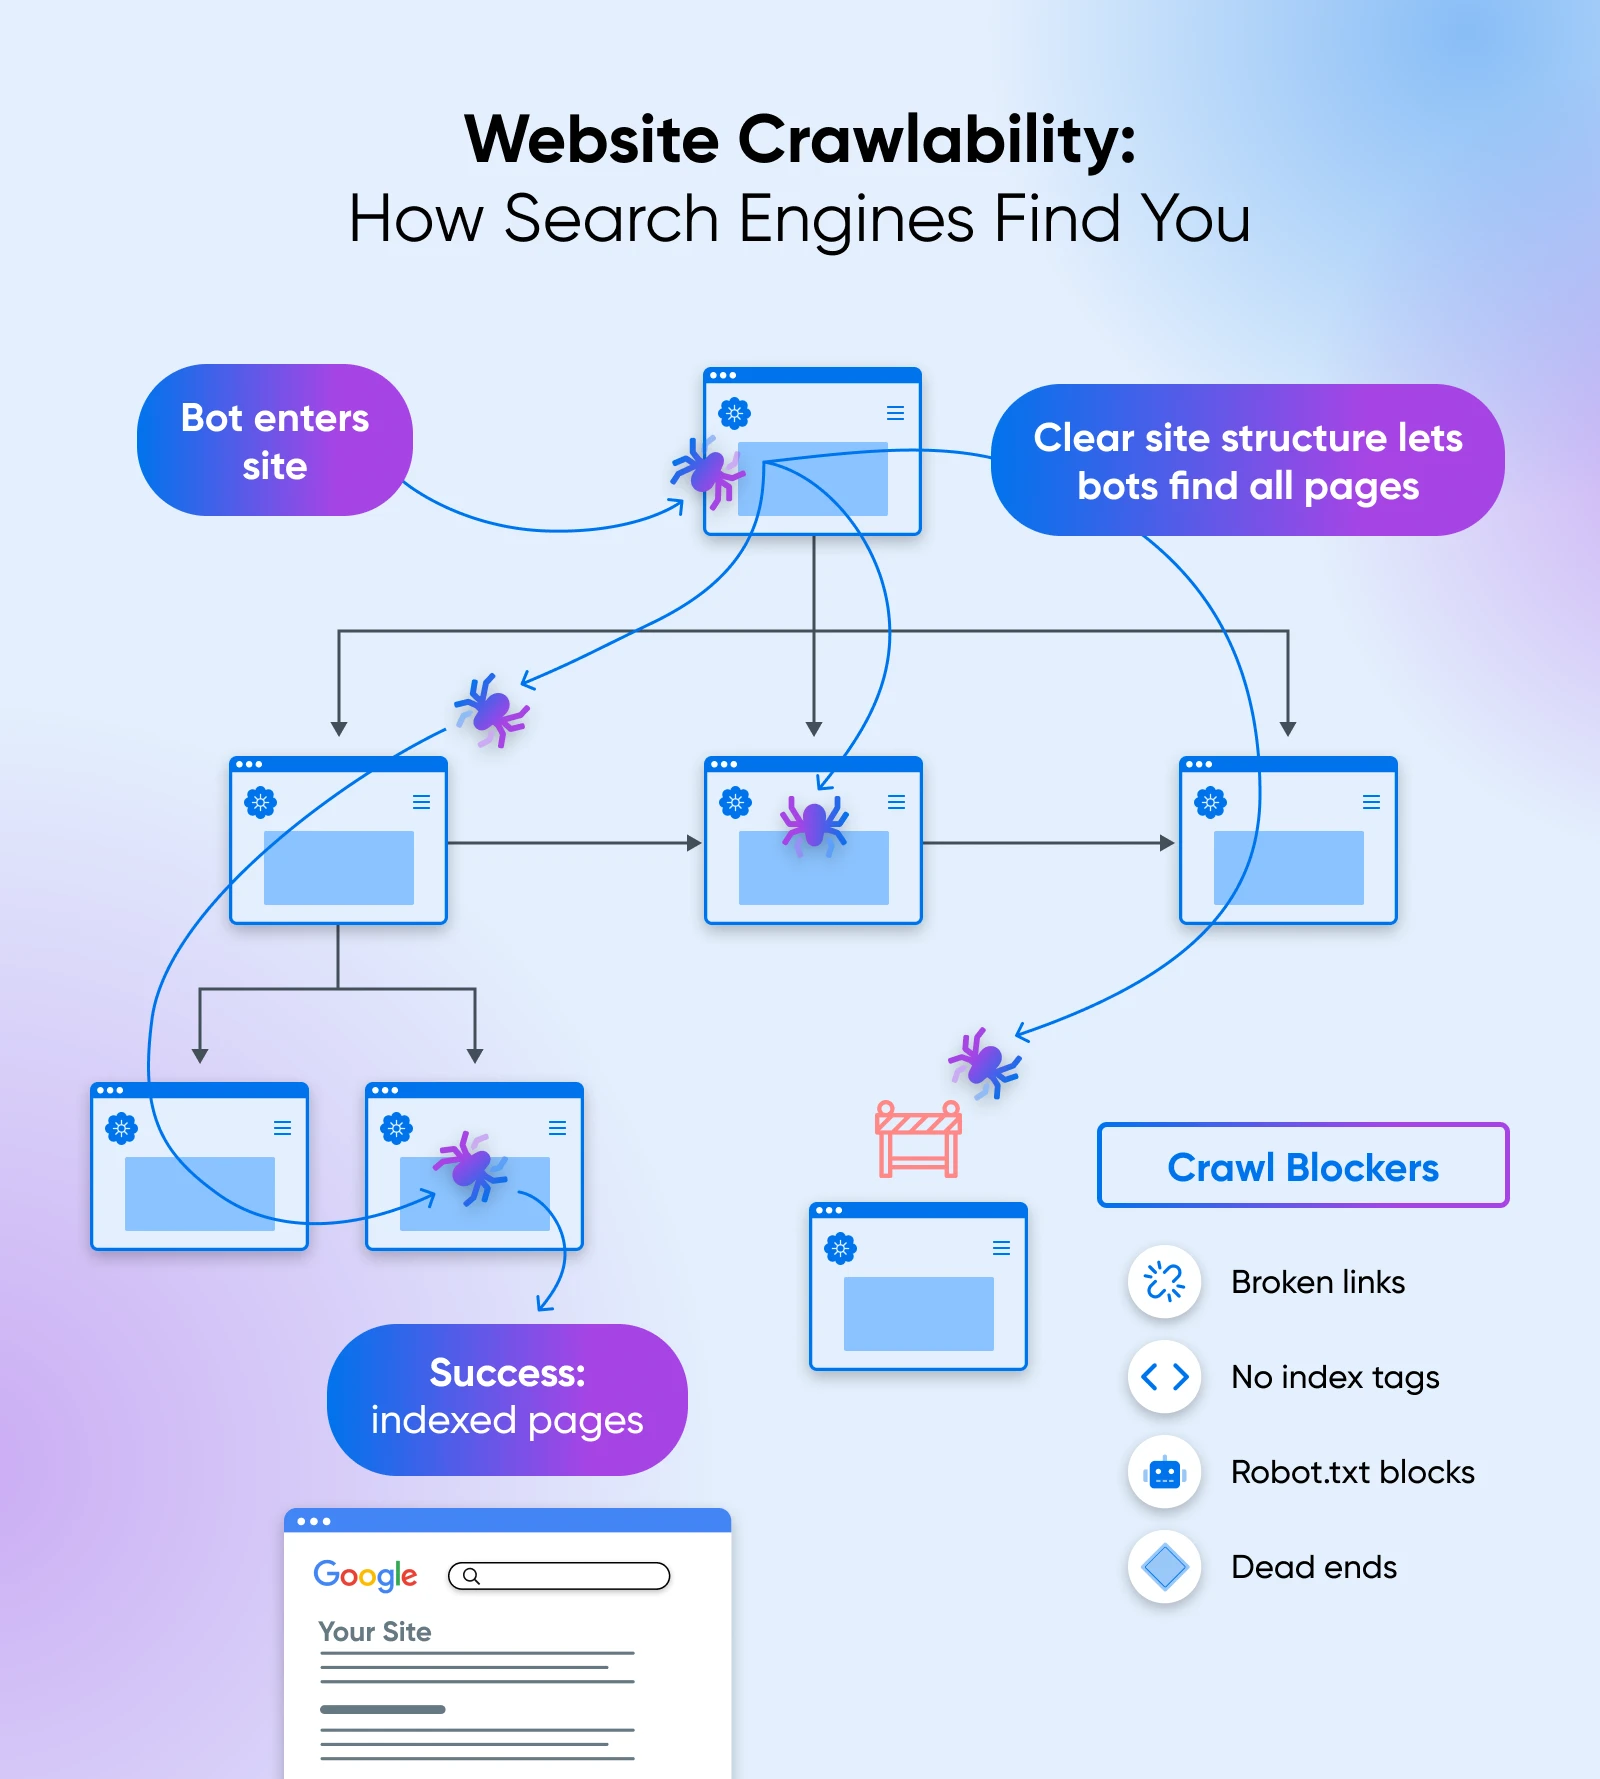
You see, search engines use crawlers (programs made for indexing) to scan your website and find your content. This information allows the search engine to direct relevant traffic your way.
To make sure that’s happening, we’ll need to run a few tests.
Start With Google
But before we dive into the technical stuff, it’s worth taking a moment to Google your site.
Why? Because you can quickly see if major pages are missing from the search results.
Here’s the workflow.
The results will show you which pages on your site Google knows about. It will also tell you roughly how many pages are being crawled and indexed. You can see the number just above the results:
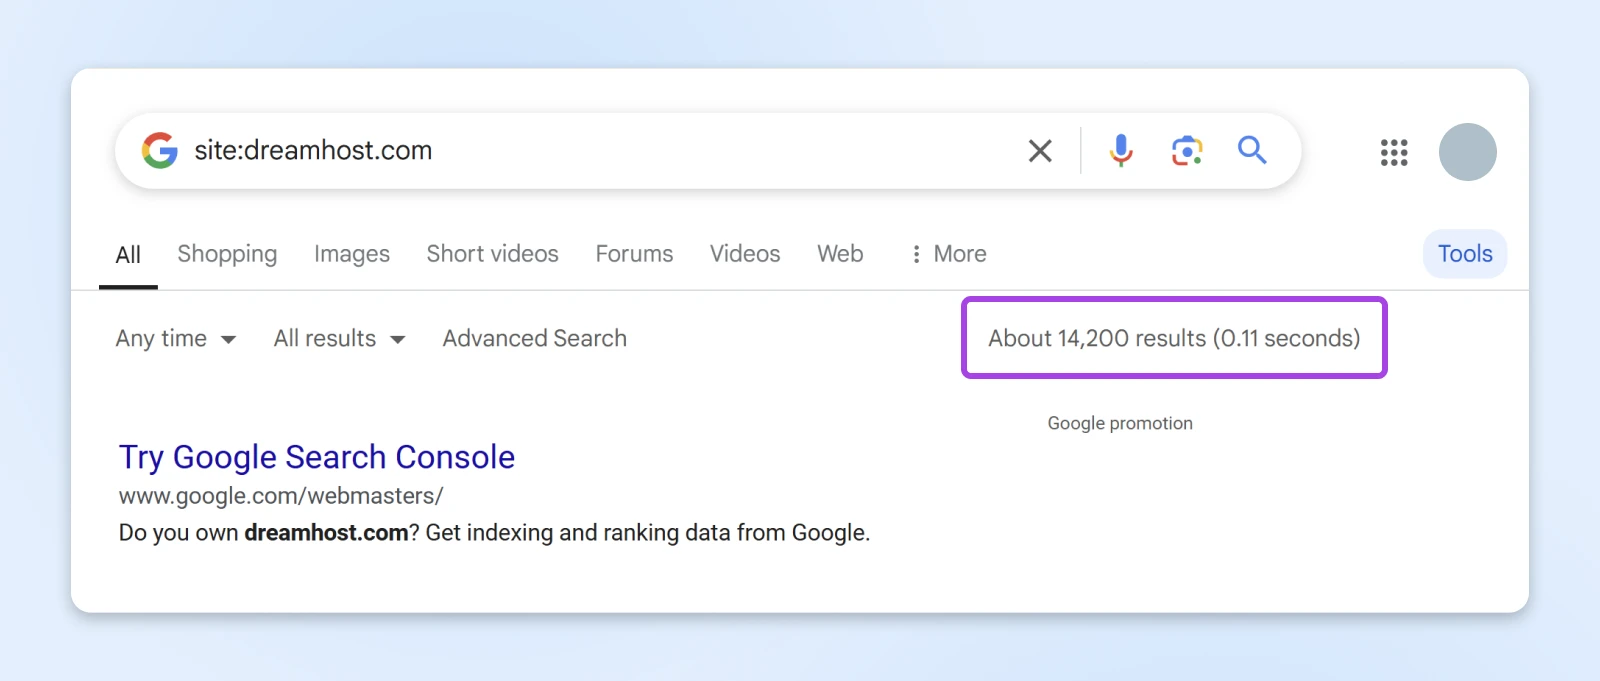
Note: You may have to click Tools to see these numbers.
Run a Test With Google Search Console
Next, visit the Page Indexing report in Google Search Console (GSC). This will give you a more comprehensive overview of pages that have been both crawled and indexed.
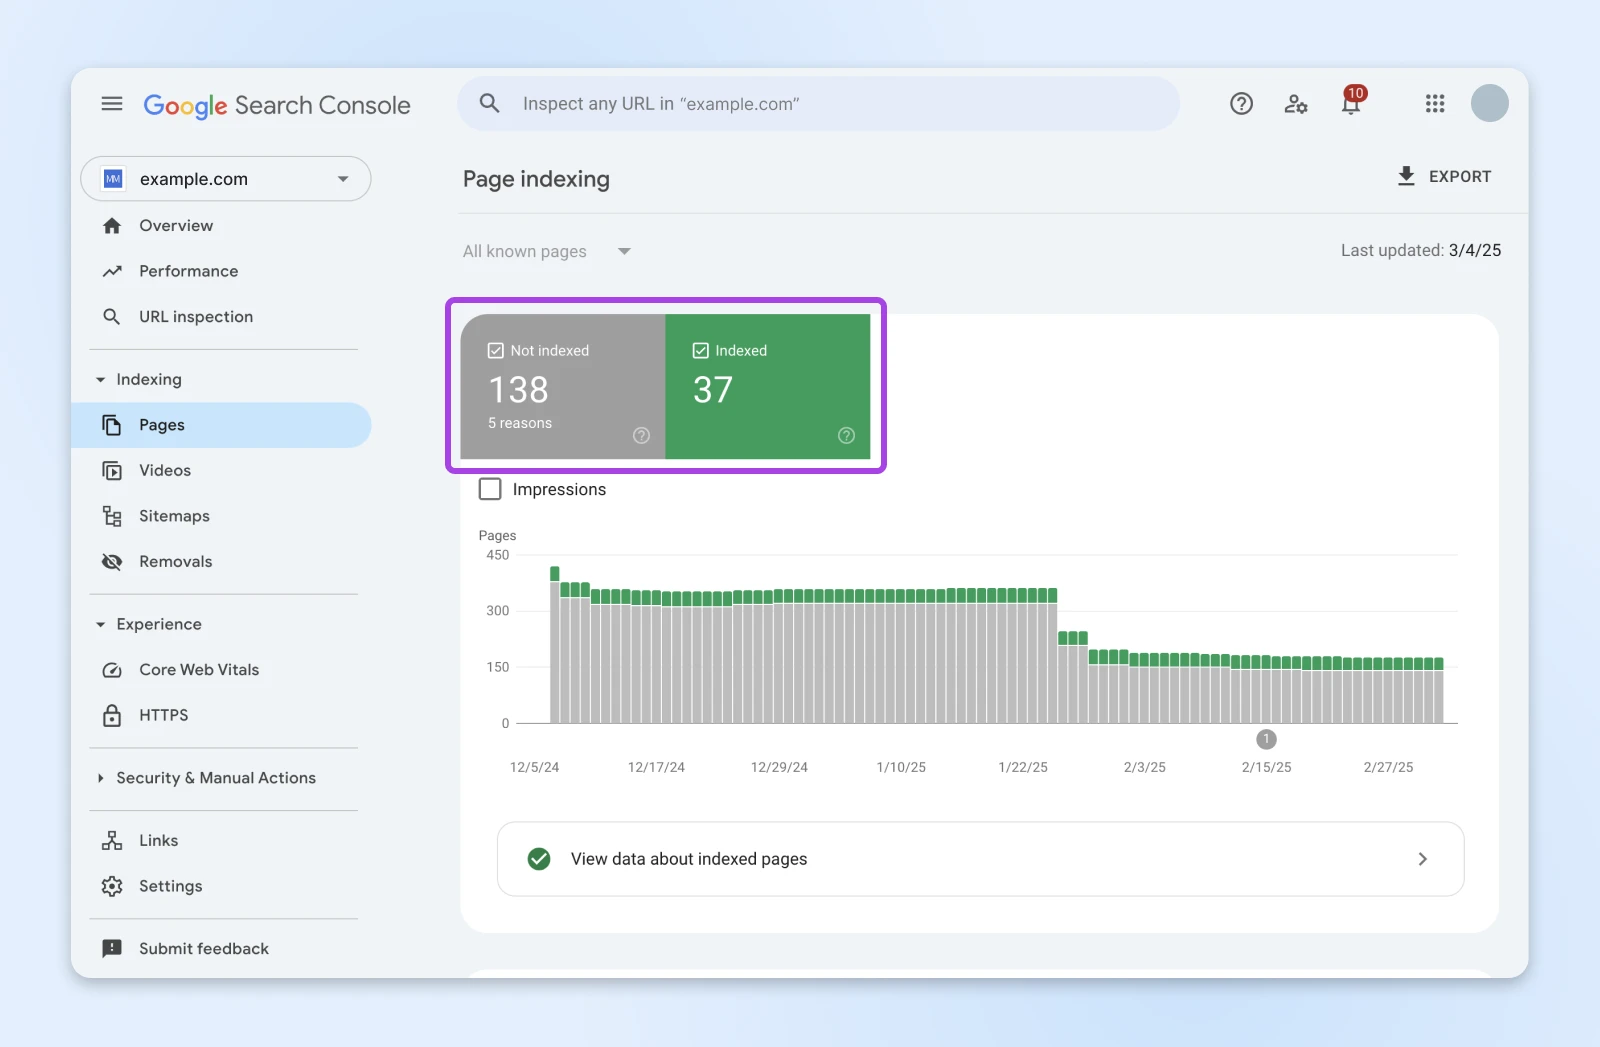
If any pages have been missed, the reasons will appear in the list at the bottom of this dashboard. You can click on each item here to see the individual URLs.
Here are some common causes:
- Page with redirects: The crawler was redirected to another URL.
- Not found (404): The crawler followed a link but found nada.
- Server error (5xx): Your web host is having issues, meaning the crawler couldn’t look around.
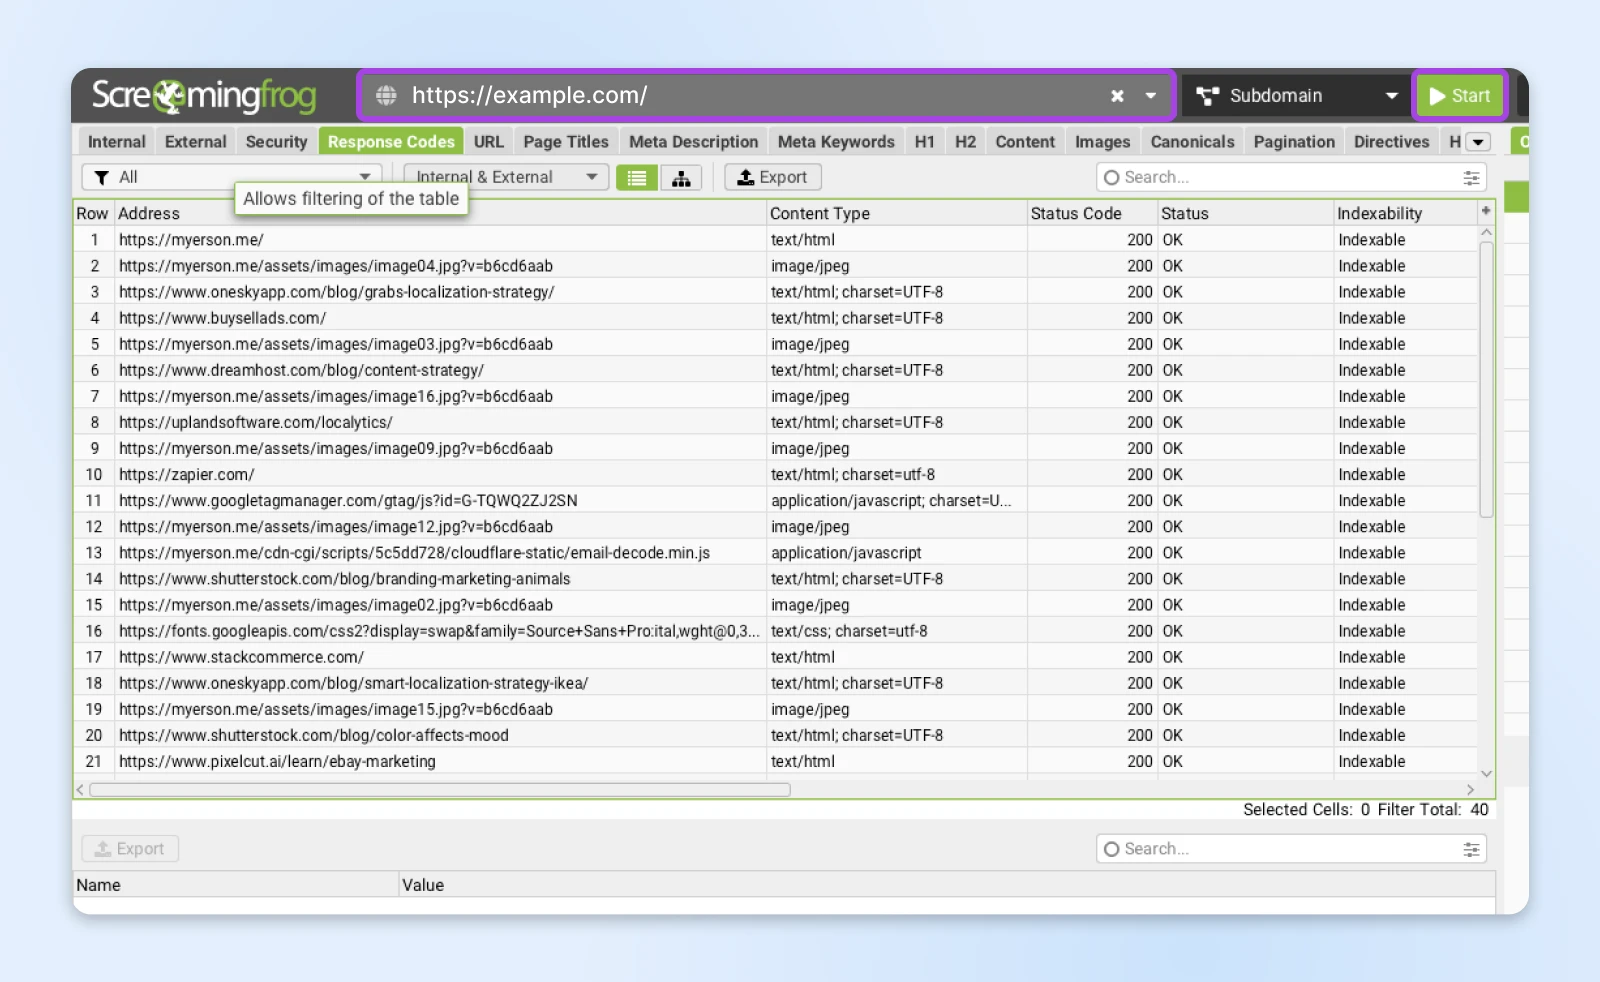
Get More Detail With Screaming Frog
Now, let’s dive a little deeper.
Download and install the Screaming Frog Spider tool on your computer. Open the app and then:
Action Checklist: Troubleshoot Crawlability Problems
Okay, you’ve run the tests and found some crawlability issues. Don’t sweat it! Here’s a quick checklist of fixes.
Broken links (404 errors)
- Replace the link: If possible, replace the broken link with a working link to the correct page.
- Redirect the broken page: If the content has moved, set up a 301 redirect from the old URL to the new URL.
- Remove the link: If the linked content is no longer available, simply remove the link.
Pages with redirects
- Check the redirect: Make sure the redirect is intentional and points to the correct destination page.
- Update internal links: If you’ve redirected a page, update any internal links that point to the old URL.
Server errors (5xx)
- Contact your hosting provider: Let them know you’re experiencing server errors. They can help you diagnose and resolve the issue. (Or you could just switch to a host with 100% guaranteed uptime. Just sayin’.)
And finally…once you’ve fixed the issues, use the URL Inspection tool in Google Search Console to request indexing for the affected pages.
Step 2: Double-Check Your Robots File
About that robots.txt file. It’s essentially a rulebook, telling crawlers how to behave on your site.
Usually, this is helpful. For example, the rule below prevents your WordPress admin area from popping up on Google:
Disallow: /wp-admin/
The problems begin when the wrong rules are inserted into your robots.txt file. You can accidentally ban search engines from visiting your site:
Disallow: /
This kind of thing can happen if you check the wrong box in a plugin.
Double-check by visiting Google’s own robots checker. Put in your website domain, and watch the robots.txt files pop up.
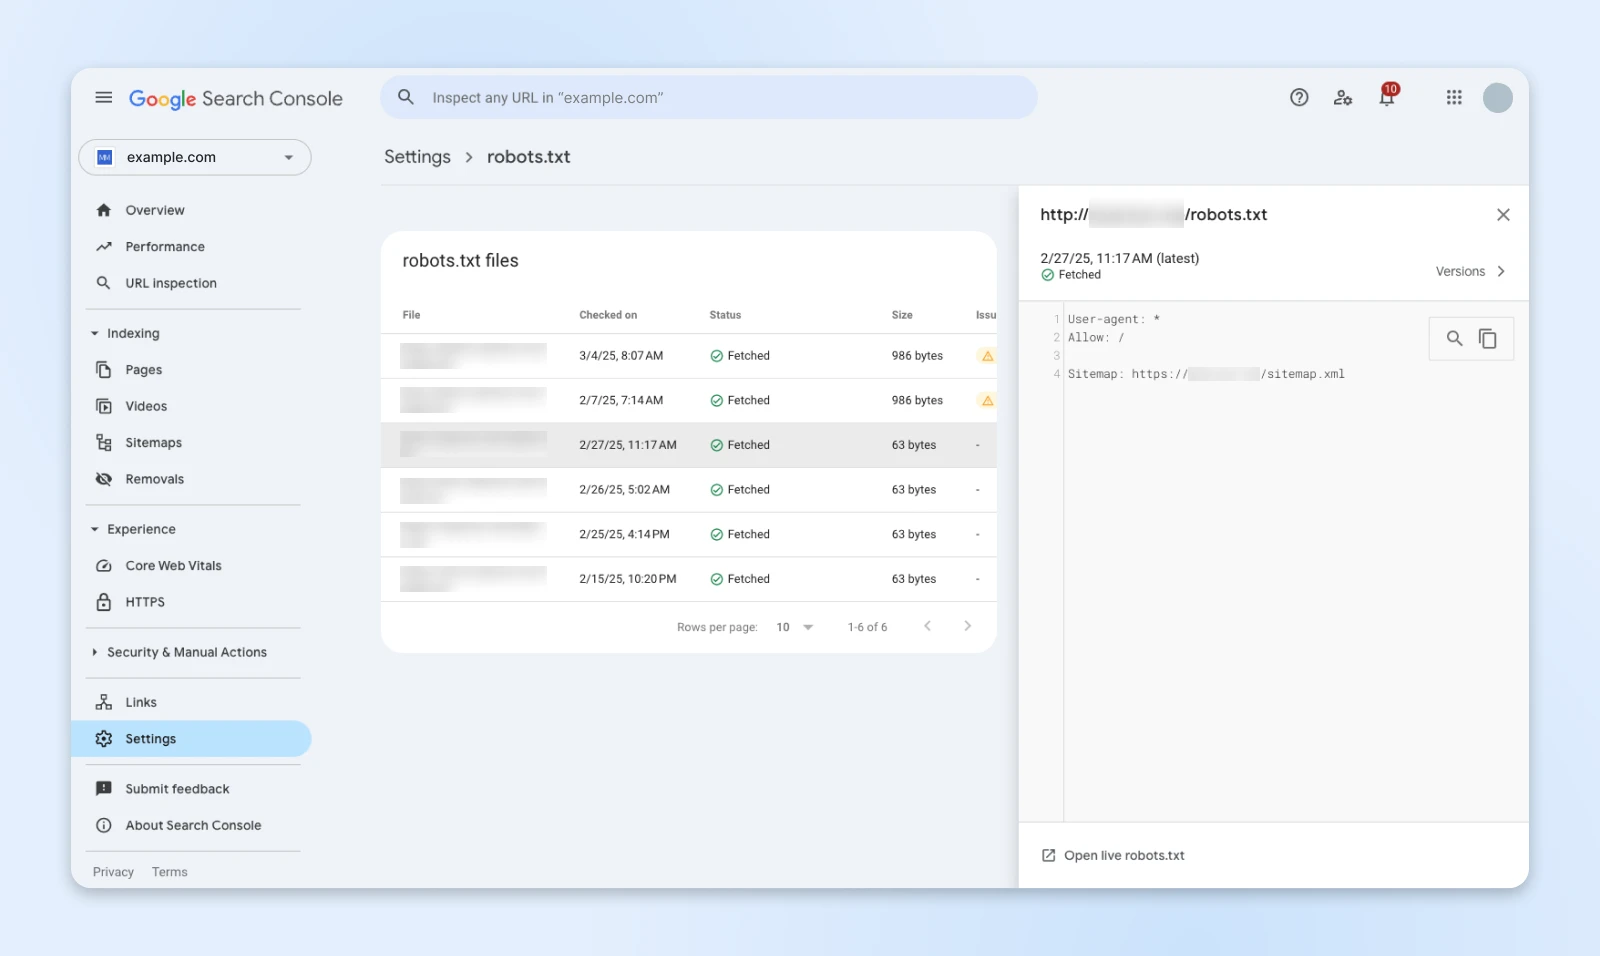
Then, tap on the files to see inside. Make sure any “Disallow” instructions are covering the right URLs. Remove any rules blocking important pages.
Step 3: Check Out Your Sitemap
We’ve now ensured that crawlers can enter and explore your site. The next step is to give them a guided tour.
You can do this by creating a sitemap. Or by making sure your existing sitemap paints an accurate picture of your site architecture.
Sitemap
A sitemap is an outline of the main pages on a website. Sitemaps are used by crawling bots to ensure that they index all important content. A sitemap can also provide a helpful overview of the structure of a website.
Read More
This is especially important if your site has:
- More than 100 pages
- Pages that can’t be reached if you start on the homepage and click internal links — These are called orphan pages.
We can check the status of your sitemap through GSC. Visit your account and select Sitemaps from the sidebar menu.
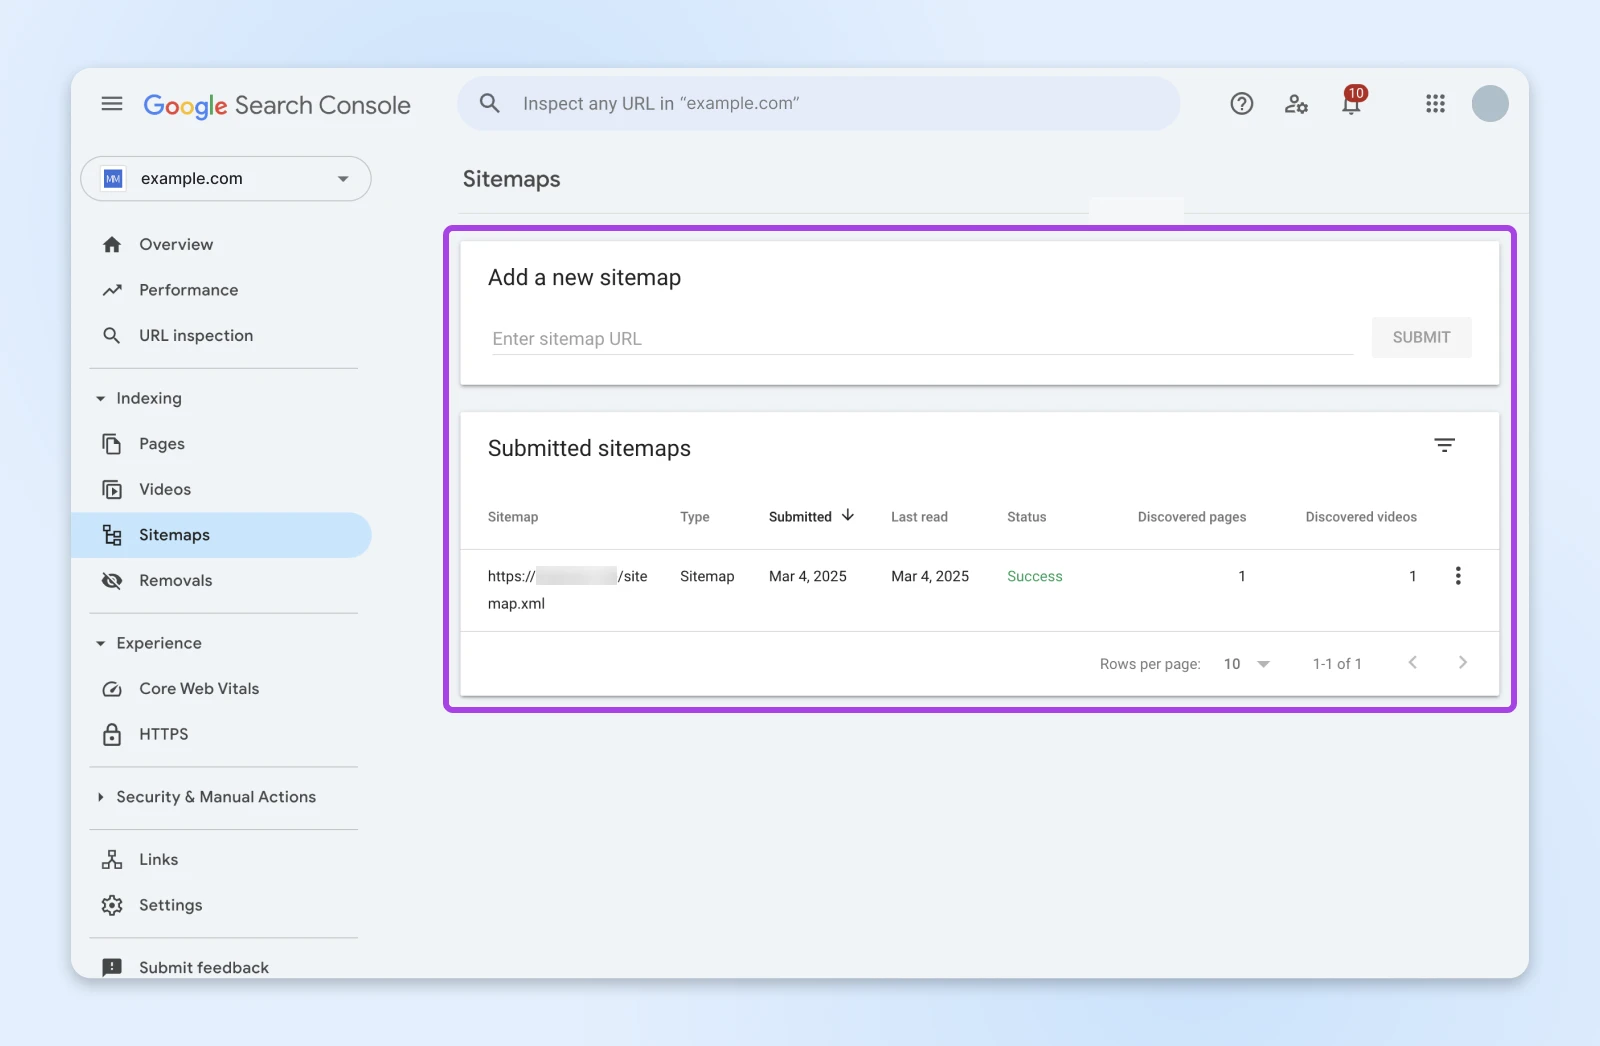
If you haven’t got a sitemap, this area will be blank. You can generate one and submit the link here.
Maybe your site already has a sitemap, and you’ve submitted it to Google. It should show up on this list.
Google helpfully provides a health check. There are three possible statuses.
- “Success”: Google has found your sitemap and is using it.
- “Couldn’t fetch”: Google couldn’t find your sitemap. Maybe you entered the wrong link, or the file has moved?
- “Sitemap had X errors”: Google found your site map and started using it, but encountered problems. Usually, this is because your sitemap isn’t up to date.
You can click on any sitemap listed here to see more details, including why errors are happening.
To learn more about sitemap formatting and troubleshooting, head over to our dedicated sitemaps guide!
Top Tip: If your site runs on WordPress, install a plugin like AIOSEO. This will handle sitemap updates automatically.
Step 4: Confirm That Your Site Is Indexable
Just because your site is crawlable doesn’t mean it will appear in search results.
Once the crawlers have collected information about your site, search engines have to figure out:
- What your content is about
- Which search terms match your content
- The relative quality of your content compared with other similar pages
This process is called indexing.
In the technical audit process, it’s vital to test indexing. Problems with your site can make it impossible for search engines to read your content.
Get an Overview of Indexing With Google Search Console
Start by returning to the “Page Indexing” report in GSC. Here, you can see a breakdown of pages that have and haven’t been indexed.
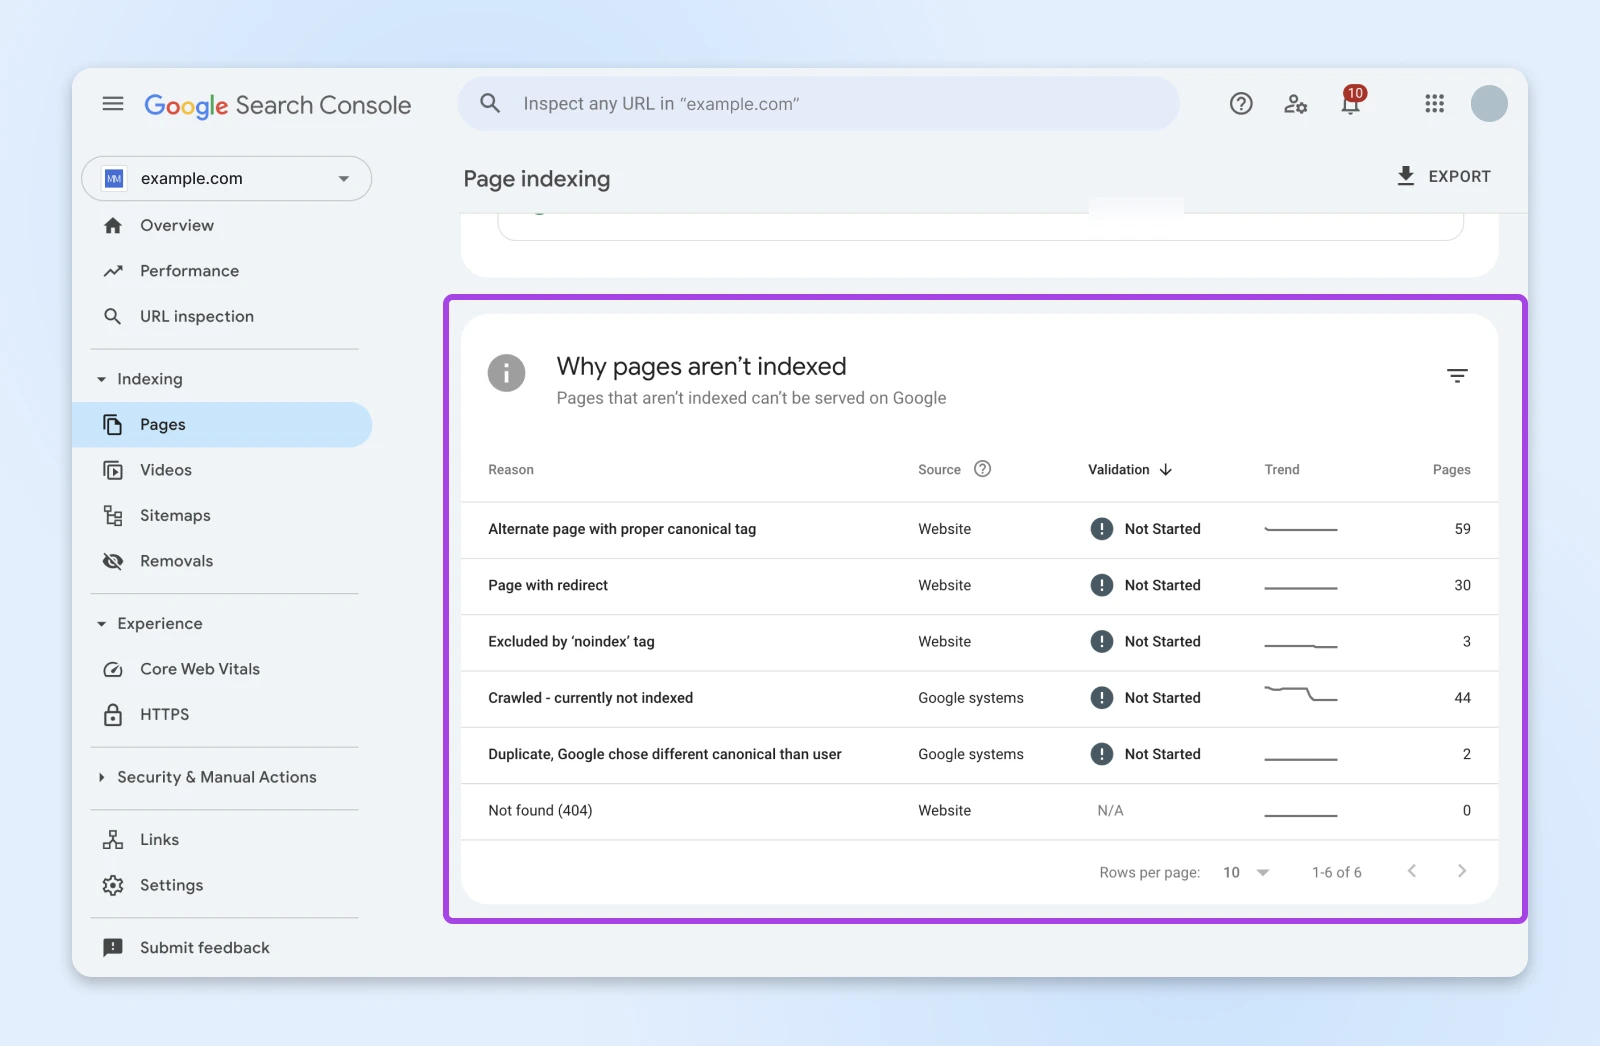
Some of the common reasons why indexing doesn’t happen:
- “Alternate page with proper canonical tag”: You have duplicate content, and you correctly marked the version to be indexed (top work). Google has seen the canonical tag and is taking your advice.
- “Duplicate, Google chose different canonical than user”: Google ignored your advice and chose the other duplicated page.
- “Excluded by ‘noindex’ tag”: You have a rule in your HTML header that bans crawlers from indexing your page!
Take a closer look at any specific URL by typing the address into the search bar at the top of the page.
This opens the URL Inspection tool, which is packed full of useful (and some useless) information.
Check Your Indexing With Screaming Frog
Google Search Console only tells us which pages Google has indexed. It doesn’t tell us about pages that are unindexable. Yes, that is a word in SEO land.
To find these hidden gems, you’ll need to reopen your Screaming Frog report. If you check the list of URLs, you will see a column called “Indexability.” Here, you can see which pages make the grade.
Top Tip: Speed things up by sorting the list using this column. That way, all the URLs with indexing issues will rise to the top.
Action Checklist: Troubleshooting Indexing Issues
All right, you’ve identified some pages that aren’t being indexed. Let’s fix that!
“Excluded by ‘noindex’ tag”
- Remove the noindex tag: If the page should be indexed, remove the <meta name=”robots” content=”noindex”> tag from the page’s HTML code. Also, check your HTTP headers to make sure that a noindex rule isn’t being sent that way.
- Check your CMS settings: If you’re using a CMS like WordPress, check the page isn’t accidentally set to “noindex” in the settings.
- Resubmit the URL to Google: Use the URL Inspection tool in Google Search Console to request indexing for the page.
“Duplicate, Google chose different canonical than user”
- Review the content: Check that the page you want indexed is actually the best and most comprehensive version of the content.
- Strengthen internal linking: Make sure plenty of internal links point to the page you want indexed, using relevant anchor text.
- Re-evaluate the canonical tag: Is the canonical tag pointing to the correct page? Double check!
- Consider merging the content: If the two pages are very similar, consider merging them into a single, stronger page.
Screaming Frog shows “Non-Indexable” status
- Check for noindex tag (again!): Screaming Frog is great at spotting those pesky noindex tags.
- Check for other robots meta tags: Look for other robots meta tags that might be preventing indexing, such as nofollow.
- Inspect the URL in Google Search Console: Use the URL Inspection tool to see if Google is reporting any specific indexing issues.
Step 5: Test the Performance and Accessibility of Your Website
Google pays close attention to site performance. Websites that are quick to load, optimized for all devices, and accessible for all users tend to get higher rankings — simply because that’s what most people prefer.
So, checking performance is an important step in your technical SEO audit checklist.
There are hundreds of testing tools made for this purpose. We’re going to use a free one, made by Google: Lighthouse.
Here’s the workflow:
At the top of the page, you will see two tabs: “Mobile” and “Desktop.”
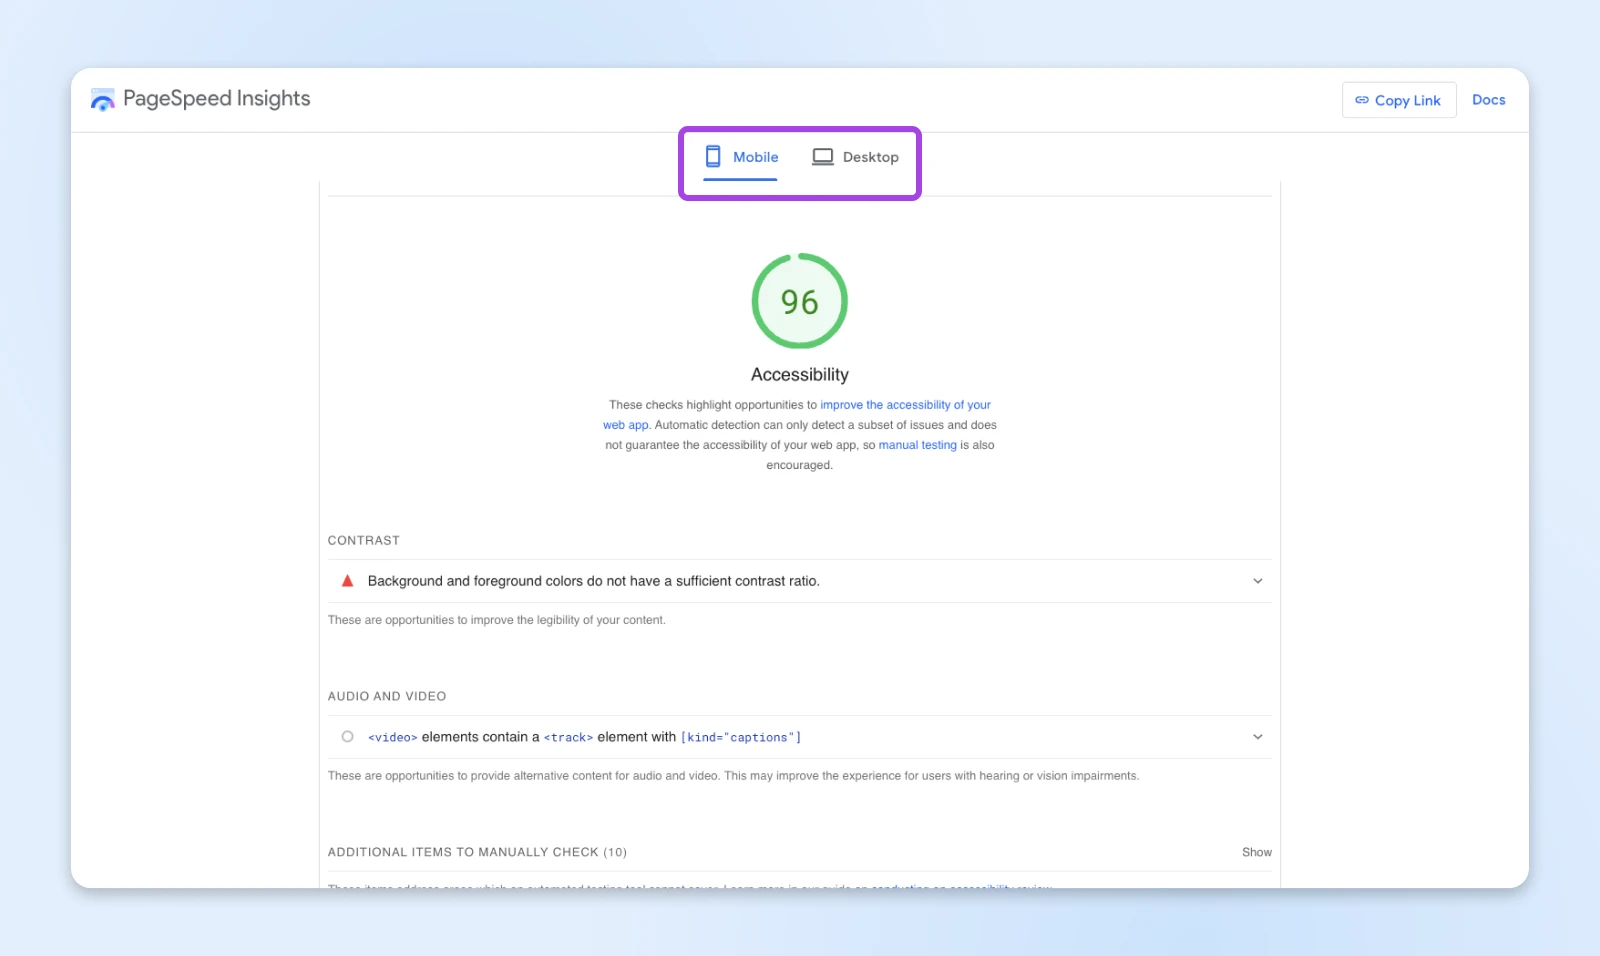
Why is mobile the default? Because Google indexes the mobile version of your website first, followed by the desktop version. It makes sense, given that the majority of web traffic is now generated by mobile devices.
As you scroll down, there are two key sections to look at:
Performance Analysis
Lighthouse provides a pretty detailed analysis of your site performance, and how it might impact your SEO efforts.
Everything in green is good. Orange is usable. Red is a major problem.
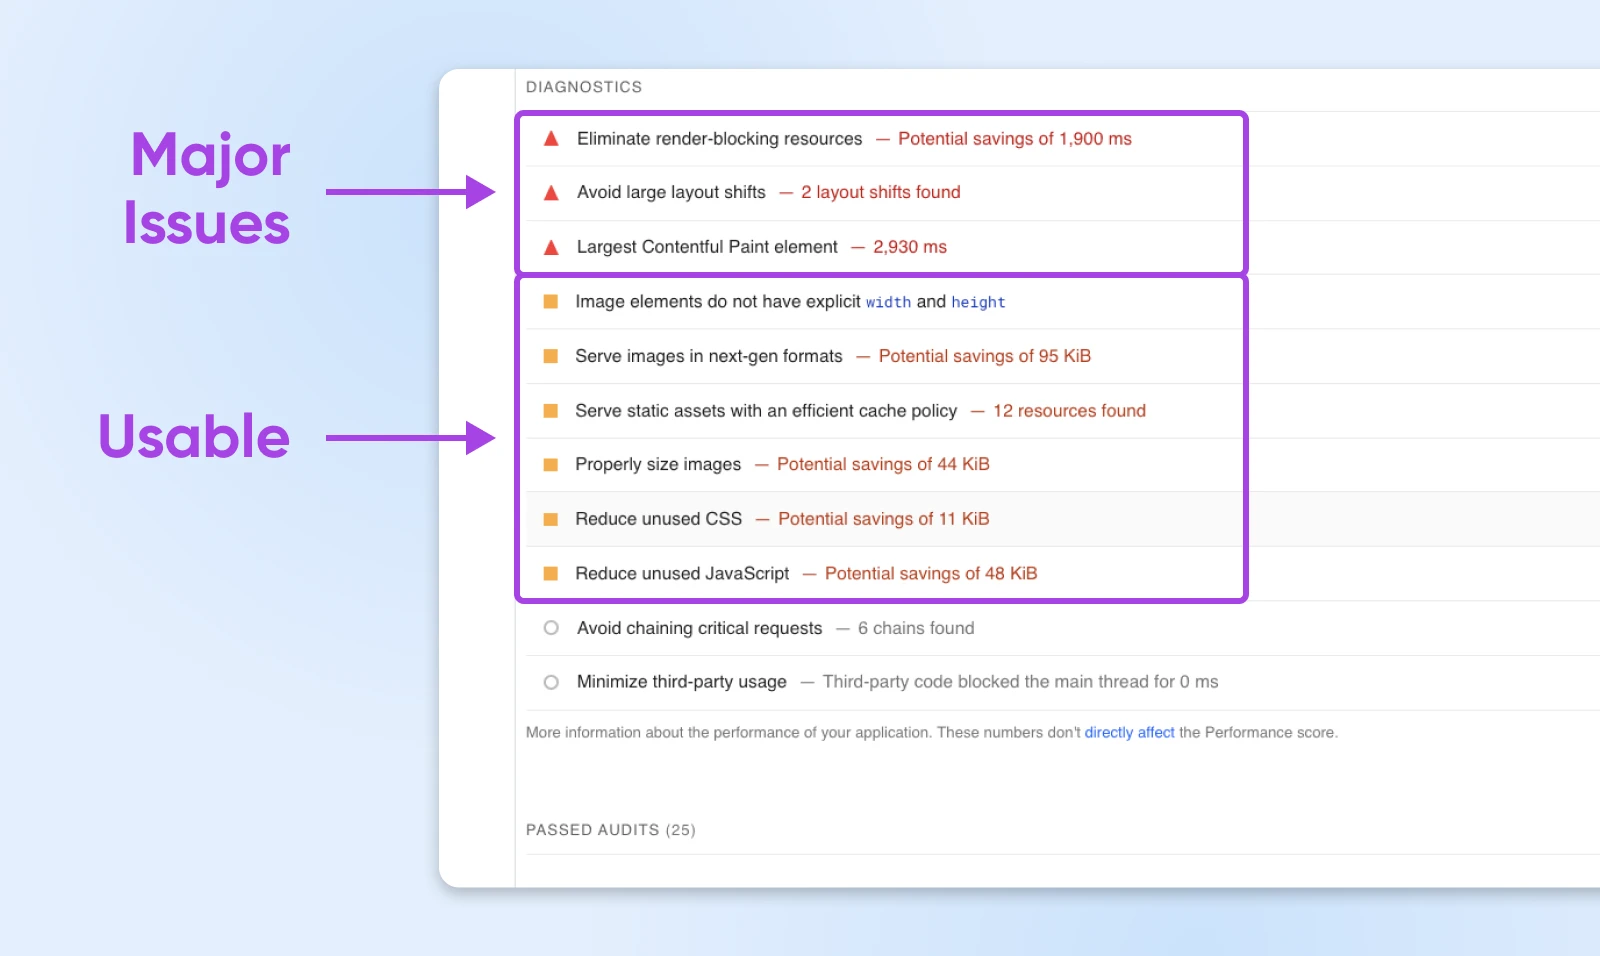
The “Diagnostics” section gives you really good feedback on individual performance issues, and how you can fix them. Just click on any item on the list for more detail.
Below this, you should see the label “Passed Audits.” Tap that to expand a list of tests that your site has aced. Instant ego boost, right there.
Accessibility Analysis
Your scorecard for accessibility provides feedback on the most important stuff, like legibility and alt text.
Unfortunately, Lighthouse can’t automatically test every aspect of a website — so the app provides a checklist of things you can test manually. Access this list by clicking Additional Items to Manually Check.
Step 6: Hunt Down Duplicate Content
There’s no official penalty for having multiple pages on your website with identical content.
But Google doesn’t like showing multiple versions of the same thing. It’s confusing for users, and makes it harder for Google to figure out which pages to rank. You could even end up competing with yourself in the search results!
To check your site for duplicates, visit Google Search. Type info: followed by your site’s domain (e.g. info: example.com) and hit Enter.
Go to the very last page of the search results. If Google suspects you have duplicate content, you might see a message like this:
“In order to show you the most relevant results, we have omitted some entries very similar to the X already displayed.”
This doesn’t guarantee you have a serious duplication problem, but it’s a sign that you should investigate further.
Using Screaming Frog To Find Duplicate Content
If that quick check raises a red flag, it’s time to bring out the big guns! Fire up Screaming Frog and take another look at your crawl results.
Sort the table by “Page Title.” This will group together pages with the same or similar titles, which are often a sign of duplicate content.
When you identify one of these groups, examine the content of the individual pages to see if they’re truly duplicates.
Action Checklist: Deal With the Duplicates
If you find duplicate content, don’t panic! There are a few ways to fix it:
- 301 redirects: If one page is clearly the “main” version, redirect the duplicate page to the main page.
- Canonical tags: Use canonical tags to tell Google which version of the page you want it to index.
- Noindex tag: If a page really doesn’t need to be indexed (like a printer-friendly version of an article), use the “noindex” tag to tell Google to ignore it.
Step 7: Review Your Structured Data
Phew, that’s a lot of auditing already. Don’t fret; you’re on the home straight!
The last piece of our SEO puzzle is structured data, also known as schema markup. This information helps Google to interpret your content and deliver useful extras in the results page.
Say you run a foodie website and you want your recipes to appear in Featured Snippets. Google is much more likely to pick your content if you serve up key information like prep time, ingredients, and user ratings in a tasty format.
There are loads of great, free tools for generating schema markup, like Google’s Structured Data Markup Helper. For WordPress sites, AIOSEO makes the process really easy.
To validate your structured data, we would recommend using Google’s Rich Results Test. Simply type in your website’s domain, and check out the results.
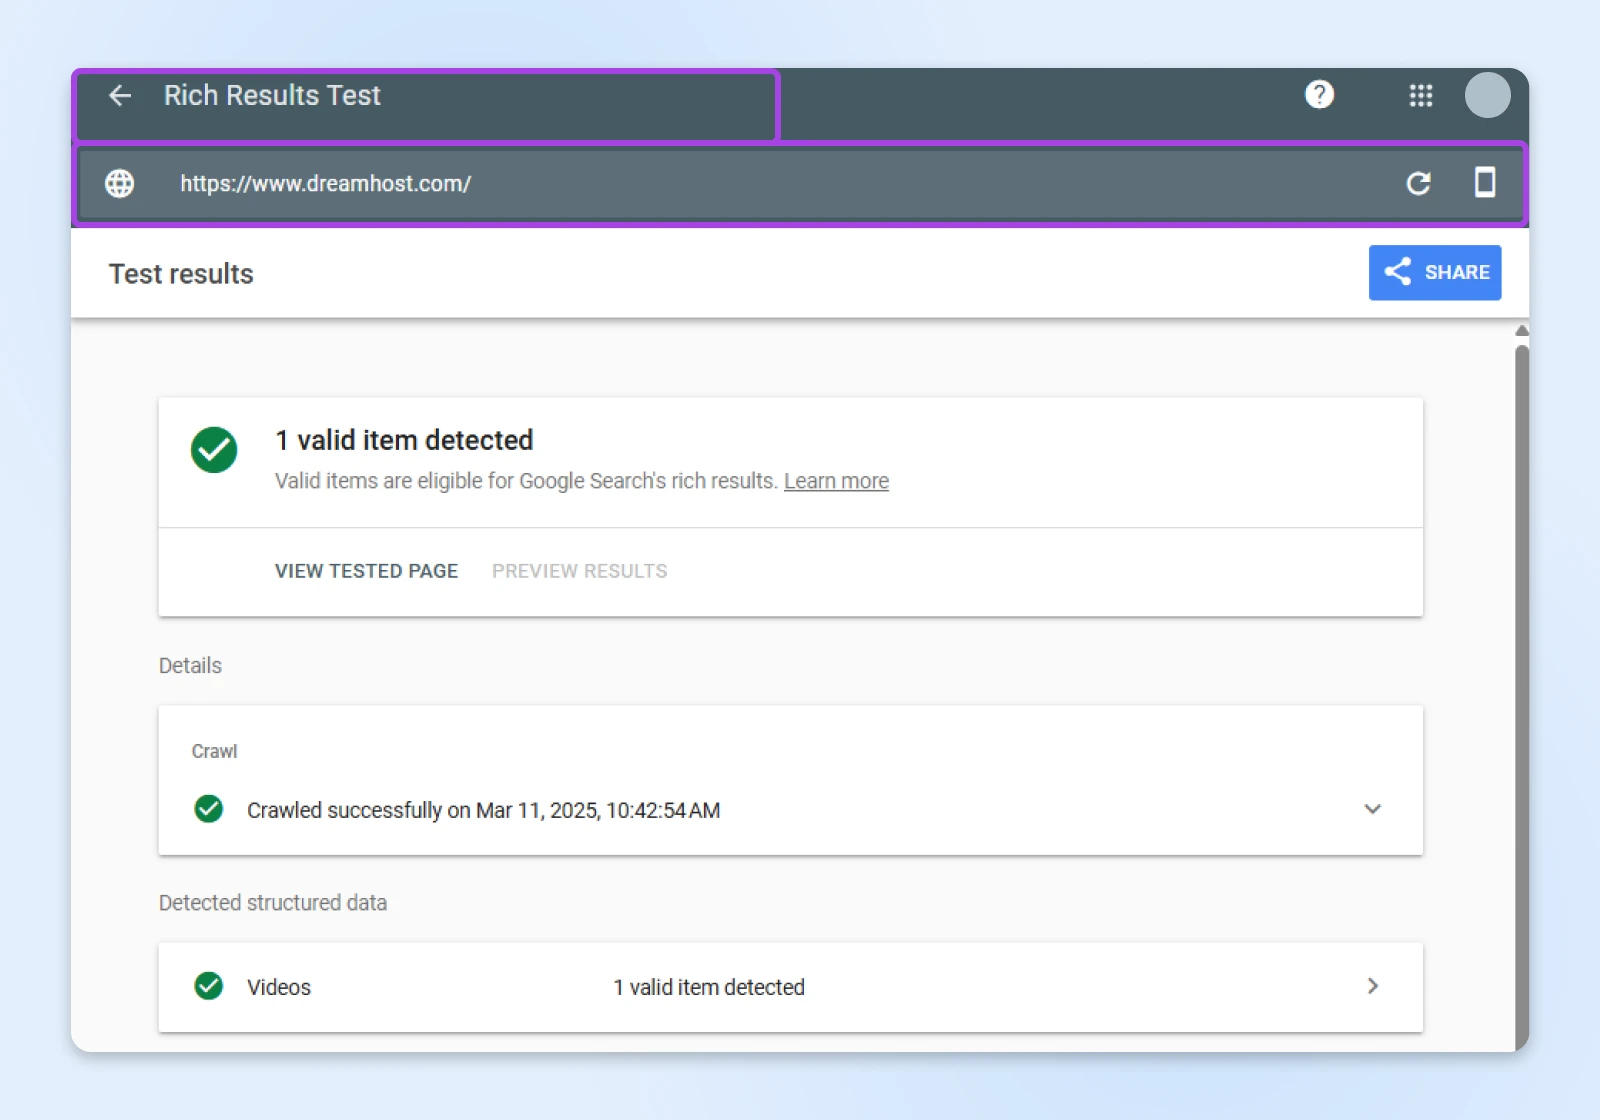
As with several other Google tools, you should see a status for each data type. You can also click each item to get more information on how to address the errors.
The TL;DR Technical SEO Audit
That was a lot of scrolling. If you’re looking for a shortcut, we’re happy to help!
Here are the absolute basics you need to perform an SEO audit.
If you get stuck, just scroll up to get more information!
Technical SEO Audit? That’s a Smart Business Move
This might all seem like nerding out for no reason, but keep in mind that the SEO performance of your site can have a real impact on your bottom line.
If you’re looking for more ways to improve your small business website, consider moving to DreamHost hosting.
Our plans come with unlimited bandwidth, 100% uptime, and a whole stack of useful features. Sign up today to give it a try!

Pro Services – SEO Marketing
Search Engine Optimization Made Easy
We take the guesswork (and actual work) out of growing your website traffic with SEO.
Learn More
This page contains affiliate links. This means we may earn a commission if you purchase services through our link without any extra cost to you.
Did you enjoy this article?

