How to See Search Analytics in WordPress (2 Easy Ways)
Ever wondered what people are searching for on your website or how they’re even finding your content in the first place? 🤔
Digging into search analytics data opens up a world of opportunities! It helps you understand your audience, create content they’ll love, and grow your traffic and sales.
Then, you can adjust your site for a better visitor experience. Whether users are looking for specific products or answers to pressing questions, search analytics can help you out.
In this guide, we’ll show you 2 different methods that we use for viewing search analytics in WordPress and gaining valuable insights.
What Is Search Analytics in WordPress?
Search analytics can help you understand how visitors find and interact with your WordPress website. This data is all about gathering insights that can guide you in creating better content and improving the user experience.
In this guide, we’ll cover the 2 main types of search analytics to focus on: Internal Search Analytics and External Search Analytics.
Internal search analytics show you what people search for while they are already on your website. For example:
- Search Terms: See exactly what users are typing in the search bar. Are they looking for specific products, blog posts, or answers to common questions?
- Search Frequency: Track how often specific search terms are entered to identify the most popular keywords among your audience.
- Search Refined Rate: Track how many times visitors refine their search queries. High refinement might indicate that the search results aren’t meeting their needs.
On the other hand, tracking how people are finding your site through search engines is also important.
With these external search analytics, you can see:
- Top Performing Pages: Identify which pages are getting the most organic traffic. Are your product pages or blog posts getting the attention you expect?
- Organic Search Keywords: See which keywords are bringing visitors to your site from search engines. Are users finding your blog posts, product pages, or landing pages?
- Ranking Position: Track how your keywords are ranking in search engines. Are your target keywords improving in rankings over time?
These insights are crucial because they help you understand what people are searching for outside your site. As a result, you can optimize your content to rank better in the search results.
🚨 Important: If you’re looking for insights into overall website performance, then we recommend using Google Analytics through the MonsterInsights plugin. It shows all your analytics data in WordPress as beginner-friendly reports. Just check out our guide on How to Install Google Analytics in WordPress for more information!
Why Do I Need to Track My Search Analytics?
Tracking your search analytics gives you a clear view of how visitors interact with your WordPress blog or website and how they find you.
The most obvious reason is to improve the user experience. Knowing common search terms on your site allows you to improve navigation and make your content easier to find.
Other reasons to track your search analytics include:
- Understand user intent. By tracking what people are searching for on your site, you can understand their needs and what they’re looking for. This helps you provide the right content or products that match their expectations.
- Optimize Content Strategy: You can identify gaps in your content or find topics to write about. This helps you focus your efforts on what truly resonates with your audience.
- Boost SEO: Understanding which keywords bring visitors from search engines lets you fine-tune your SEO strategy. You can optimize for those keywords and attract even more traffic.
- Increase Engagement: By meeting your visitors’ needs with relevant content and a smooth search experience, they are more likely to stay longer, explore more pages, and return in the future.
Overall, continuously tracking search trends helps you measure the impact of your content updates and WordPress SEO efforts. This way, you can adjust strategies as needed.
How to See Search Analytics in WordPress
Now, combining internal and external search analytics gives you a full picture of what visitors are looking for and how they found your site. With these insights, you can make smarter decisions to serve your audience better.
In the following sections, we’ll share how to see internal and external search analytics in WordPress.
Ready? Let’s jump right in!
Method 1: How to See Internal Search Analytics in WordPress
If you want to gain valuable insights into what your visitors search for while they are on your site, then this method using SearchWP will help you do just that.
SearchWP is the best search plugin for WordPress, and it’s very easy to use.
Plus, we use SearchWP across some of our partner brands, and we’ve seen a big improvement in the search functionality. Our users can now find what they’re looking for faster, leading to a smoother experience and improved engagement.
Want to learn more? Just check out our complete SearchWP review.
Step 1: Install and Activate SearchWP
First things first, let’s install and activate SearchWP. Simply click on the ‘Get SearchWP Now’ button on the website.

Note: SearchWP is a premium plugin. To see your site’s internal search analytics, you’ll need the Metrics extension, which is included with the Pro plan and higher.
Once that’s done, head over to the ‘Downloads’ tab in your SearchWP account.
Afterward, you can click the ‘Download SearchWP’ button to save the plugin file to your computer.
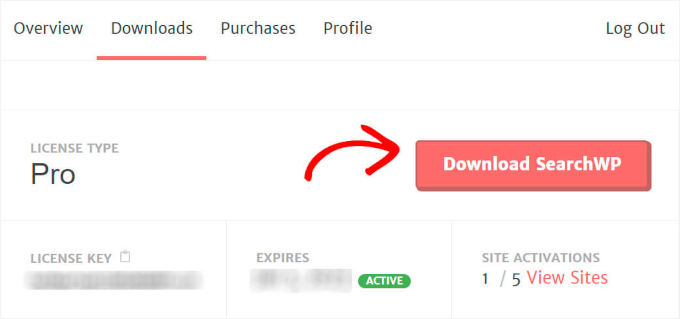
Now that the plugin is downloading, don’t forget to copy your license key. You’ll need it shortly to activate the plugin.
Next, you can hop over to your WordPress admin area and upload the SearchWP plugin zip file.
Not sure how to do that? No worries! Check out this simple step-by-step guide on how to install a WordPress plugin.
Once SearchWP is installed and activated, it’s time to enter your license key.
To do this, you’ll head to SearchWP » Settings and locate the ‘License Key’ field.
Then, simply paste your SearchWP Pro license key into the field and hit the button to activate it.
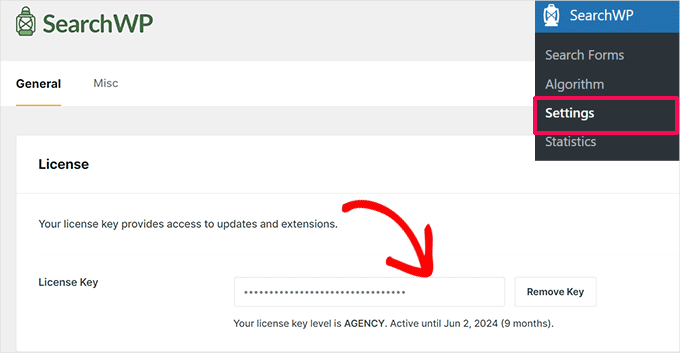
With SearchWP now up and running, you’re all set to move on to the next step.
Step 2: Install and Activate the Metrics Extension
While SearchWP collects search data by default, the Metrics extension takes things to the next level by giving you advanced insights into your visitors’ search behavior.
To get started, you can head to the SearchWP » Extensions from your WordPress admin area. Then click the ‘Install’ button beneath the Metrics extension.
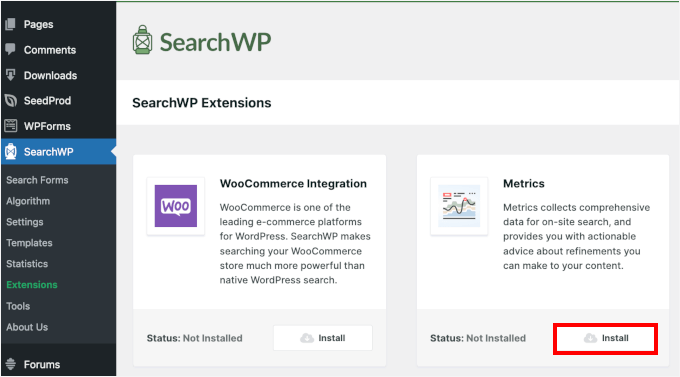
This will start the installation and activation process for the Metrics extension.
Step 3: Check Out Your Site Search Terms Data
Once the Metrics extension is activated, let’s take a look at the search analytics data.
First, you need to head to SearchWP » Metrics.
Here, you’ll see all the search data collected from your site visitors. At first, there won’t be any data since you just installed the plugin. But from now on, every search on your site will appear here.
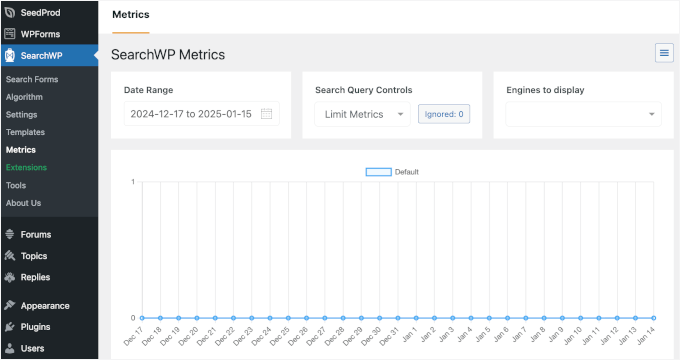
You can try performing a search on your live site to see how it works.
After that, you can head back to the ‘Metrics’ tab and check if your search query appears in real time.
That’s it! You should now see the search term you used displayed like this:
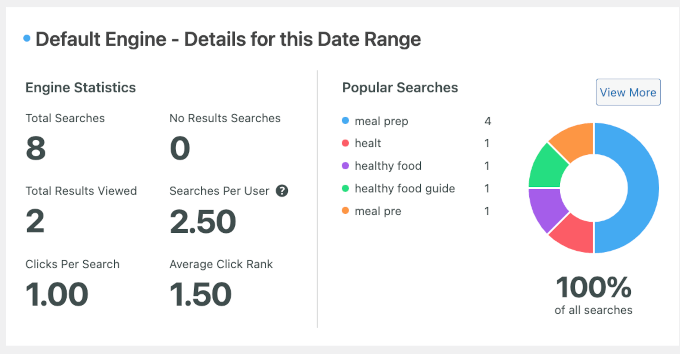
On the right-hand side, you’ll see your site’s popular searches.
Meanwhile, the left-hand panel is where you can see the detailed reports of your site’s search analytics. They include the following metrics:
- Total searches: This shows how many times people have used the search bar on your site.
- Total results viewed: This tells you how many search results people clicked on.
- Clicks per search: This shows the average number of results people click on when they search.
- No results search: This shows how often people searched but didn’t find anything.
- Searches per user: This tells you how many searches each user makes on your site on average.
- Average click rank: This shows how high up the search results people are clicking, helping you understand which results are most popular.
By now, you’re all set to start tracking and analyzing the search activity on your website.
If you notice any issues, then you may like to follow our guide on how to improve WordPress search with SearchWP.
Method 2: How to See External Search Analytics in WordPress
The Search Statistics dashboard in All in One SEO (AIOSEO) gives you a bird’s-eye view of your website’s performance on Google.
From tracking impressions and clicks to analyzing keyword and content performance, it gives you all the insights you need to improve your site’s visibility.
At WPBeginner, we use AIOSEO for various SEO tasks, such as optimizing meta descriptions, title tags, OpenGraph settings for Facebook and X (formerly Twitter), and more. So, we know firsthand why it’s the best SEO plugin on the market. For a deeper dive, don’t miss our complete AIOSEO review!
Step 1: Install and Activate AIOSEO
First, you will need to sign up on the All in One SEO website. Just click on the ‘Get All in One SEO for WordPress’ button on the homepage.

Keep in mind that you will need the Elite plan to access the Search Statistics feature. However, you can also check out the free version of AIOSEO on WordPress.org and see if you like the tool.
Once you’re all signed up, you’ll need to head to your WordPress dashboard to install and activate the All in One SEO (AIOSEO) plugin for WordPress. If you need help, check out our step-by-step guide on how to install WordPress plugins.
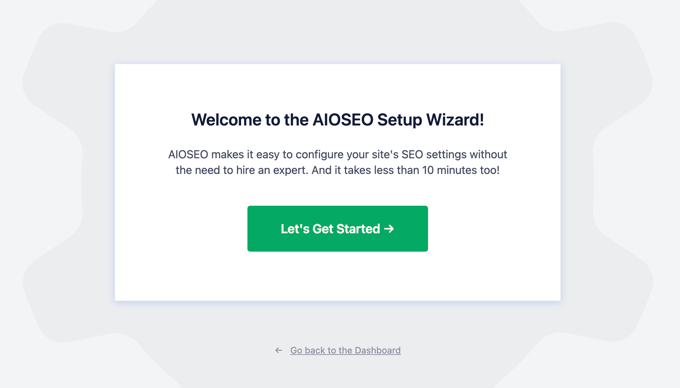
Upon activation, the plugin will run a setup wizard.
To set it up, click the ‘Let’s Get Started’ button and follow the on-screen instructions.
For detailed instructions, you can see our ultimate guide on how to set up All in One SEO for WordPress.
Step 2: Get Started with the SEO Overview
Now that AIOSEO is up and running on your site, you’ll see an All in One SEO menu item in your admin area.
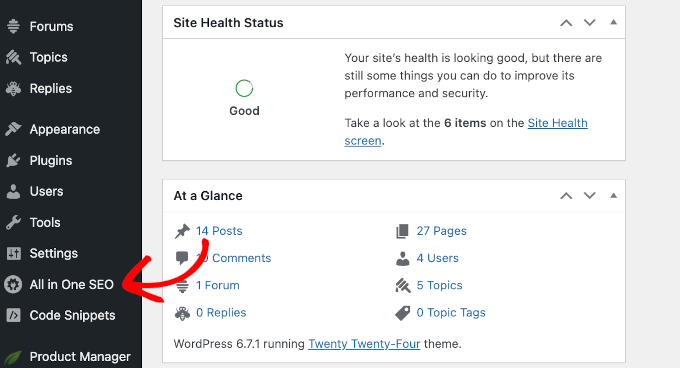
To access the Search Statistics analytics, you can click on the All in One SEO menu item and once again on Search Statistics.
This will take you to the Search Statistics dashboard.
This section provides an overview of your site’s performance in search results, starting with the SEO Statistics and Keyword Positions widgets.
Expert Tip: You can mouse over all AIOSEO graphs to see details over time.
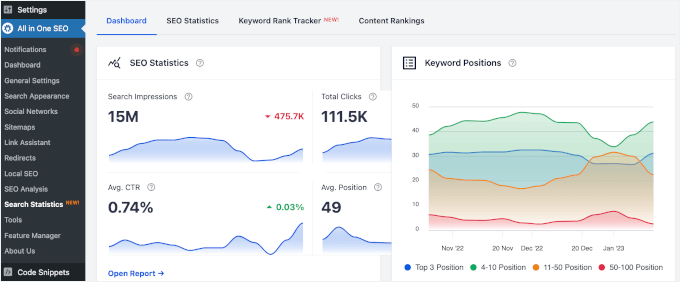
The SEO Statistics widget provides insights into your site’s search performance, showing key metrics like:
On the other hand, the Keyword Positions diagram shows your content rankings across the search engine results pages (SERPs), whether it’s in the top 3, positions 4-10, 11-50, or 50-100.
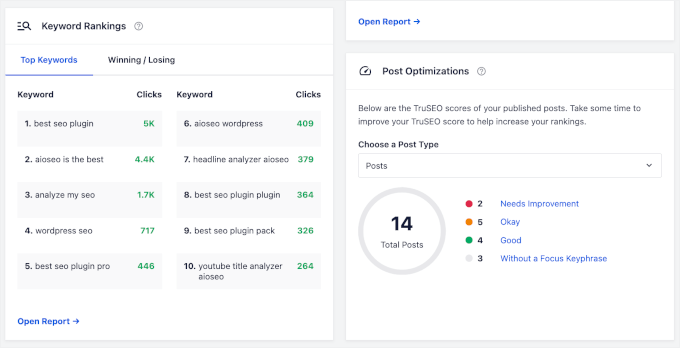
If you scroll down this tab, you’ll find additional overviews in widget format. Each widget provides a quick overview, and you can click on them to access the full reports.
Now that you’re familiar with the dashboard, let’s dive into the analytics in each tab: ‘SEO Statistics,’ ‘Keyword Rank Tracker,’ and ‘Content Rankings.’
Step 3: Explore the SEO Statistics Reports
In the ‘SEO Statistics’ tab, you can explore key metrics like search impressions, total clicks, average CTR, and average search position.
Here’s what each one means:
- Search Impressions: How often does your site appear in the search results?
- Total Clicks: The number of times users clicked on your site from the search results.
- Average CTR (Click-Through Rate): The percentage of impressions that resulted in clicks.
- Average Search Position: The average rank of your site in the search results.
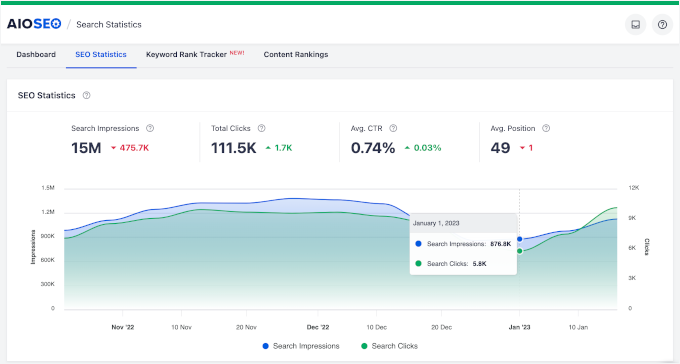
Below the quick count, you can see a diagram comparing search impressions and clicks. Comparing these 2 metrics helps you understand how effective your content is at attracting visitors.
Here’s why:
- Impressions show how often your site shows up in search results, but they don’t guarantee that people will click.
- Clicks indicate how many people actually clicked on your site after seeing it in the search results.
By comparing these 2, you can see how well your titles and meta descriptions are convincing people to visit your site. A low click-through rate (CTR) means you might need to update your content’s appeal or relevance.
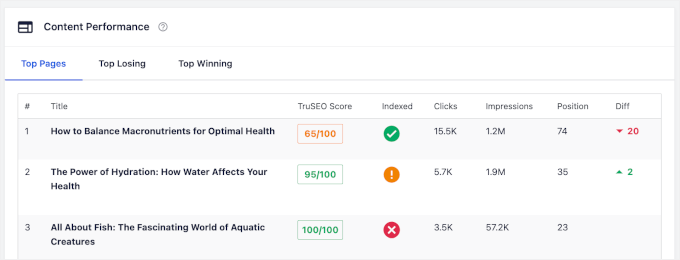
At the bottom of the tab, you’ll find the ‘Content Performance’ section.
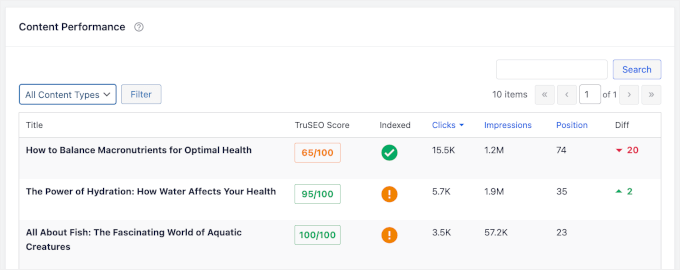
Here, you’ll see a more detailed report on how each of your posts or pages is performing.
There are also dedicated columns that let you know how your content is doing in terms of AIOSEO’s TruSEO scores and if Google has indexed it.
Additionally, the ‘Diff’ column shows whether your content has moved up or down in search rankings. This data helps you spot changes and make improvements.
Step 4: Dive Into Keyword Insights
Tracking keyword performance lets you monitor their rankings, identify trends, and optimize for better results for your content.
To dive deeper into how your keywords are performing, you can start with the Search Statistics dashboard.
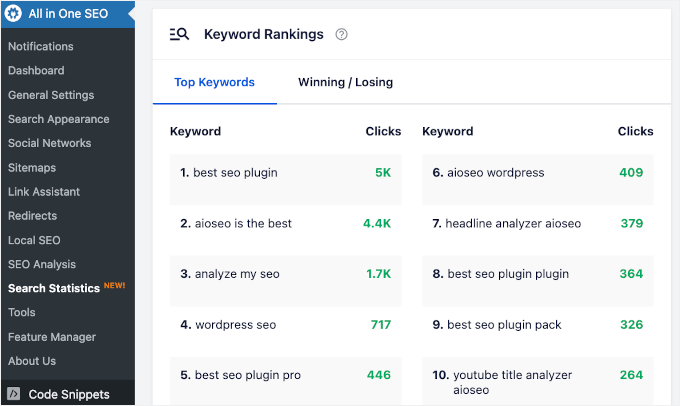
Besides the ‘Keyword Positions’ widget, which shows your keyword ranking distribution, there’s another widget you’ll find helpful: the ‘Keyword Rankings’ widget.
This widget gives you two quick insights: Top Keywords and Winning / Losing keywords.
The ‘Top Keywords’ tab gives you valuable information about which keywords are driving the most clicks to your website.
Then, there’s the ‘Winning / Losing’ tab.
Winning keywords are those that are performing well – these are your golden opportunities for further content optimization.
Losing keywords, on the other hand, might need a little more attention, whether that means optimizing them further or considering replacements.
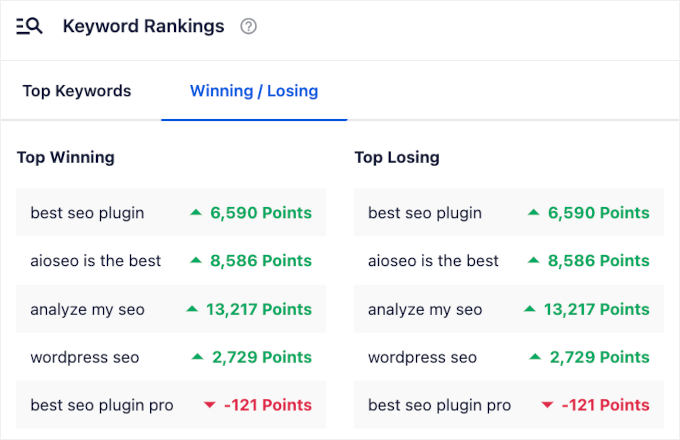
This gives you a quick view of where to focus your efforts!
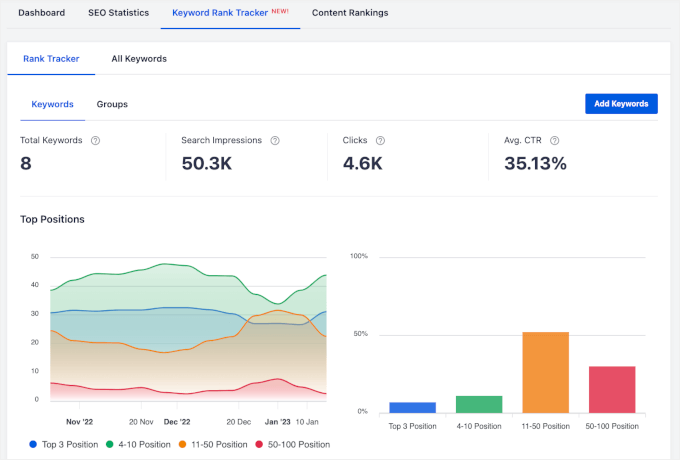
Now, you can switch to the ‘Keyword Rank Tracker’ tab, where you can find more tabs.
Let’s start by heading over to Rank Tracker » Keywords.
From here, you can see the total number of keywords that are tracked on your site. You can also find the total number of search impressions, clicks, and average CTR.
Below that, you’ll find 2 graphs showing the keyword ranking distributions.
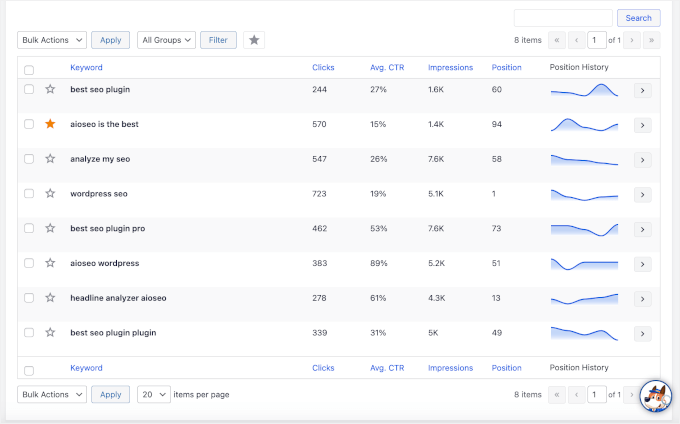
At the bottom of the ‘Keywords’ tab, you’ll find a table.
It shows you all the keywords tracked on your site and their performance in terms of clicks, CTR, impressions, positions in the SERPs, and position history.
Then, let’s check out what the ‘Groups’ tab has to offer.
In addition to keywords, impressions, clicks, and CTR, you can view the total number of keyword groups tracked on your site.
In the 2 graphs below, you’ll find the estimated traffic and top position for all your keyword groups.
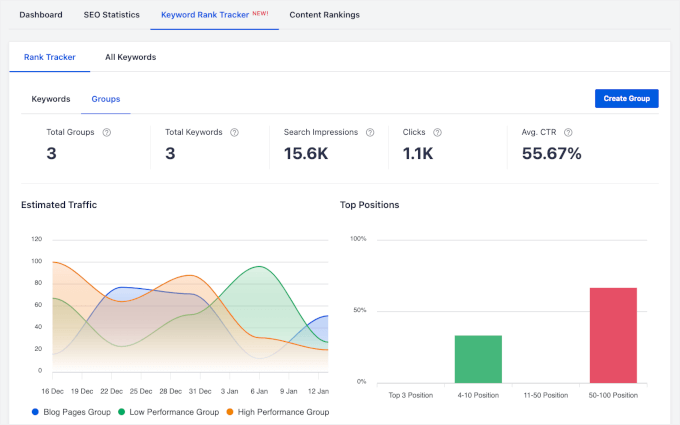
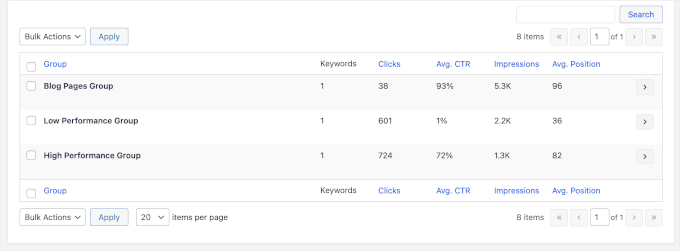
For more details, you can see the information in the table at the bottom of the tab.
For example, we have 3 keyword groups: ‘Blog Pages Group,’ ‘Low Performance Group,’ and ‘High Performance Group.’
Then, you have the data on their clicks, CTR, impressions, and average positions.
Now, you’ll want to move to the ‘All Keywords’ tab.
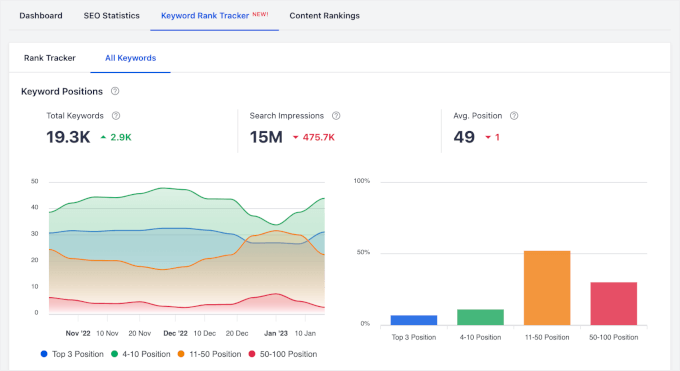
In this tab, you’ll find 2 sections: ‘Keyword Positions’ and ‘Keyword Performance.’
The ‘Keyword Positions’ section tells you the total number of keywords that your site ranks for in the search results. You can also see the search impressions and average positions.
Plus, you’ll notice small details like green up arrows and red down arrows, showing whether numbers are increasing or decreasing over time.
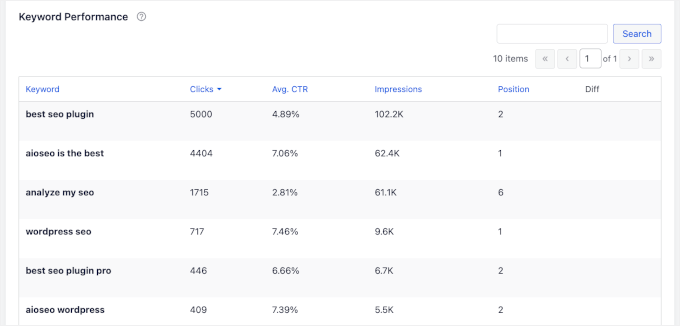
To view a detailed breakdown, scroll down to the ‘Keyword Performance’ section.
Here, you can track each keyword’s clicks, average CTR, impressions, and positions.
Step 5: Take a Closer Look Into Content Performance
In the Search Statistics dashboard, you’ll find the ‘Content Rankings’ section at the very bottom of the page.
This area lets you see your ‘Top Pages,’ ‘Top Winning,’ and ‘Top Losing’ content. Key metrics you’ll see include:
- Clicks: The number of times your content was clicked from the search results.
- Impressions: How many times has your content appeared in the search results?
- Position: The content ranking in the SERPs.
- Ranking Differences: Changes in your content’s ranking over time.
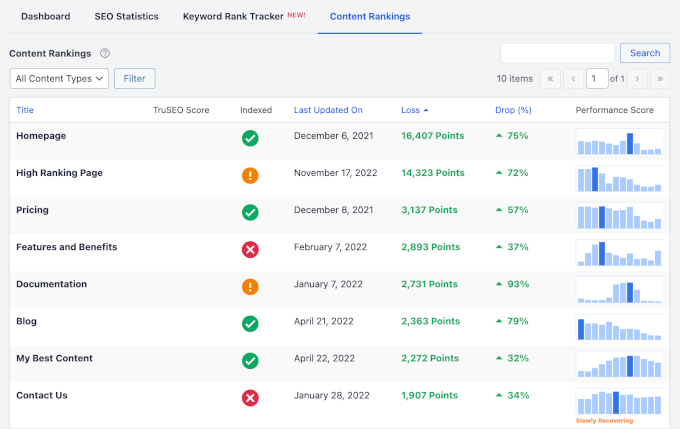
In the ‘Content Rankings’ tab, you’ll also find several important data points:
- TruSEO Score: This is a score reflecting how well your content is optimized for SEO.
- Indexed: This shows whether Google has indexed the page or not.
- Last Updated On: The most recent date when the content was updated.
- Loss Drop (%): The percentage decrease in rankings or performance.
- Performance Score: This score indicates the overall performance of your content based on its ranking and engagement.
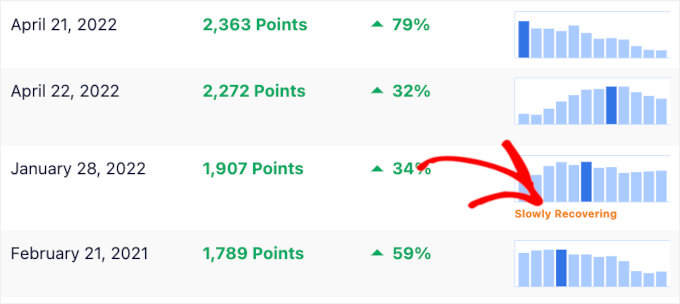
Sometimes, you may notice a little snippet in the ‘Performance Score’ column, such as ‘Slowly Recovering.’
This indicates that while the page isn’t yet back to its previous performance, it is gradually improving in rankings, and you might see positive results soon.
Step 6: Take Action on Post Optimizations
Finally, there’s the ‘Post Optimization’ widget in the ‘Dashboard’ tab.
This section offers insights and suggestions to improve your posts’ TrueSEO scores.
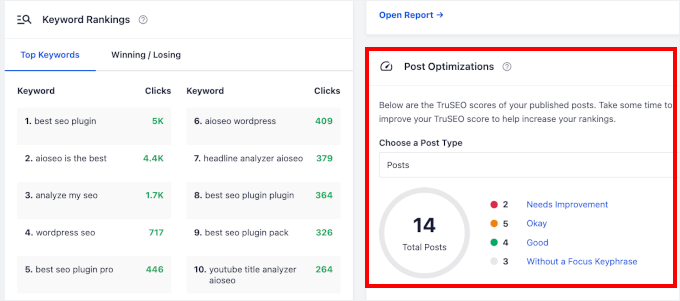
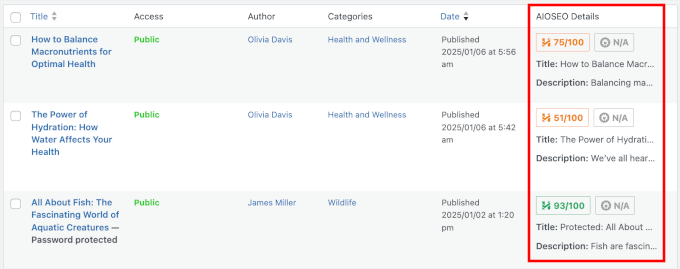
Here, you’ll find 4 post categories: Needs Improvement, Okay, Good, and Without a Focus Keyphrase.
If you click on any of these categories, you’ll be taken to the ‘Posts’ section, where the blog posts are filtered according to the selected category.
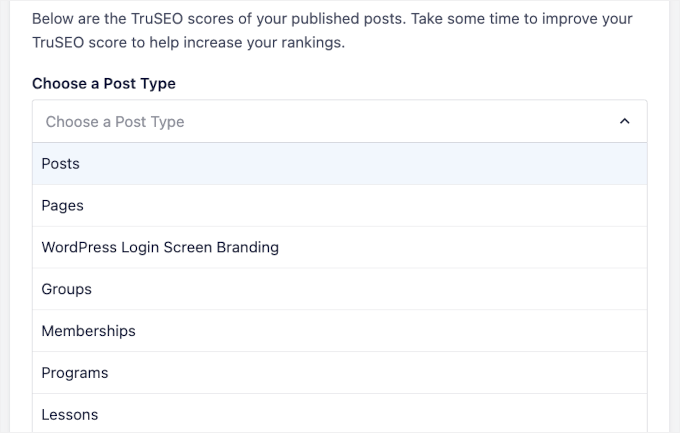
If you want to see how your other content types perform, then you can use the dropdown menu to select a content type.
AIOSEO works with various content types, including pages, memberships, courses, and more!
Once you’ve looked at all this data, you may be wondering how to improve your content and rankings. The articles below can help you out:
ℹ️ Struggling with WordPress SEO? Let our experts set up a solid SEO foundation for your site. From technical audits to keyword research and local SEO, our team can handle everything to boost your rankings and traffic.
Get started with our WordPress SEO services today and watch your traffic grow!
We hope this article has helped you learn how to see search analytics in WordPress. Next up, you might want to check out our guide on adding scroll depth tracking or our expert list of website marketing data every site owner must track.
If you liked this article, then please subscribe to our YouTube Channel for WordPress video tutorials. You can also find us on Twitter and Facebook.


