How to Disable Comments in WordPress (7 Easy Ways)


The comments section of certain websites can often turn into a repository of unhelpful spammy links, or comments that don’t really add to the conversation. Turning off comments can improve the quality of your site while saving you the work of having to moderate endless spam.
Or certain posts on your website might not need a comments section at all.
#1 – How To Turn Off Comments For Your Whole Site
You’ll first need to log in to your WordPress dashboard with your username and password.

Once you’re logged into your WordPress dashboard, you’ll want to navigate to Settings, then click on Discussion.
Under the Default post settings, uncheck the third option titled Allow people to submit comments on new posts.
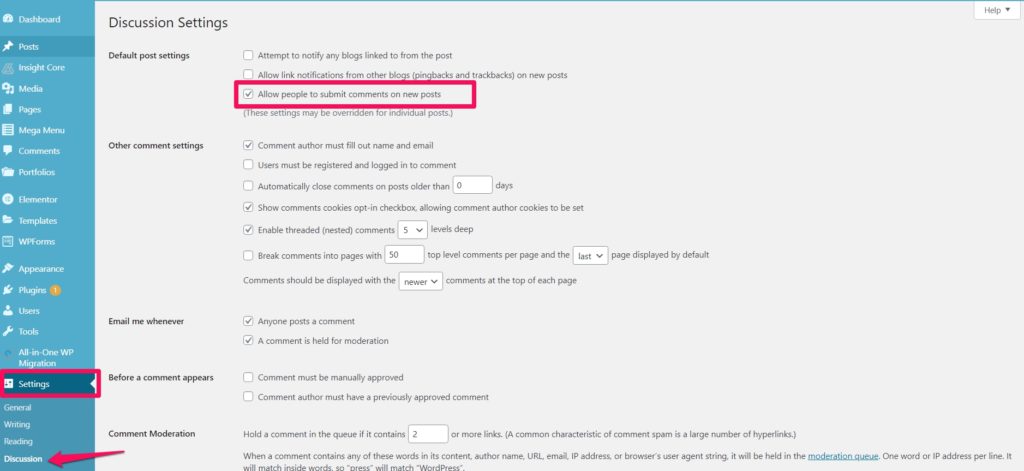
That will now close comments for any new posts you publish.
However, to disable the comments site-wide, you’ll want to find the option under the Other comment settings title Automatically close comments on posts older than “blank” days.
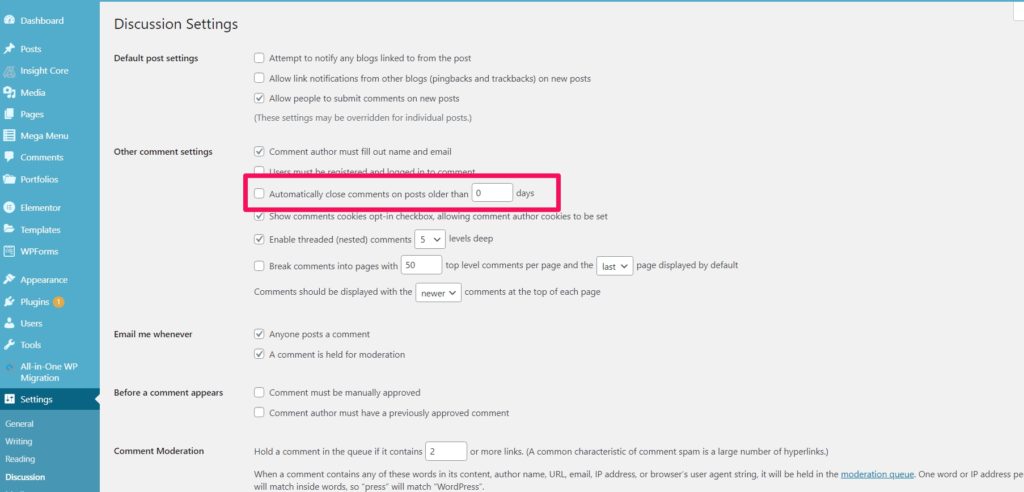
Click the checkbox and fill in “0” for the number of days. Once you make these changes and click Save at the bottom of your screen, your entire website should have comments disabled on both future posts and your existing content.
But wait, what if you only want to close the comments section for specific pages and posts?
#2 – How To Turn Off Comments on Specific Pages and Posts
First, navigate to the posts section on your WordPress dashboard and locate your specific post. Once there, on the right sidebar, locate and click Discussions.
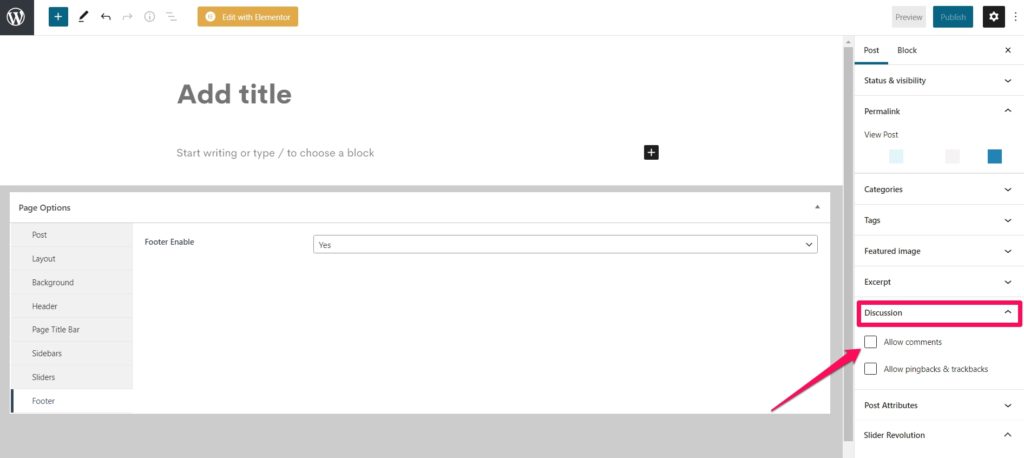
Then unclick the Allow Comments option. Voila! You have disabled comments for that specific post. You can do the same with pages.
Now, what if you want to either turn off or turn on comments for a large group of specific posts and pages?
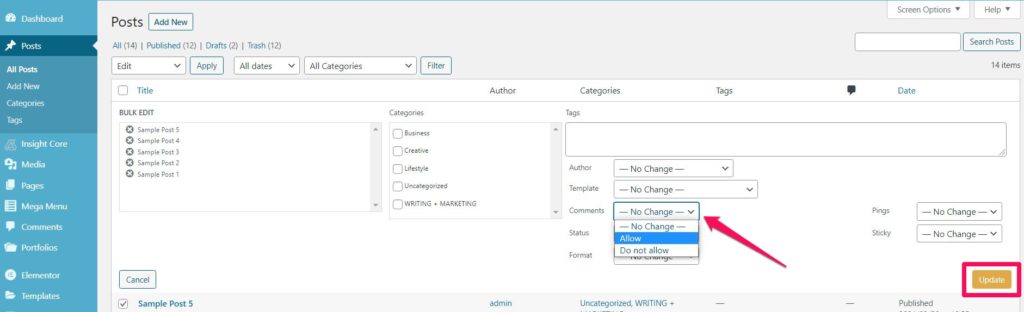
#3 – How To Bulk Edit and Turn Off Comments On Specific Posts and Pages
To bulk edit whether or not you want to enable comments on a specific post or page, head back to your WordPress dashboard and click on posts.
Then look for and choose the specific posts you want to bulk edit. Once you click each checkbox, click Bulk Actions> Edit > Apply.
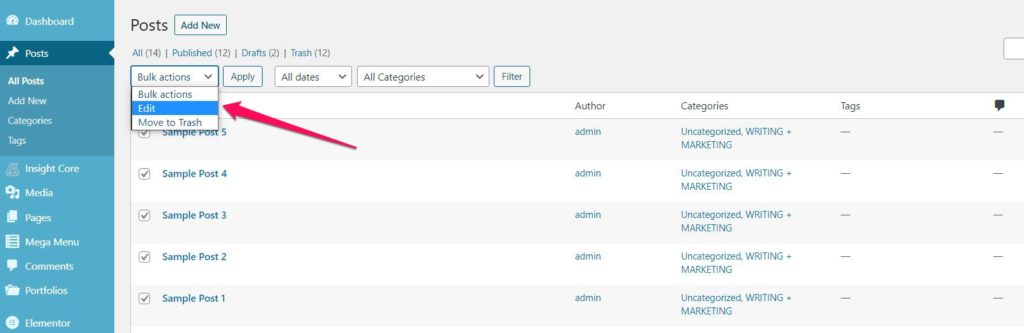
You’ll then be able to bulk edit your comment preferences for all posts at once. Navigate to Comments and then choose your comments preference. Don’t forget to click Update. You can do the same with pages under the Pages section.
#4 – How To Delete All Your Old WordPress Comments
This all sounds great so far. Now, what if you wanted to delete all your old WordPress comments made before you configured your comments section?
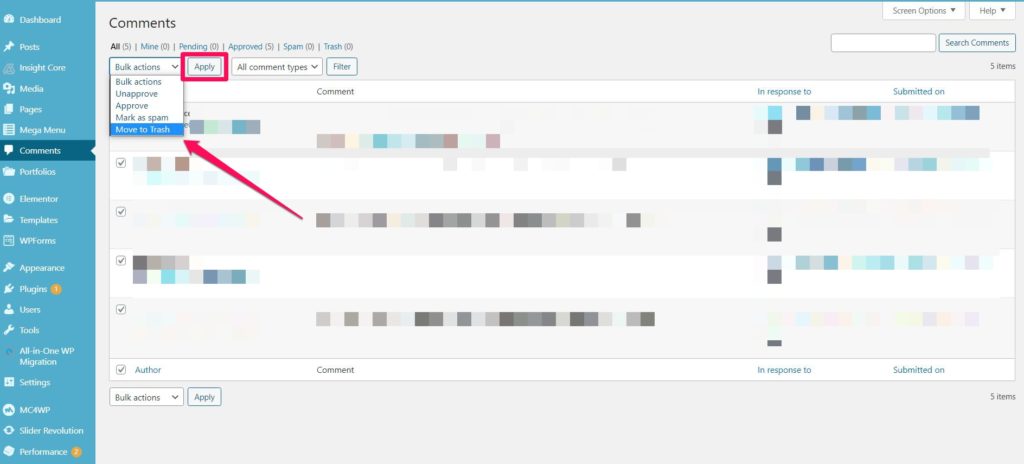
You’ll want to go back to your WordPress dashboard, locate and click on Comments, find the comments you want to delete, and click on their corresponding checkbox.
Under Bulk Actions, click Move To Trash, then click Apply. Your comments have now been deleted.
#5 – How To Turn Off Comments if You Still Use The Classic WordPress Editor
While lots of WordPress users have transitioned to using its new Gutenberg editor, some of us are still using the old classic editor. In that case, you can still turn off site-wide comments in the Settings section on your WordPress dashboard.
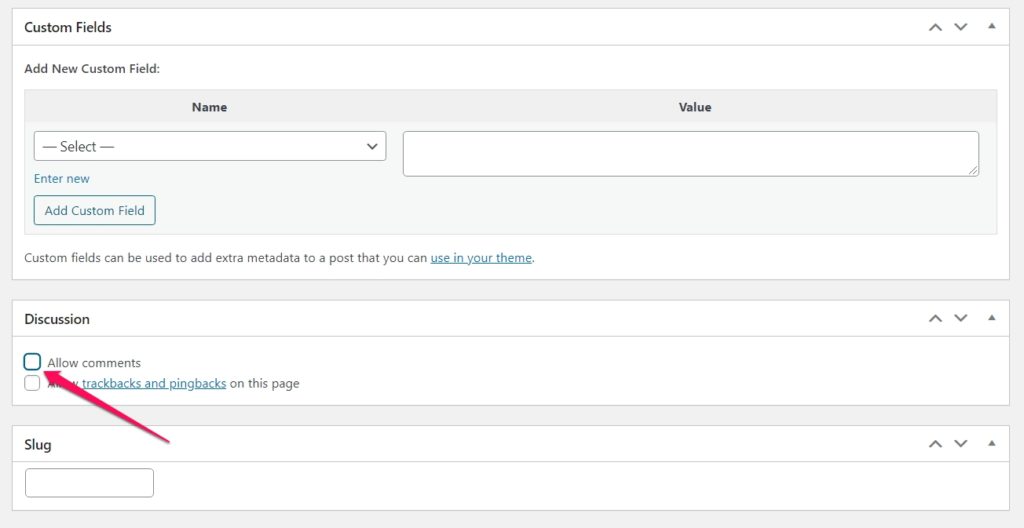
To turn off comments for specific posts and pages if you’re using the classic editor, simply open the post you want to disable comments for. Then, scroll all the way down to a section labeled Discussion.
Click on the toggle button and uncheck the Allow comments option.
Once done, click the Update button in the top right to save your changes. There you have it. Now, when you open or preview that specific post and scroll to the comments section, you won’t see an option to leave any comments.
If you happen to use a third-party plugin to collect and display comments on your WordPress site, you’ll want to navigate to the Plugin section on your WordPress dashboard and simply deactivate and delete the plugin. After you’ve done that, make sure you’ve followed the instructions above to ensure your built-in WordPress comments are also disabled either site-wide or on certain posts or pages to your liking.
#6 – How To Disable Comments For Media Files
Did you know it’s possible for your WordPress media files to receive comments? Thankfully, you can easily disable these.
First, from your WordPress dashboard, navigate to Media Files and click on the file of your choice.
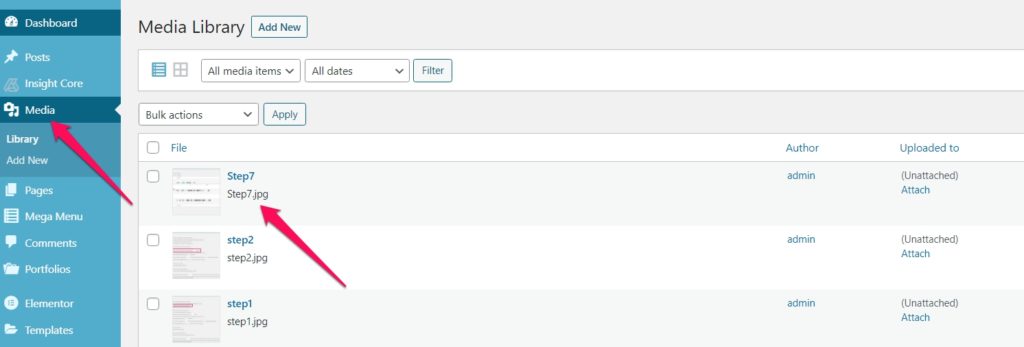
Once you’ve opened your file, navigate to the top right corner and click on Screen Options.
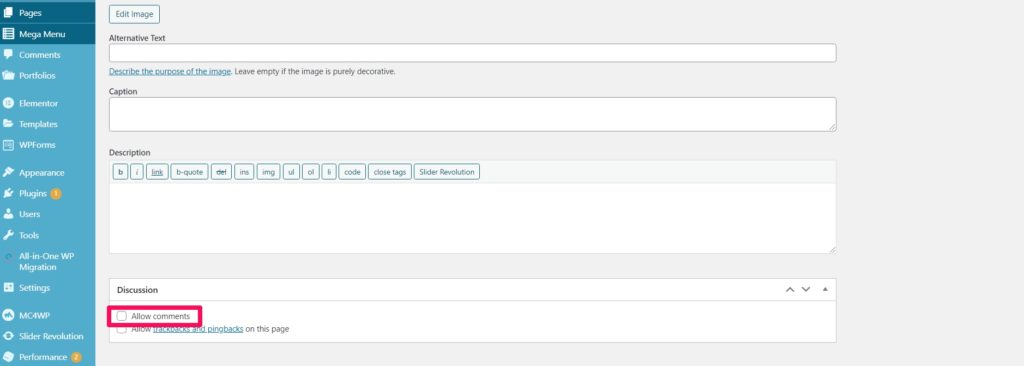
From there, make sure the discussion box is checked off, so you can then see it at the bottom of your image editing screen.
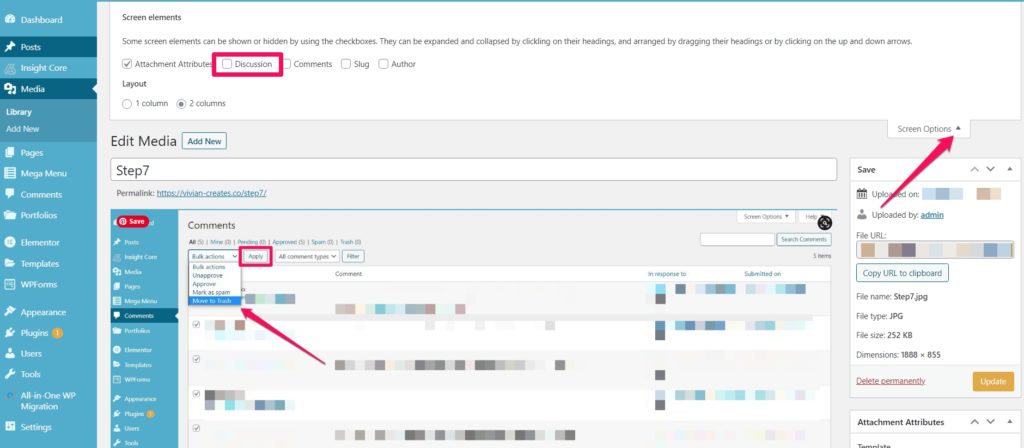
Once you scroll down to the panel labeled Discussion, you can check whether you want comments on or off. Don’t forget to click Update to save your changes.
Keep in mind that if you want to disable all your media file comments, you’ll have to go through each file individually. Unfortunately, WordPress doesn’t let you bulk edit media files.
#7 – How To Disable Your WordPress Comments With A Plugin
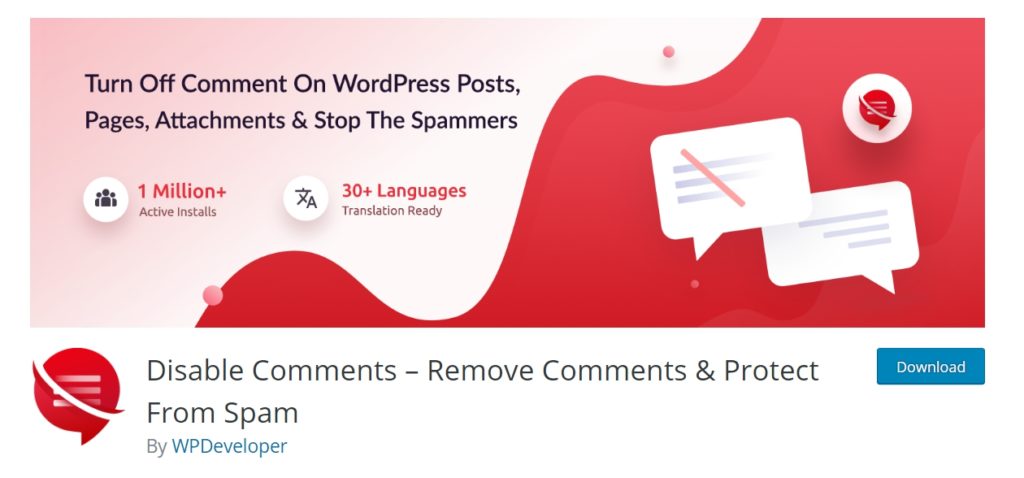
A great way to bulk disable all your WordPress comments at once, including your media files, posts, and pages, is with the Disable Comments – Remove Comments & Protect From Spam plugin by WPDeveloper.
Once you’ve downloaded the plugin, uploaded it to your plugin section, and activated it, you can configure it by clicking on Settings.
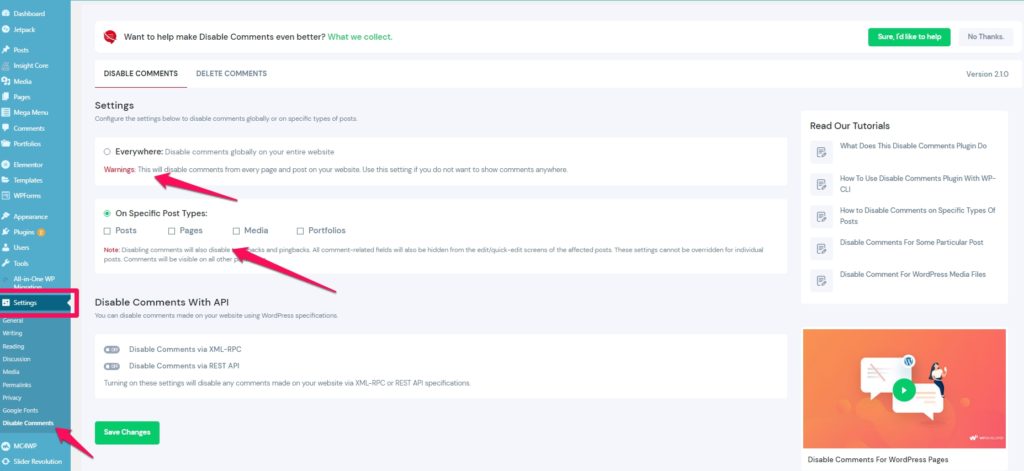
With this plugin, you’re able to either disable comments everywhere by clicking that option, or disable comments by posts, page, media, or portfolio. Once you make your choice, be sure to hit Save to apply your changes.
It doesn’t stop there. You can also bulk delete comments either everywhere on your site, by post type, or by type of comment. Again, hit Delete Comments when you’ve configured your preferences.
The plugin is a great way to configure comment preferences in bulk.
For instance, deleting old comments on WordPress might take having to select a group of posts at a time since only a certain number of posts are listed per page on the dashboard. With the plugin, you can select all posts and delete all comments in one go.
If you’re all for convenience and don’t mind an extra plugin on your WordPress site, this can be a great quick fix.
How To Configure Your WordPress Comments
Besides turning your comments on or off, WordPress allows you to easily configure your comments according to your needs. We’ll go through each section in more detail.

Default Post Settings
Under default post settings, you can configure the ability to send notifications to anyone you’ve linked to from your post. You can also allow link notifications in the form of pingbacks from other blogs to show up in your comments section.
And finally, you can enable or disable blog commenting on new posts (though you can override these settings for individual posts if you need to).
Other Comment Settings
In this section, you can configure how users interact with your comments section, how your comments are displayed, and what is and isn’t required or allowed when leaving comments. You can choose whether you want each commenter to be required to fill out a name and email address, if you want to require commenters to have a registered account before commenting, if you want to allow comment cookies, and whether you want old comments first or newer comments first.
Email Me Whenever
WordPress lets you configure comment notifications in case you want to be notified any time someone leaves a comment.
Before a Comment Appears
WordPress also empowers you to moderate any new comments before they’re published publicly. This can come in handy if you get a lot of spam comments.
Comment Moderation
The comment moderation section lets you elaborate and get more specific with the type of comments coming in and what the criteria should be for holding them for moderation before being published.
For example, spam comments are notorious for including numerous links in one comment. You can adjust the comment queue to hold a comment by defining the number of links it contains, or the type of words it contains. So it can be held in moderation to be revised by you before publishing or discarding.
Disallowed Comment Keys
You can also create a word matching criteria for comments containing a designated word in its URL, IP address, author name, or email to be sent straight to the trash.
Avatars and Default Avatars
And finally, there’s the Avatar section. If you do decide to leave your comments enabled for certain words or pages, you can configure the type of Avatar published for users without a custom Avatar.
Lastly, don’t forget to hit Save Changes for any changes you make.

