How to Build a Wedding Website with WordPress (Step by Step)
When we first began building wedding websites for clients, we spent countless hours figuring out the best approach, testing different themes, and finding the right combination of plugins.
Luckily, creating your own wedding website doesn’t have to be complicated or expensive. With WordPress, you can build a stunning site that handles everything from sharing your love story to managing RSVPs. Best of all, you can do it yourself without any coding knowledge.
In this guide, we’ll walk you through the exact steps we use to create wedding websites that not only look amazing but also make wedding planning easier.
Whether you’re tech-savvy or just getting started with WordPress, we’ll show you how to design a wedding website that your guests will love.
Why Build a Wedding Website with WordPress?
So you’re excited to plan your big day. But with all the details swirling around, it can be difficult to keep everyone up-to-date. This is true for any wedding, but the bigger the guest list, the bigger the headache!
That’s where a wedding website comes in. It’s like a central hub where your guests can find everything they need – from basic facts like the date and location, right down to parking info, schedules, and detailed maps.
Imagine: no frantic phone calls or last-minute messages from confused guests.

Plus, your website can do the heavy lifting: guests can RSVP, pick their meal choices, leave sweet messages in a digital guestbook, and more. Even after the big day, a wedding website is the perfect place to share all those gorgeous photos with your guests.
At this point, you may be wondering: if a wedding website saves all that time and stress, why doesn’t everyone have one?
The truth is that many guides make things way too complicated. They use confusing jargon and focus on expensive tools, leaving couples so overwhelmed that it feels safer to stick to the old-fashioned (and stressful) way of doing things.
But guess what? It doesn’t have to be that way! We’re all about making wedding websites easy-peasy for every couple. In this guide, we’ll show you how to create a website that is:
- Easy to Learn: No tech skills? No problem! We’ll break everything down into simple, actionable steps. Just go from Step 1 to Step 2, 3, 4…and you’ll have a beautifully designed wedding website in no time.
- A Breeze to Set Up: We’ll focus on tools that are quick to install and manage so you can get your site up and running FAST and get back to planning the fun stuff.
- Budget-Friendly: Weddings are expensive, we get it! That’s why we’ll share tips and tricks (including exclusive discounts) to keep your costs down.
- Essentially Self-Maintaining: We’ll point you to user-friendly platforms that practically run themselves. Because who wants to spend hours tinkering with tech when you have a wedding to plan?
That said, let’s see how you can create a wedding website:
We know wedding planning can be a LOT, and adding another task to your list might seem overwhelming. So, if you’re feeling the pressure, why not let our expert team design your dream website for you?
We’ll take care of everything from design to development so you can focus on what really matters: planning a special day with all your loved ones.
Step 1: Choose Your Wedding Website Builder
First things first, you need to pick the right tool for the job. We know you’re drowning in wedding decisions, so let’s make this one easy: we recommend WordPress.
There are lots of different website builders, but WordPress stands out for people seeking a user-friendly, reliable, and budget-friendly solution.
Let’s talk about your budget. Weddings can get pricey, so saving those cents wherever you can is a must. The awesome thing about WordPress is that it’s open-source and totally free to use. That means more cash for your dream honeymoon!
Now, ‘free’ doesn’t mean ‘basic.’ WordPress is a powerhouse, it just has a different approach when it comes to features – an approach that’s perfect for wedding websites.
WordPress lets you install add-ons called plugins, which are pieces of software that add extra functionality to your website. We’re talking over 59,000 free plugins in the WordPress.org library alone! That includes plenty of plugins that were designed specifically for weddings like event calendars, maps, and tools to manage that ever-growing guest list.
Now, let’s get a bit more technical: there are two types of WordPress software, so it’s important to pick the right one.
First up is WordPress.com, which is a blog hosting platform. Then there’s WordPress.org, also known as self-hosted WordPress. We recommend WordPress.org for your wedding website because it gives you total control.
For a deeper dive into why we consistently recommend WordPress, please see our complete WordPress review.
Step 2: Setting Up Your Website Hosting
Before you can create a beautiful wedding website, you’ll need a few things in place.
First up, let’s pick a domain name that’s as unique as your love story. This will be your online address, where guests can find all the details about your special day.
You’ll also need a web hosting plan, which is where your website lives online. We know wedding planning can be stressful, so we recommend choosing a hosting provider that’s got your back with reliable service and top-notch customer support. This means fewer technical problems and more peace of mind.
To make your life easier, we’ve hand-picked some of the best WordPress hosting for your wedding website.
A domain name typically costs $14.99/year, and hosting costs start from $7.99/month. This is a lot, especially since it’s taking funds away from your big day.
Thankfully, Bluehost has agreed to offer WPBeginner readers a huge discount on web hosting, plus a free domain. You can click the button below to get started for as little as $1.99 per month.
Alternatively, you can head over to the Bluehost website in a new tab.
Then, click the green ‘Get Started Now’ button.

This takes you to the pricing page, where you can choose a hosting plan.
We recommend picking the ‘Basic’ or ‘Choice Plus’ plan, as they have everything you need to create a beautiful wedding website.
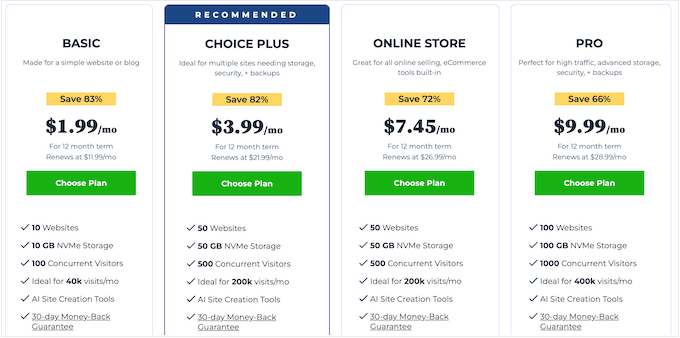
After choosing a plan, go ahead and click ‘Continue.’
Next, it’s time to choose a domain name for your wedding website.
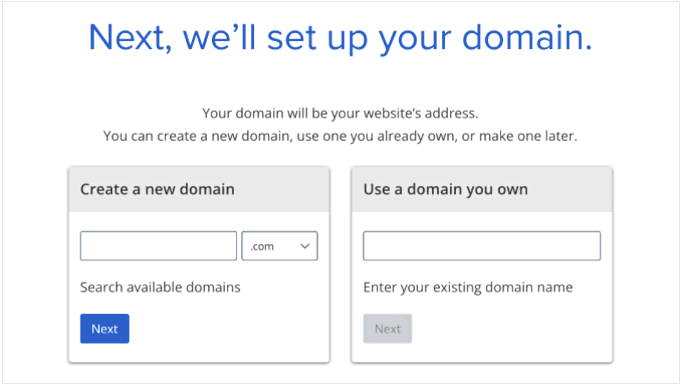
A strong domain name is essential for helping guests find your site without any confusion. Ideally, your domain name should be easy to say, easy to spell, easy to remember, and connected to your wedding. You can even add personal touches like your names or your venue to make it more unique.
Need some inspiration? Then check out our guide on how to choose the best domain name.
After choosing a domain name, go ahead and click the ‘Next’ button.
Bluehost will now ask for your account information, such as your name and email address. You’ll also get a chance to buy some optional extras.
Typically, we don’t recommend buying these extras straight away, since we’re trying to keep costs down. Plus, you can always buy these extras later if your wedding website needs them.
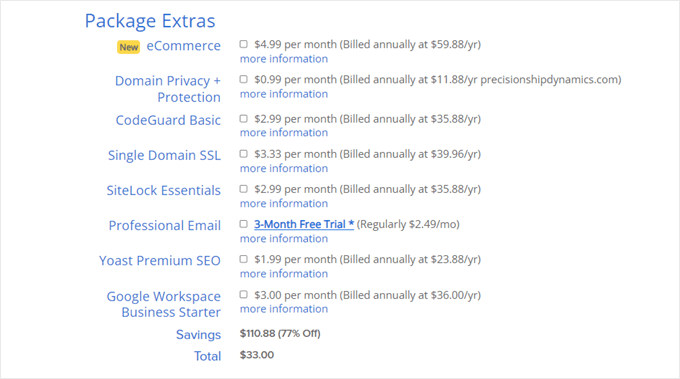
That done, simply type in your payment information to complete the purchase.
After a few moments, you’ll get an email with instructions on how to log in to your web hosting control panel. This is the dashboard where you can manage your site, including setting up email notifications and asking for WordPress support.
Step 3: Install WordPress on Your Web Hosting
When you sign up with Bluehost using our link, Bluehost will install WordPress on your domain name automatically.
Give it a few minutes to load, and then click the ‘Edit site’ button, which will take you to set up your new website.

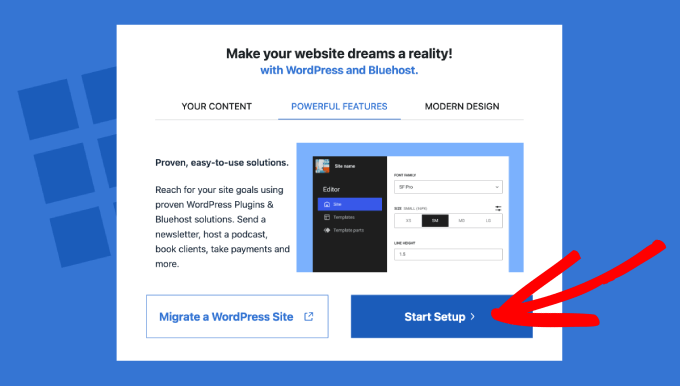
At this point, a window will appear asking if you want to migrate a WordPress site or start a new setup.
Since we’re creating a new wedding website, click the ‘Start Setup’ button.
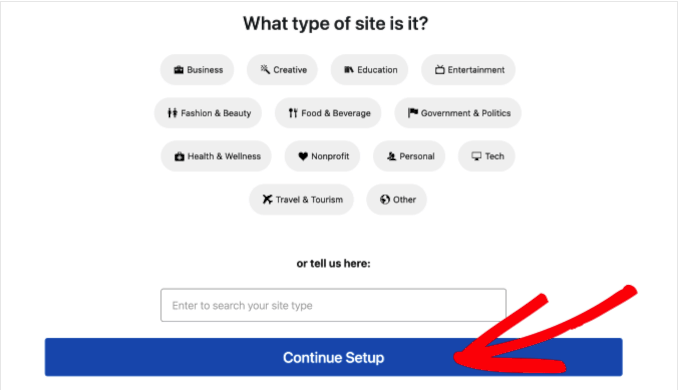
The setup wizard will now ask for some basic information, such as the type of website, blog, or online marketplace you’re building.
Choose the category that best fits your site and then click ‘Continue Setup.’
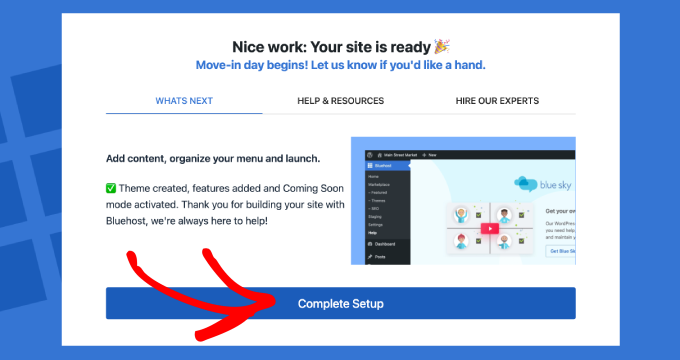
Once you’ve gone through the entire Bluehost WordPress setup wizard, click on ‘Complete Setup.’
Bluehost will now take you to the WordPress admin area.
You can also log in to the WordPress dashboard by heading to yoursite.com/wp-admin/ directly in your web browser.
If you’re using a different WordPress website host, such as SiteGround, Hostinger, HostGator, or WP Engine, then you can see our complete guide on how to install WordPress for all the top hosting providers.
That’s the setup out of the way! You’re now ready to start building your wedding website.
Step 4: Select a WordPress Theme
Your wedding website is the first glimpse that friends and family will get of your big day, so let’s make it count.
By default, each WordPress site comes with a basic theme, but this doesn’t exactly scream “dream wedding.”
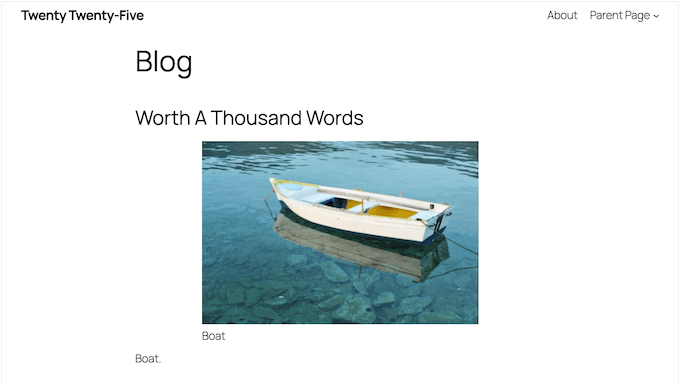
When choosing a theme for your wedding website, the first thing to consider is how it looks. It’s got to capture the vibe of your event, whether that’s classic elegance, modern chic, rustic charm, or bohemian dreams.
You want a theme that screams ‘you’ as a couple.

Next, think about all those gorgeous photos and videos you’ll want to share. Your website is the perfect place to showcase your love story and get everyone excited for the big day. Plus, it’s a great way to set the tone for your wedding.
Are you adventurous spirits planning a fun-filled celebration? Choose photos and visuals that capture that energy!
Dreaming of a rustic, romantic wedding? Share those beautiful nature shots from your latest trip.
Remember, your website needs to look amazing on every device, especially smartphones. You don’t want guests squinting at tiny text or struggling to navigate your wedding site on their smartphones.
To help you out, we’ve rounded up the best themes for wedding websites.
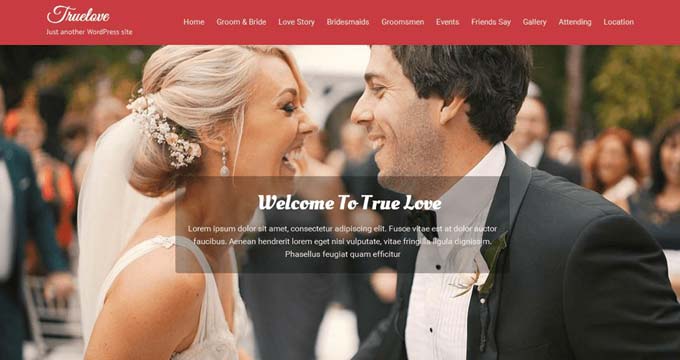
And don’t worry if you’re not tech-savvy – installing a theme is super easy! Just follow our step-by-step guide, and your website will look gorgeous in minutes.
Once you’ve got your theme, you can customize it to your heart’s content.
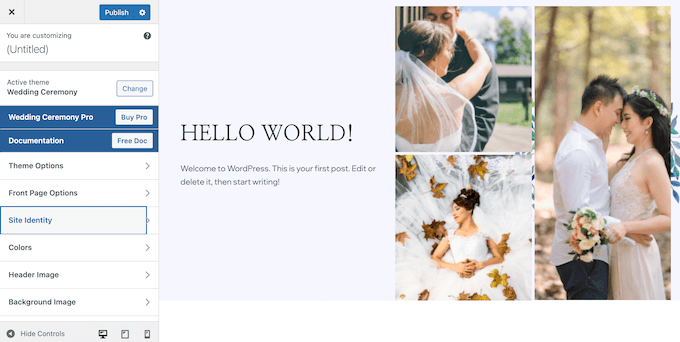
Just head over to Appearance » Customize in the WordPress dashboard. This will launch the theme customizer, where you can fine-tune the theme settings and see your changes in the live preview.
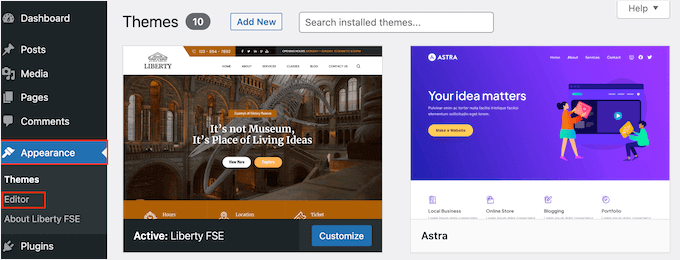
Are you using one of the newer full-site editing themes? Then you’ll need to go to Appearance » Editor instead.
This launches the full site editor, where you can add, remove, and edit the blocks in your WordPress theme. It’s super intuitive.
Another option is using a website and landing page builder plugin like SeedProd.
SeedProd is a drag-and-drop page builder that’s super popular and easy to use. We’ve used it to build many of our partner websites, including the Duplicator, WPForms, and WP Charitable websites – even the SeedProd site was designed using SeedProd!

With SeedProd, you can create stunning landing pages, homepages, and even entire websites.
It also comes with ready-made templates designed specifically for wedding websites.
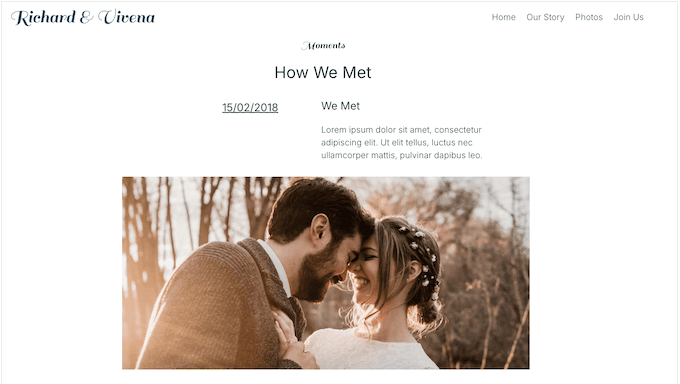
This template is perfect for sharing all the important details about your big day. Just swap out the placeholder text and images with your own content, and you’re good to go.
Alternatively, SeedProd has an AI builder that can create a custom website in just a few seconds. For details on how to use it, just see our guide on how to make a WordPress website using AI.
Step 5: Create a Custom Home Page
WordPress has two two default content types called posts and pages. Website owners typically use posts to create articles and blogs, which isn’t really what you need for your wedding website.
And there’s another problem. Your wedding website is like a digital welcome mat for your guests. However, by default, WordPress displays a list of blog posts on the homepage. This isn’t exactly the warm welcome you want to give your wedding guests!
That’s why we recommend creating a custom home page that includes all the most important details about your big day.
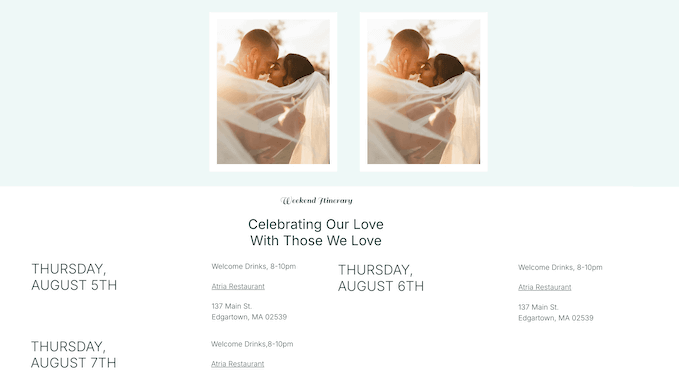
Once you’ve designed your homepage, it’s time to set it as your front page so it’s the first thing visitors will see.
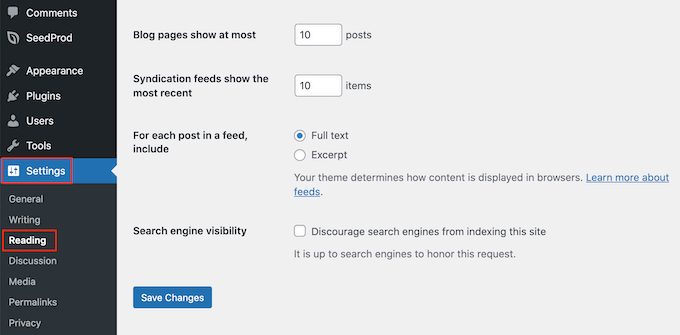
To do this, head over to Settings » Reading.
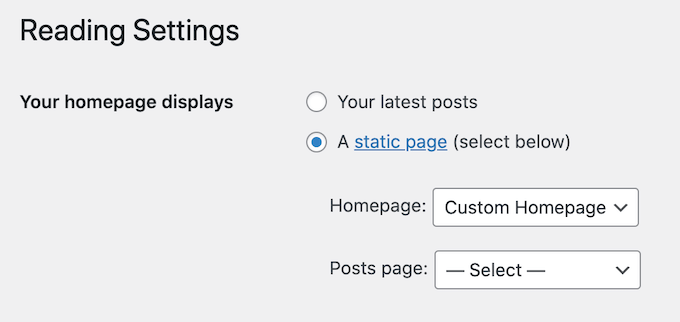
Here, scroll to ‘Your homepage settings’ and select ‘A static page.’
Next, open the ‘Homepage’ dropdown and select the page you created earlier.
Finally, scroll to the bottom of the screen and click on ‘Save Changes.’ Now, when your guests visit your website, they’ll be greeted by your beautiful custom homepage.
Step 6: Add Membership Features
Before we go any further, let’s talk about something that can make your life a whole lot easier: a membership plugin such as MemberPress.
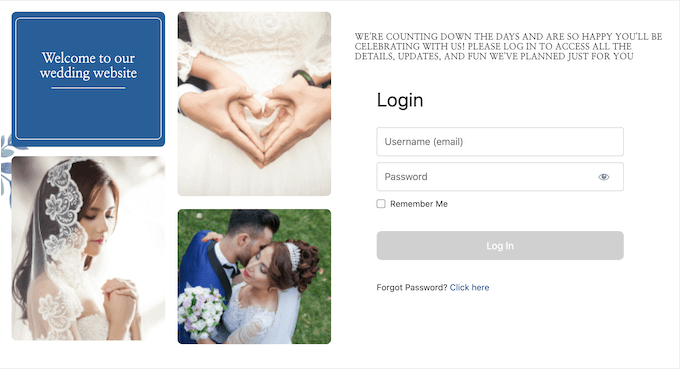
A membership plugin lets guests create accounts on your website so that you can keep track of everyone. This can be super helpful for managing things like RSVPs, meal choices, and any other information you need from your guests.
With MemberPress, you can even control which parts of your website each guest can see. For example, you might want to show different information to guests who are invited to the ceremony and reception versus reception-only guests. This can help you avoid any confusion or awkward misunderstandings.
You can even make your entire website private so that only registered guests can see details about your wedding. This is a great option if you’re sharing sensitive information like your guest list, gift registry, or a detailed wedding day schedule.
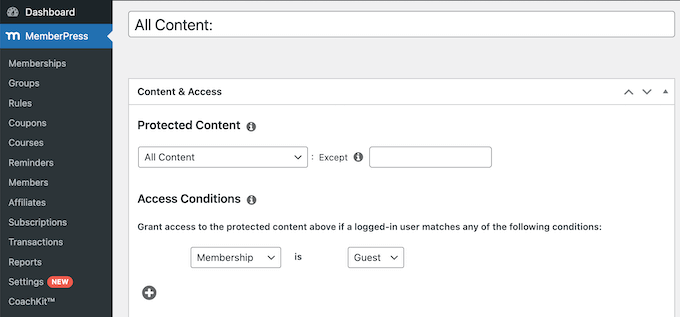
Planning to share the wedding or honeymoon photos on your website? MemberPress also lets you create a private gallery just for your guests. Set it up now, then you can simply upload your photos after the wedding without worrying about strangers seeing them.
As already mentioned, MemberPress is our top pick for membership plugins. It’s an all-in-one solution that lets you create unlimited memberships and restrict access to any type of content on your site—pages, posts, categories, files, you name it!
Want to learn more? Then check out our in-depth MemberPress review. Alternatively, you can get started straight away, with our guide to creating a WordPress membership site.
Step 7: Add More Pages
We’ve already talked about how a wedding website lets you share all the essential details for your big day.
Need to share the date and time of your ceremony? Done. Venue address and directions? Easy peasy. Dress code, maps, FAQs – your wedding website can handle it all. This means fewer questions for you and more time to focus on enjoying your special day.
But before you get carried away adding all this amazing content, let’s talk about keeping things organized.
You want your website to be user-friendly, so guests can find what they need quickly and easily. That means creating different pages for different types of information.
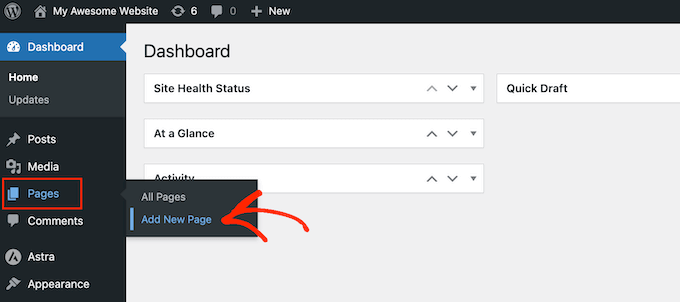
To add a new page in WordPress, simply go to Pages » Add New Page.
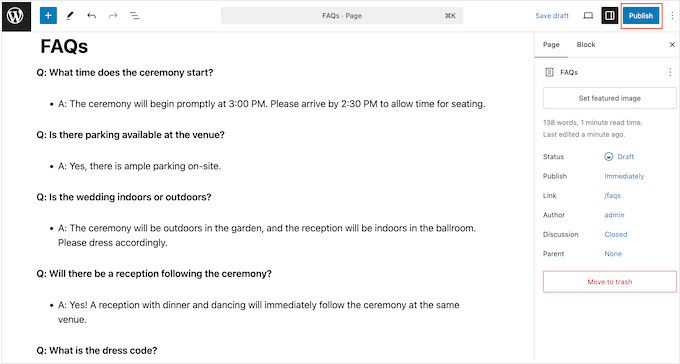
This opens the WordPress content editor, where you can add a title, type in the body text, add a featured image, and more.
Once you’re happy with a page, just hit the ‘Publish’ button to make it live.
Want more creative control over your page layouts and designs? Then be sure to check out our guide on how to create custom pages in WordPress. It’s packed with tips and tricks to make each page truly memorable.
Step 8: Add a Google Map
Let’s make sure your guests arrive at your wedding without a hitch. Sharing the location is essential, but simply adding the address or venue name to your website isn’t always enough.
That’s where the magic of Google Maps comes in. By adding a Google Map to your wedding website, you’re giving your guests a familiar tool to plan their trip.
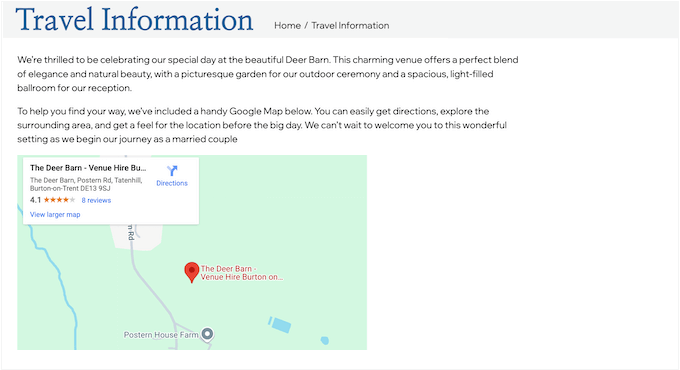
They can use the map to get directions, find parking options, research nearby hotels, and discover other important details. This is especially helpful for guests traveling from out of town who might not know the area well.
You can embed Google Maps directly in your site using a map plugin or a code snippet. We cover both methods in our guide on how to add a Google Map in WordPress, so you can choose the method that suits you the best.
Even if your ceremony, reception, and accommodations are all in different locations, a Google Map can help your guests navigate between them with ease. No frantic phone calls from lost guests! Less stress for them, and definitely less stress for you.
Step 9: Add an RSVP Form
Knowing who’s coming to your big day is essential for everything from seating plans to catering to those awesome party favors.
Traditionally, guests would RSVP through the mail or with a phone call. But let’s be real, who has time to keep track of all those responses when you’re busy planning a wedding? And let’s not even get started on deciphering those handwritten RSVP cards.
This is another area where a wedding website really shines. With a digital RSVP form, guests can confirm their attendance with just a few clicks. No more chasing down responses or dealing with messy handwriting.
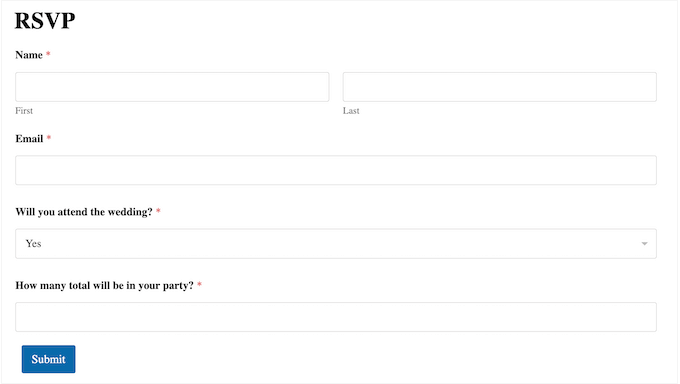
A digital RSVP form also helps you stay organized. You can see at a glance who has responded, who hasn’t, and who’s bringing a plus one. It’s a game-changer for wedding planning.
There are a few different form builders out there, but WPForms is our favorite. We use it on WPBeginner and all our partner sites for everything from contact forms to surveys. It’s reliable, easy to use, and packed with features
The best part? WPForms comes with pre-built RSVP templates, including a Party Invitation RSVP Form, Wedding Invitation RSVP Form, and Wedding Guest List Form. All these templates are easy to customize, so you can update them to match your wedding style.
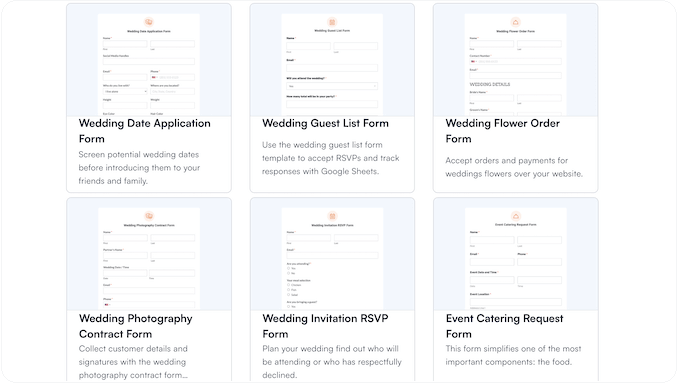
As guests fill out your form, WPForms will neatly organize all the information and display it right in your WordPress dashboard. No more spreadsheets or messy notes. For step-by-step instructions, please see our guide on how to create an RSVP form in WordPress.
But WPForms isn’t just for RSVPs. You can use it to create all sorts of forms for your wedding website.
Need guests to choose their meal options well in advance? Make a form for that! Want to collect information about dietary restrictions or allergies? WPForms can do that too!
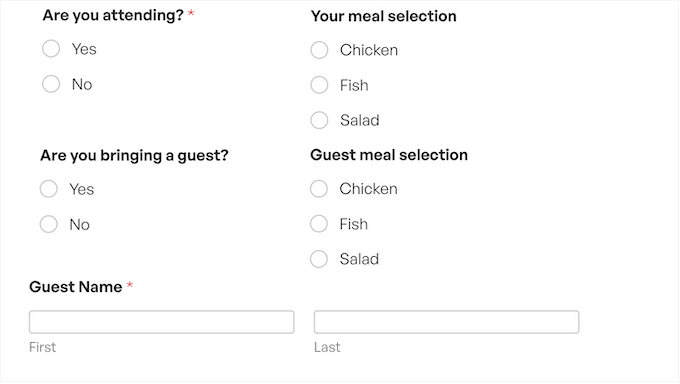
You can even get creative and let guests request their favorite songs for the DJ, or leave sweet messages in your virtual guestbook.
With WPForms, you can make your wedding website even more interactive and helpful for your guests.
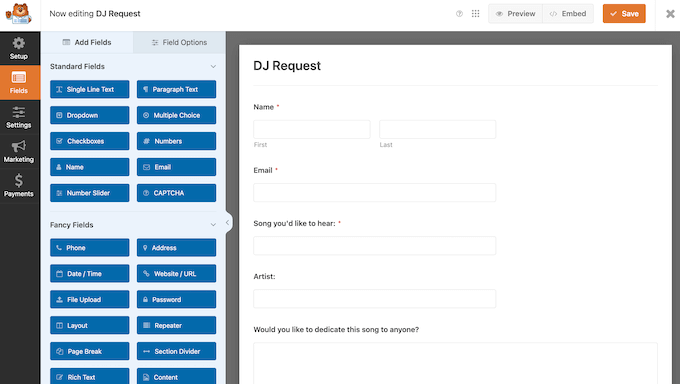
Want to learn more? Just check out our in-depth WPForms review.
Step 10: Add a Schedule
Are you planning a jam-packed wedding? Between the rehearsal dinner, the ceremony, the reception, and maybe even a farewell brunch, it’s easy for guests to lose track.
The last thing you want is for someone to miss the cake-cutting or those heartfelt speeches because they didn’t know the schedule.
To keep everyone organized and informed, consider creating a detailed schedule using a calendar plugin like Sugar Calendar.
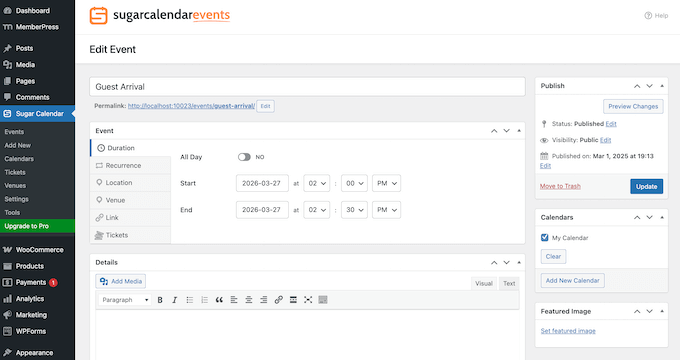
With Sugar Calendar, you can add all the important details for each event, including the start and end times, location, and even a brief description.
This is especially helpful if your wedding is spread across multiple venues or different rooms within the same location, like a large hotel.
You can even share events happening around the wedding. Got a fun pre-wedding get-together planned? Add it to the calendar!
It’s like having a central hub where everyone can see exactly what’s happening and when, from the weeks leading up to the big day, right through to the post-wedding celebrations. No more missed connections or confused guests.
Wondering whether Sugar Calendar is right for your wedding website? Simply read our detailed Sugar Calendar review for more information, or learn how to create a simple event calendar in WordPress.
Step 11: Add a Countdown Timer
Want to add a bit of fun and anticipation to your wedding website?
Imagine a live countdown right on your homepage, ticking away the days, hours, and minutes until your special day. It’s a fantastic way to build excitement among your guests and make them feel like they’re part of the celebration.
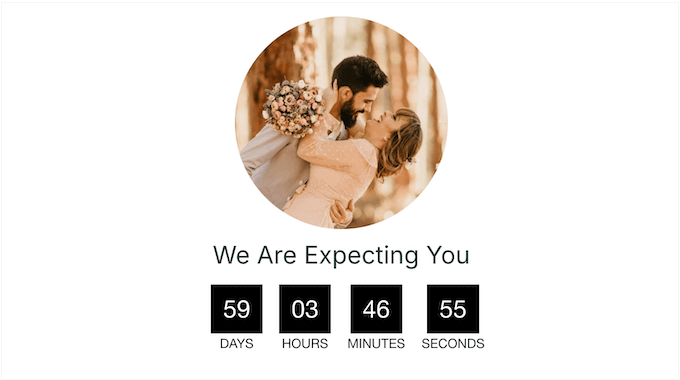
Plus, it can gently remind your guests to finalize any last-minute arrangements, like booking transport or a hotel.
Did you use SeedProd to create an engaging custom homepage? Then you’re in luck! SeedProd has a dedicated Countdown block that you can simply drag and drop onto your design.
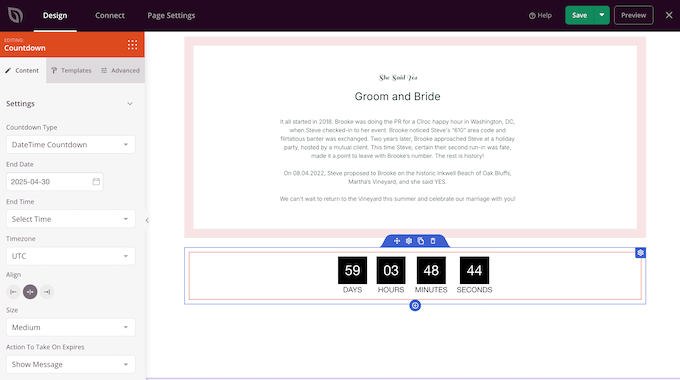
For detailed, step-by-step instructions, please see our guide on how to add a countdown timer widget in WordPress.
Not using SeedProd, but love the idea of a live wedding countdown? Don’t worry! We have a guide to the best countdown plugins instead, so you can still get the same effect.
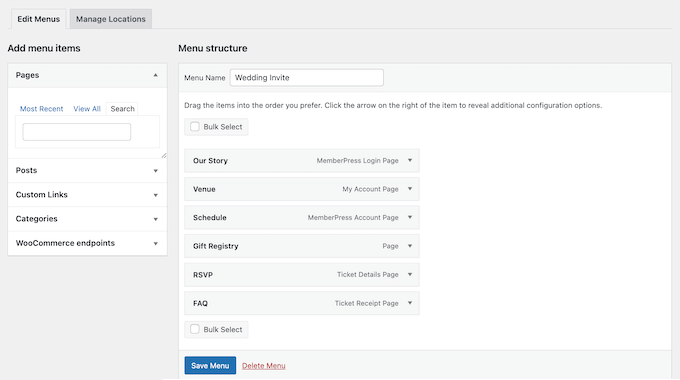
Now you’ve added some content, let’s add a navigation menu. A well-organized menu will help your guests find the information they need, whether it’s directions to the venue, your gift registry, or the schedule of events.
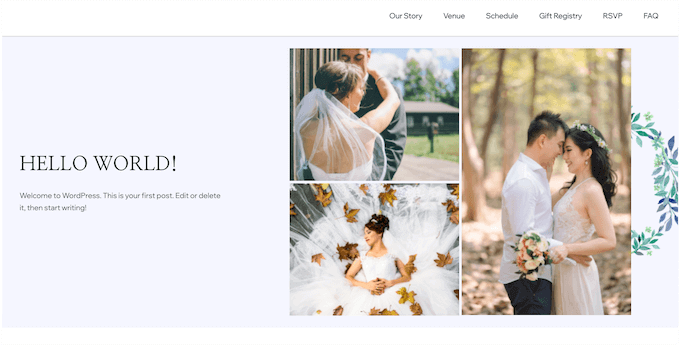
Don’t worry – adding menus and even sub-menus in WordPress is surprisingly straightforward.
For a comprehensive, step-by-step guide, check out our detailed post on how to add a navigation menu.
Step 13: Share Your Wedding Website URL
Now your wedding website is looking fantastic, it’s time to make sure that your guests know where to find it.
The simplest and most effective way to share your website’s URL? Just add it to your wedding invitations! That way, your guests immediately have access to all the important details and updates.
You could even use a scannable QR code that leads directly to your website. For details, see our guide on how to generate QR codes.
Plus, many people cherish wedding invitations as keepsakes, so your website address will always be readily available as the big day approaches.
If you’ve already mailed out your invitations, don’t panic! You can simply send an enclosure card that contains your website address, so everyone has the URL.
Step 14: Upload Your Wedding Photos
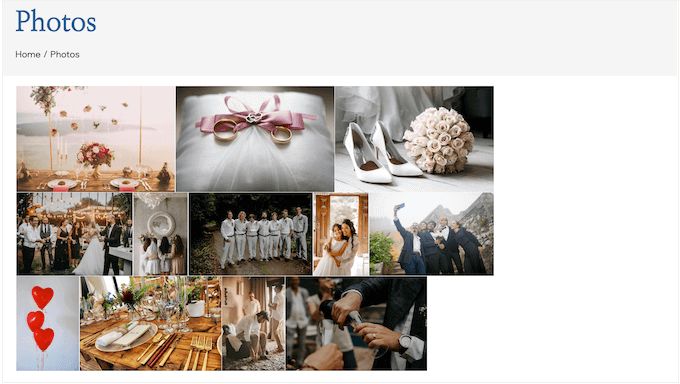
Let’s skip forward a bit: your wedding day is over, but your website can still play an important role. If you hired a professional photographer, then your website is the perfect place to share those cherished memories with your guests.
However, displaying lots of photos – dozens, hundreds, or even thousands – can slow down your site, so your guests can’t even enjoy your photos properly.
That’s why we recommend using a gallery plugin that’s optimized for performance. Envira Gallery stands out as the best image gallery plugin because it lets you upload countless photos, create unlimited sliders, and organize your wedding photos into themed albums.
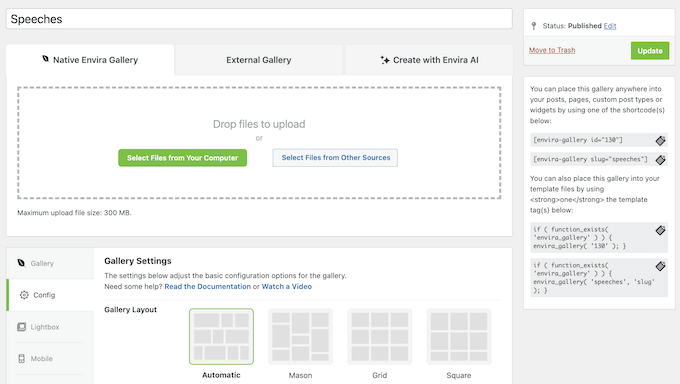
Plus, you can add ‘Download’ and ‘Print’ buttons to your galleries.
This lets your guests save and print their favorite photos, preserving those special moments without needing to contact you directly. It’s a fantastic way to share your wedding memories with loved ones.
Want to learn more? Check out our detailed Envira Gallery review, where we download this popular plugin and really put it through its paces.
Ready to dive in? Our guide on how to create a responsive image gallery has step-by-step instructions to help you get started.
Bonus Tips: How to Build a Wedding Website for a Client
Wedding websites are getting more and more popular, but not every couple has the time or know-how to build one themselves. We regularly hear from freelancers and WordPress agencies who have been asked to build these sites for their clients.
In that case, all the information we’ve shared in this guide is still relevant. However, there are ways to elevate your services and create truly memorable wedding websites for your customers.
Here are our suggestions:
- Create a custom WordPress theme. Every wedding is unique, and a bespoke theme tailored to the couple’s style will make their site truly stand out. Imagine your client’s delight at having a completely one-of-a-kind wedding website.
- Build an interactive timeline. Why not create a visual journey of the couple’s relationship, complete with photos and captions? Post-wedding, you can even build a timeline of the big day itself, so guests can relive every moment.
- Interactive venue tour. You can use virtual reality or 360-degree technology to create an interactive tour of the wedding or reception venue. This lets guests explore the space before the big day, and it’s a great way to build excitement!
- Create a blog section. A blog gives the couple a place to share updates, photos, and stories about their engagement, the planning process, and anything else that’s on their mind. Since you’re handling the website’s design and build, your clients will have more time to dedicate to this fun, personal aspect. To make things even easier, you might offer a service where the couple simply sends you their raw blog text, and you handle the formatting and uploading.
- Add important security features. Don’t assume that hackers and bots only target big businesses – every website and blog is a potential target. You’ll want to do everything you can to protect it. That means installing security plugins, following best practices, and creating regular backups.
- Optimize the site for performance. Even the couple’s nearest and dearest will get frustrated if their wedding website is slow to load. With that said, it’s important to install caching plugins, set up a CDN service, keep the software up-to-date, and follow other WordPress performance best practices.
We hope this guide has helped you learn how to build a wedding website in WordPress. Next up, you might want to see our top pick of the best RSVP plugins or check out our guide on how to create a photo gallery with albums.
If you liked this article, then please subscribe to our YouTube Channel for WordPress video tutorials. You can also find us on Twitter and Facebook.


