Fixing ERR_CONNECTION_TIMED_OUT – DreamHost
In today’s lightning-fast, digital world, there’s nothing more frustrating than trying to visit a website, watching the loading bar creep slowly across the page… and then getting an error message instead of the site you expected.
When this happens, a lot of times it’s the “ERR_CONNECTION_TIMED_OUT” error. This is a common error that has a lot of potential causes, which means it can be frustrating for site administrators to diagnose and solve. Luckily though, most of the steps required to troubleshoot it are straightforward, even for beginners.
So if you’re staring down a Connection Timed Out error, you’re in the right place. Read on to learn more about what causes this common error and, more importantly, how to fix it on your site.
What Is The ERR_CONNECTION_TIMED_OUT Error?
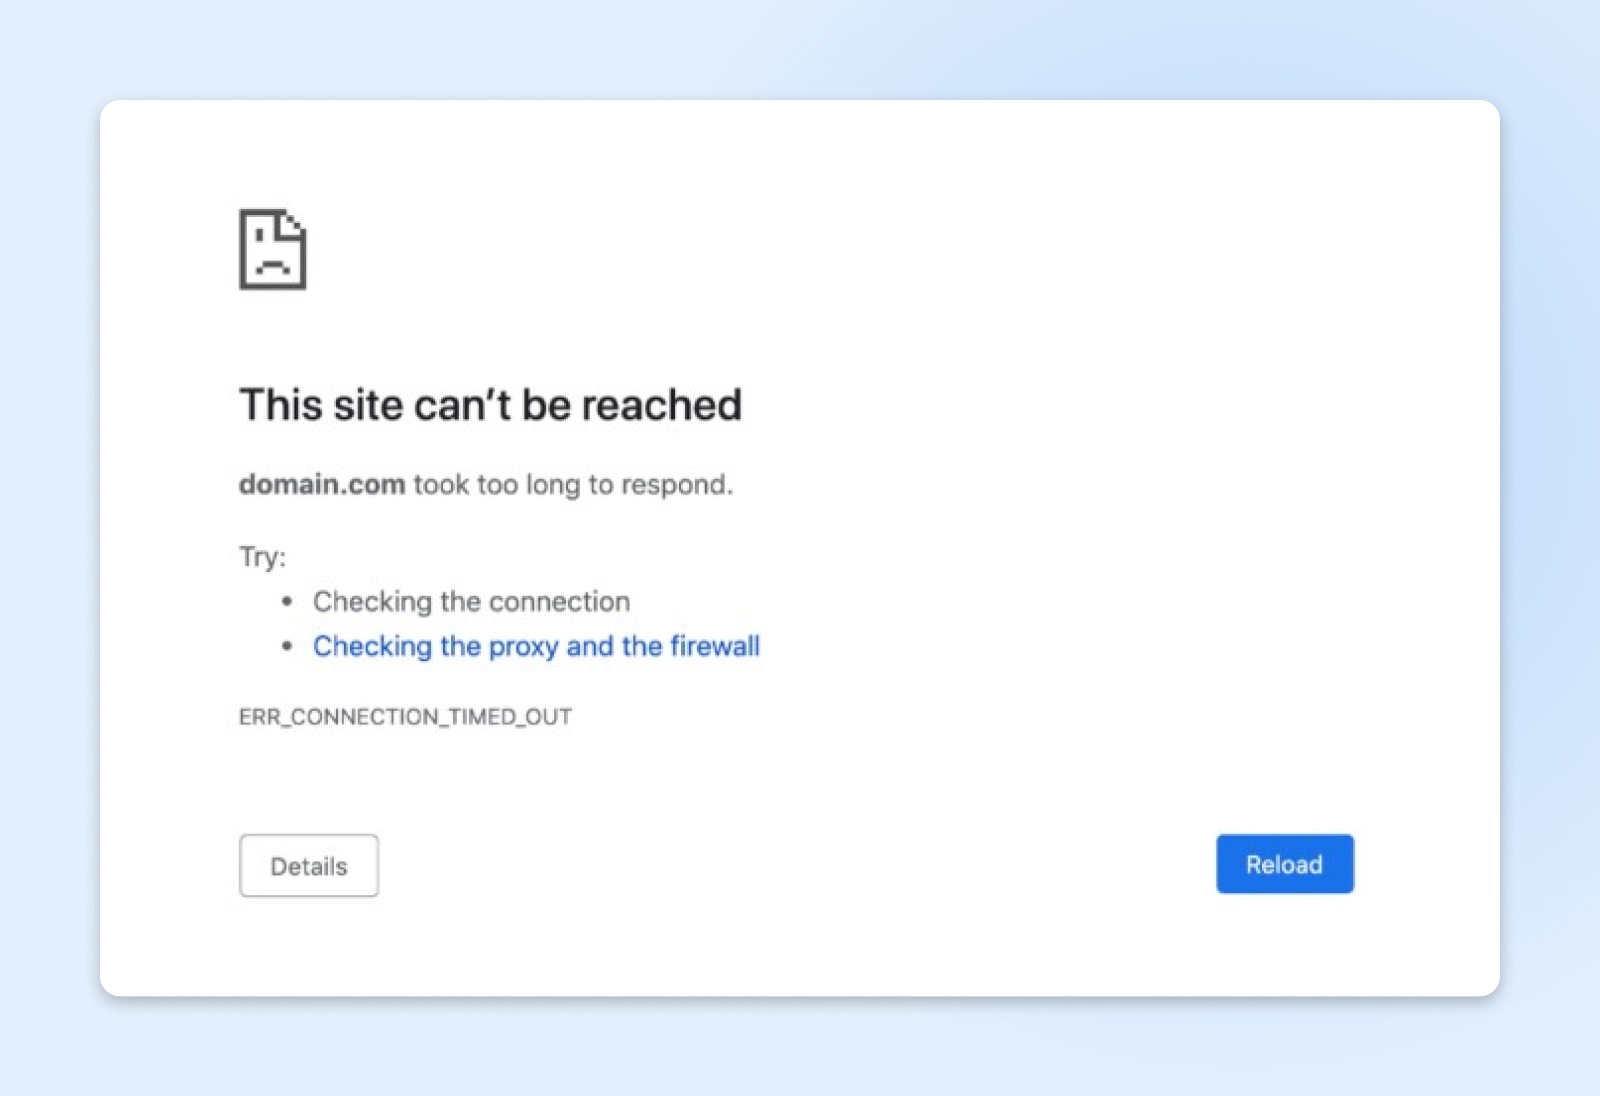
The ERR_CONNECTION_TIMED_OUT error is a message you might see in your web browser. It means that a web page or resource you’re trying to reach took too long to respond, so the connection attempt was terminated due to a timeout.
This is a shockingly common error, though it presents different ways in different web browsers. The error will probably say some variation of, “This site can’t be reached.”
In a Google Chrome browser, it’s called an ERR_CONNECTION_TIMED_OUT error.
In Safari, it displays as “Safari Can’t Open the Page.”
If you use Mozilla Firefox and encounter this error, you’ll see, “The connection has timed out.”
And if you use Microsoft Edge, the error will read, “Hmmm… can’t reach this page.”
What Causes The ERR_CONNECTION_TIMED_OUT Error?
One of the really tricky (and potentially frustrating) things about getting an ERR_CONNECTION_TIMED_OUT error on your site is that it has a ton of potential causes. These errors can be caused by:
1. Network issues: Problems with your local network, such as unstable Wi-Fi or a poor Internet connection, can prevent your browser from connecting to a server in time.
2. Firewall or security software: Sometimes, firewall settings or security software might block a connection or cause delays, leading to timeouts.
3. Browser issues: Occasionally, cached data or cookies might cause connection problems. In these cases, clearing browser cache and cookies might help.
4. DNS issues: The Domain Name System (DNS) translates domain names (like www.example.com) into IP addresses. If there’s an issue with the DNS server your device is using, it might prevent you from accessing certain websites.
DNS
The Domain Name System (DNS) protocol keeps records of which domain names correspond to specific IP addresses. This system enables you to browse the web by typing in regular URLs instead of IP addresses.
Read More
5. Server-side issues: The server where the website is hosted might be experiencing high traffic, it could be down, or there might be other technical issues preventing it from responding in a timely manner.
How To Fix ERR_CONNECTION_TIMED_OUT Errors: Step By Step
Ready to solve your ERR_CONNECTION_TIMED_OUT error?
We’ll start by troubleshooting this error at the network, browser, and software level.
Then, we’ll explore some DNS fixes.
If those don’t work, we’ll go through some steps you can take to change the configuration of your WordPress site or server to finally banish ERR_CONNECTION_TIMED_OUT errors for good.
Get Content Delivered Straight to Your Inbox
Subscribe to our blog and receive great content just like this delivered straight to your inbox.
Troubleshooting At The Network, Browser, And Software Level
We’ll start with the easiest fixes first.
Step 1: Check Your Network Connection
Sometimes, when you get a Connection Timed Out error, it’s for a very straightforward reason: connection issues.
If you’re at home, check your router and reset it if necessary. To completely power cycle it, disconnect the power supply and wait at least 30 seconds before you plug it back in.
If you’re somewhere where you don’t have access to the router, like a coffee shop, visit another site or run an internet speed test to check the connection.
Step 2: Disable Firewall And Antivirus Software (Temporarily)
Firewall
A firewall is a set of rules that governs incoming and outgoing connections for a network or a specific device. The goal of firewalls is to protect against intrusions and unwanted outgoing connections.
Read More
While your firewalls and antivirus programs are meant to protect your computer from harmful websites and programs, they can get a little, shall we say, overzealous. Even the most popular antivirus software has been known to block perfectly safe websites from time to time, which is why the next step should be to (temporarily) switch off your firewalls and antivirus software and then try accessing your site again to see if it’s getting blocked.
Of course, only do this if you’re absolutely sure the site you’re trying to access is safe.
If it turns out this is the problem, you can submit a “false positive” report to the antivirus software that’s blocking your site to let the developer know they’re keeping users away from a site that’s actually safe. They should review your report and help resolve the issue.
Step 3: Disable Proxy Settings Or VPN
Proxy servers and VPNs work kind of like an internet middleman, redirecting the flow of information between your device and the website you’re visiting to help protect your IP address. However, depending on your VPN or proxy settings, they can also control which sites are accessible, which can result in accidentally blocking certain pages and getting a Connection Timed Out error.
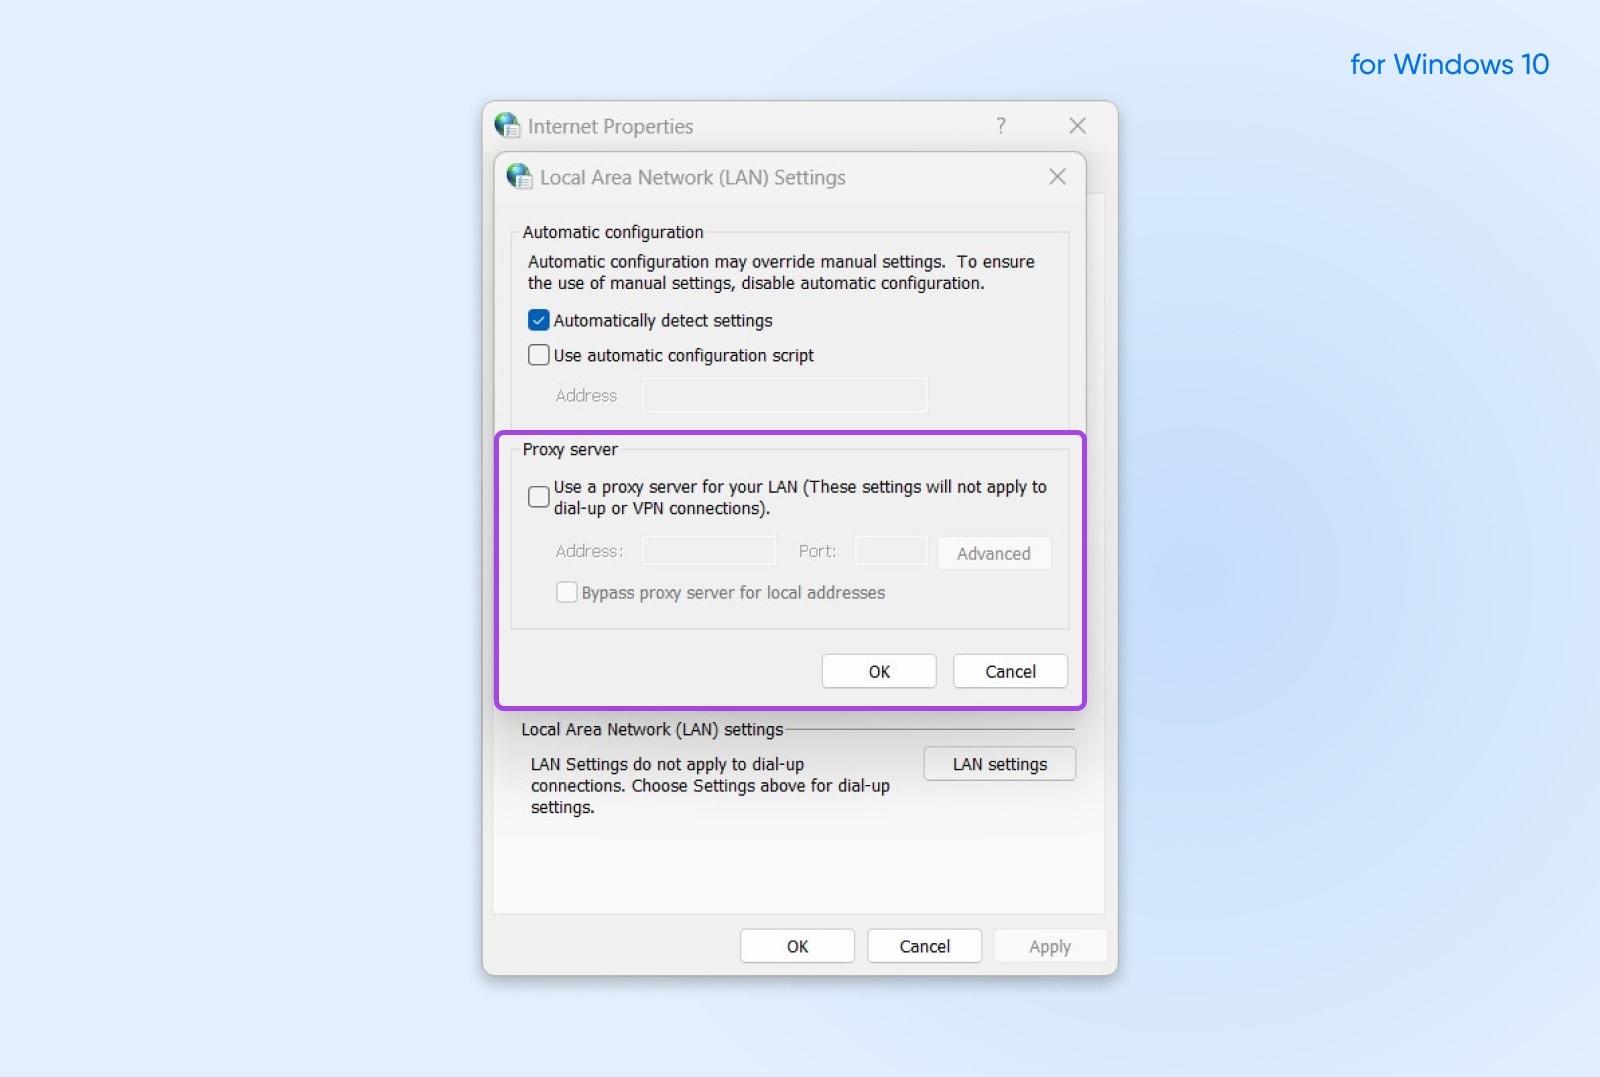
If you’re using a VPN, you can either change the protocol or turn it off temporarily. If you’re using a proxy server, you’ll need to change the settings – and how you do that depends on your operating system.
For Windows 10: Open the Control Panel and select Internet Options. This will open the Internet Properties windows. Go to the Connections tab, then LAN Settings. Uncheck all the proxy settings and click OK.
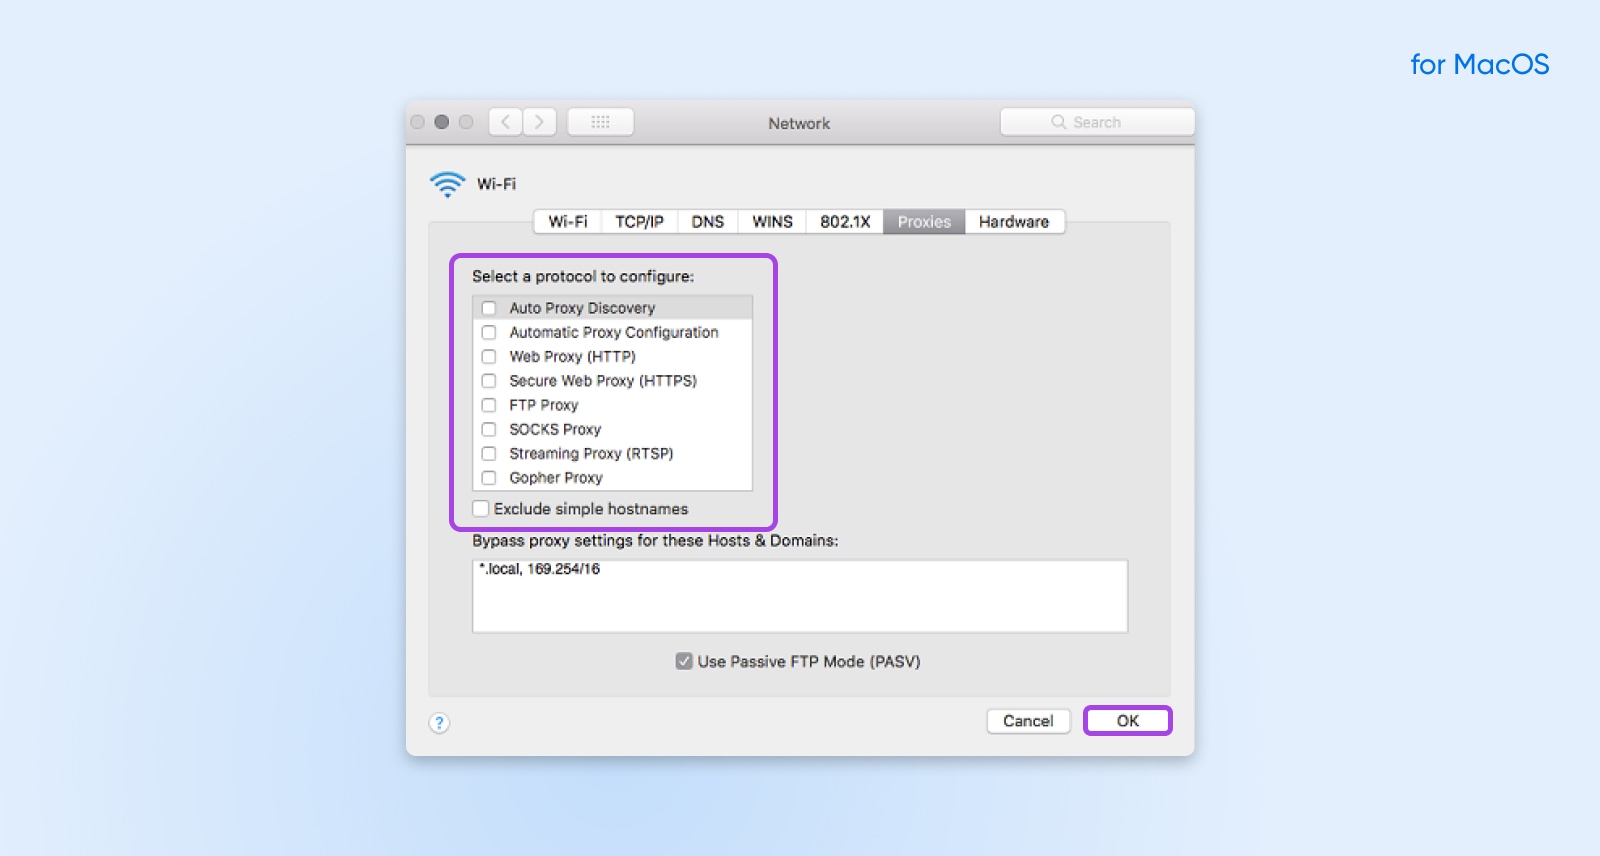
For MacOS: Open System Preferences, go to Network, and click Advanced. Under the Proxies tab, uncheck all the boxes and click OK.
Step 4: Clear Browsing Data
Your web browser stores certain information, including browsing history, login data, cookies, and more. Having browser data saved means when you revisit a web page, it can load faster. When cached data is out of date, it can cause loading problems and lead to errors, which is why it’s a good idea to clear your cache periodically.
The exact steps for doing so vary by browser, but it’s pretty straightforward – if you aren’t sure how, a quick Google search for your browser and “clear cache” should pull up a tutorial.
Troubleshooting At The DNS Level
If none of the above troubleshooting steps worked, it’s time to get a bit more technical. The next few steps will explore solutions to Connection Timed Out errors that have to do with DNS errors.
Step 1: Change DNS Servers
The first thing to try is changing your DNS servers. By default, DNS servers are automatically assigned by your internet service provider (ISP), but these default servers don’t always provide the best performance. You can try changing them to a free, third-party server, like the ones provided by Google or Cloudflare.
Once again, how you do this depends on your operating system.
For Windows 10:
- Open the Control Panel and select Network and Sharing Center.
- At the top left, click Change adapter settings. Right-click on the current connection and select Properties.
- Choose whether to use IPv4 or IPv6 addresses for your DNS settings. Then click Properties.
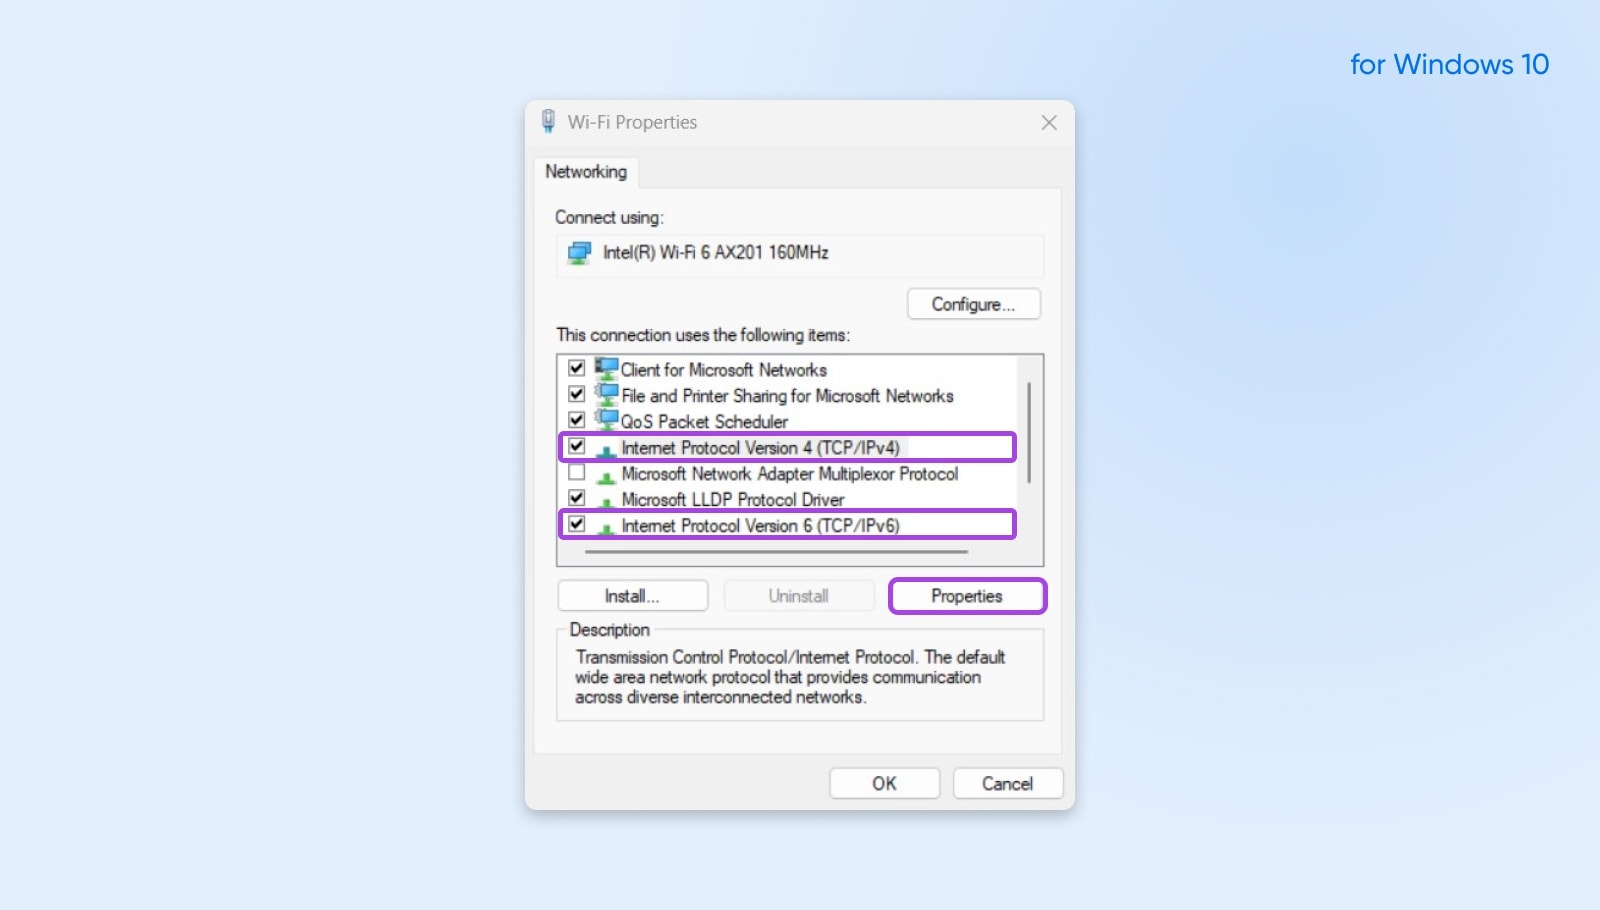
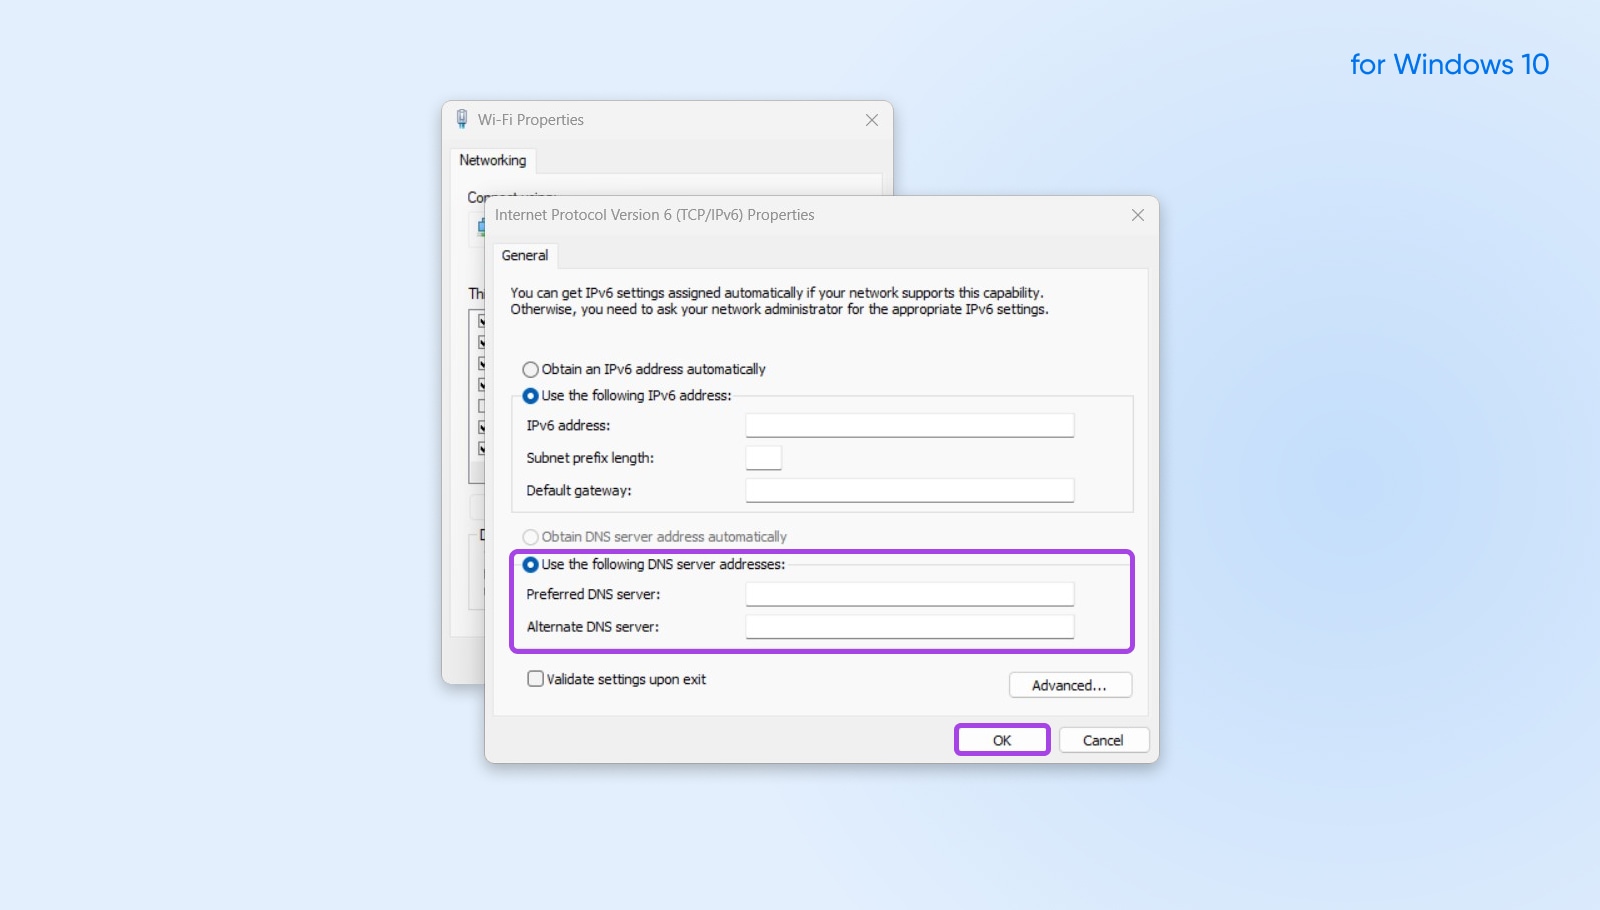
- Select the option to “Use the following DNS server addresses:”
- Type in the IP address with the following:
- Google DNS:
- For IPv4, use 8.8.8.8 and 8.8.8.4
- For IPv6, use 2001:4860:4860::8888 and 2001:4860:4860::8844
- Cloudflare DNS:
- For IPv4, use 1.1.1.1 and 1.0.0.1
- For IPv6, use 2606:4700:4700::1111 and 2606:4700:4700::1001
- Google DNS:
- Click OK, then close and restart your browser.
For MacOS:
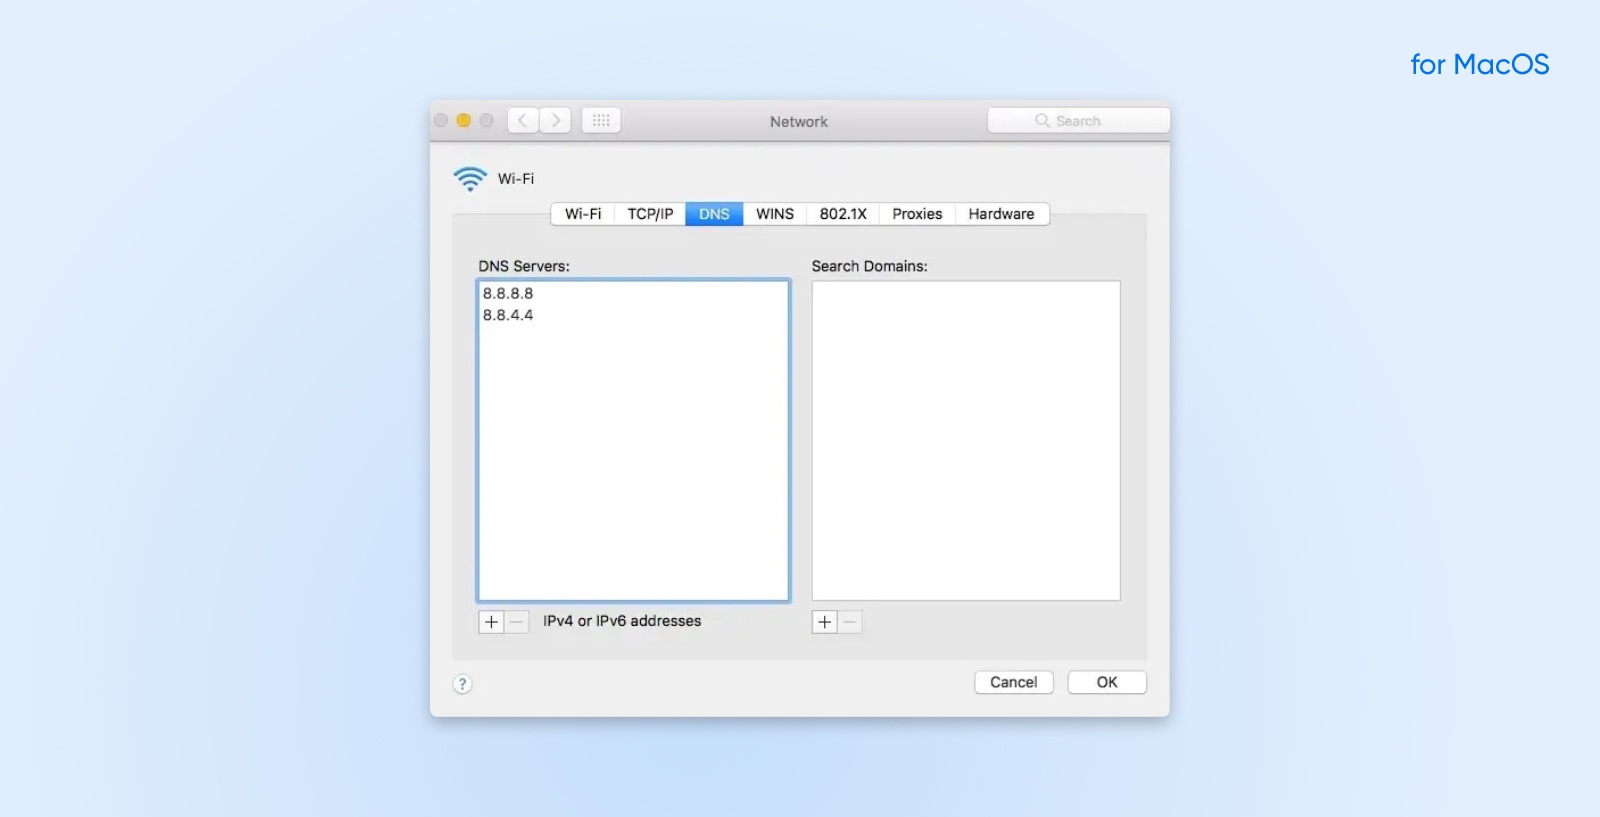
- Open System Preferences, go to Network, and click Advanced.
- On the DNS tab, click the Plus sign in the DNS Servers section. Type in each IP address:
- Google DNS:
- For IPv4, use 8.8.8.8 and 8.8.8.4
- For IPv6, use 2001:4860:4860::8888 and 2001:4860:4860::8844
- Cloudflare DNS:
- For IPv4, use 1.1.1.1 and 1.0.0.1
- For IPv6, use 2606:4700:4700::1111 and 2606:4700:4700::1001
- Google DNS:
- Click OK.
Step 2: Flush DNS
Similar to your browser, your computer keeps a cache of information about the IP addresses of websites you visit, so it doesn’t need to start from the beginning to translate their domains each time you revisit a site. Also, similar to your browser cache, your DNS cache can become outdated and cause errors, so the next troubleshooting step is to flush it.
If you’re using Windows, you can do this using Command Prompt. Press the Windows key + R to activate the Run command, then type “cmd” into the dialog box and click OK. In the Command Prompt window, enter the following:
ipconfig /flushdns
Then, press enter. If it worked, you should see a message that says, “Successfully flushed the DNS resolver Cache.”
If you’re on Mac, open the Terminal application and insert the following command:
dscacheutil -flushcache
Note that there’s no success message on Mac.
Step 3: Check Your Hosts File
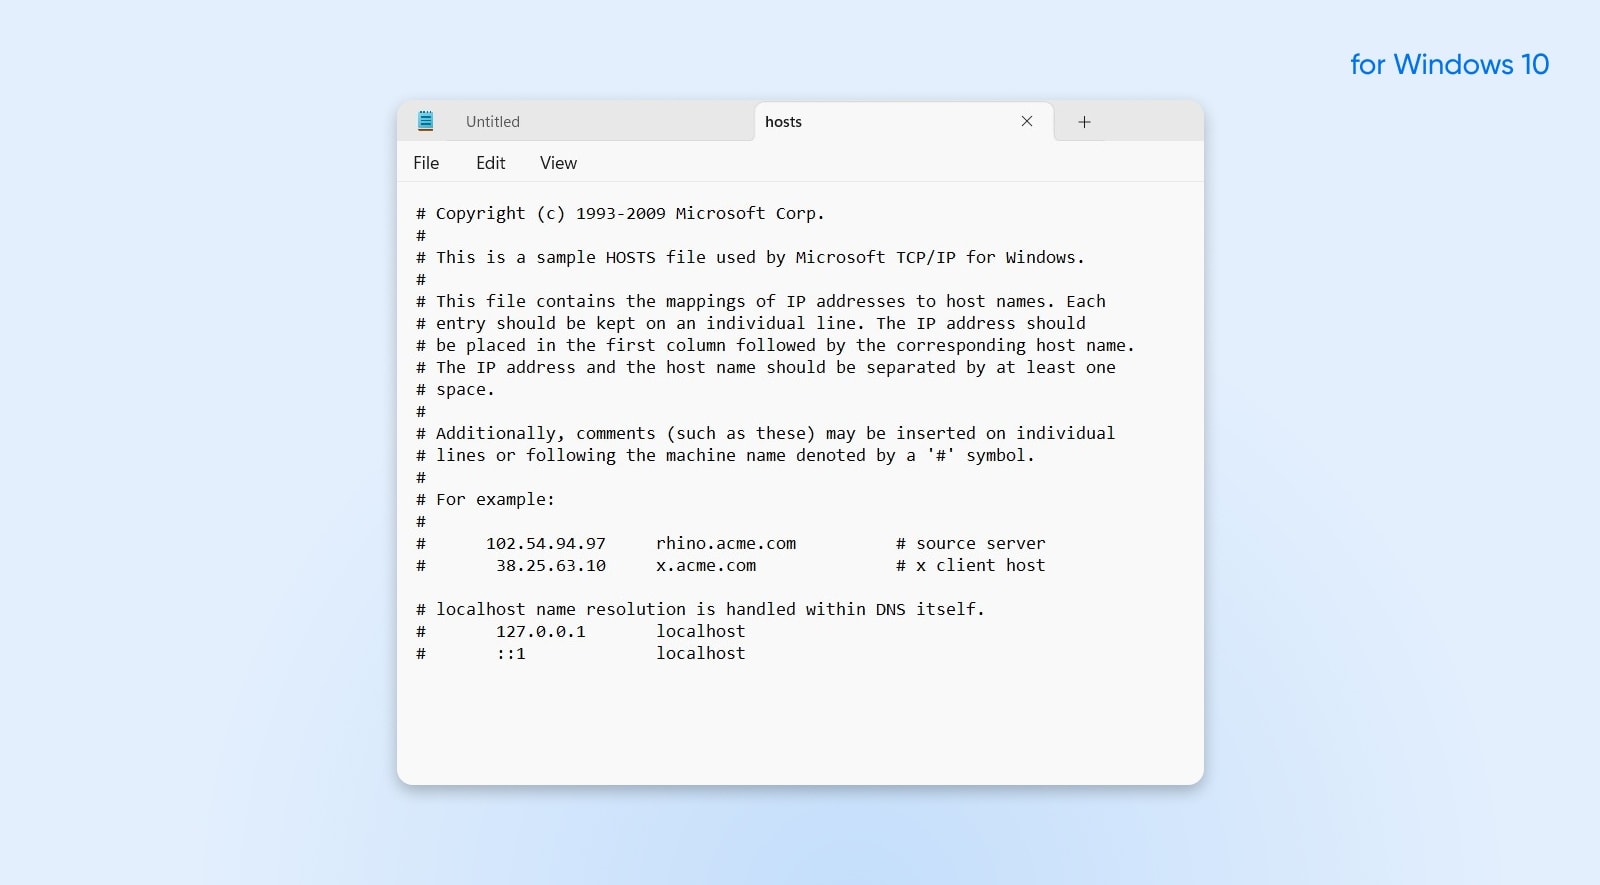
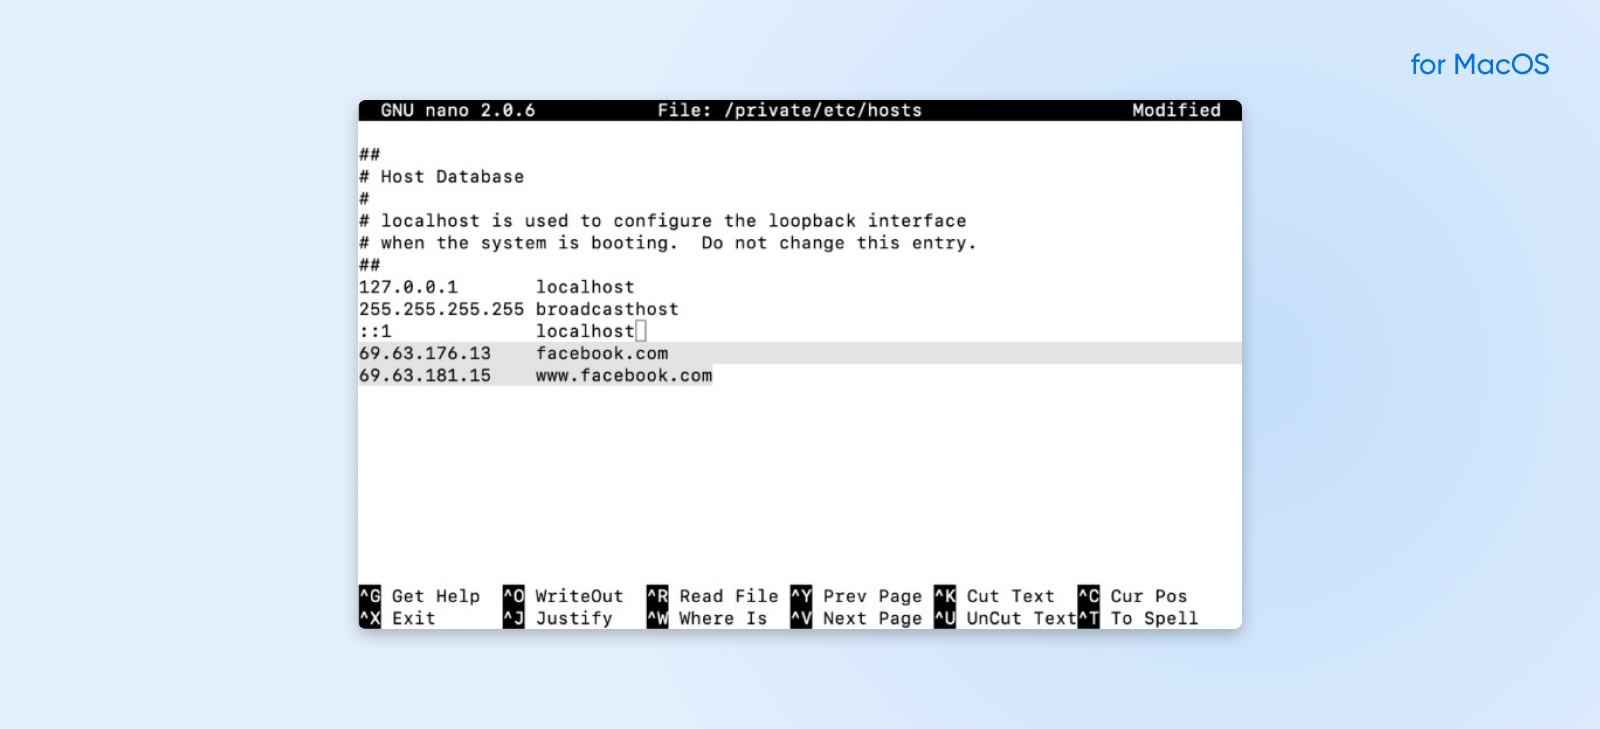
Your hosts file is where your computer stores a sort of map between IP addresses and their corresponding domain names. However, it may also include a list of blocked websites, and if the site you’re trying to access is blacklisted in your hosts file, that will cause the Connection Timed Out error.
On Windows, you’ll need to set up additional access with a text editor, like Notepad, to view the Windows hosts file. From the start menu, find Notepad, right-click on it, and select Run as administrator. Then, from your text editor, navigate to File → Open and put the path below into the File name bar:
C:WindowsSystem32driversetc
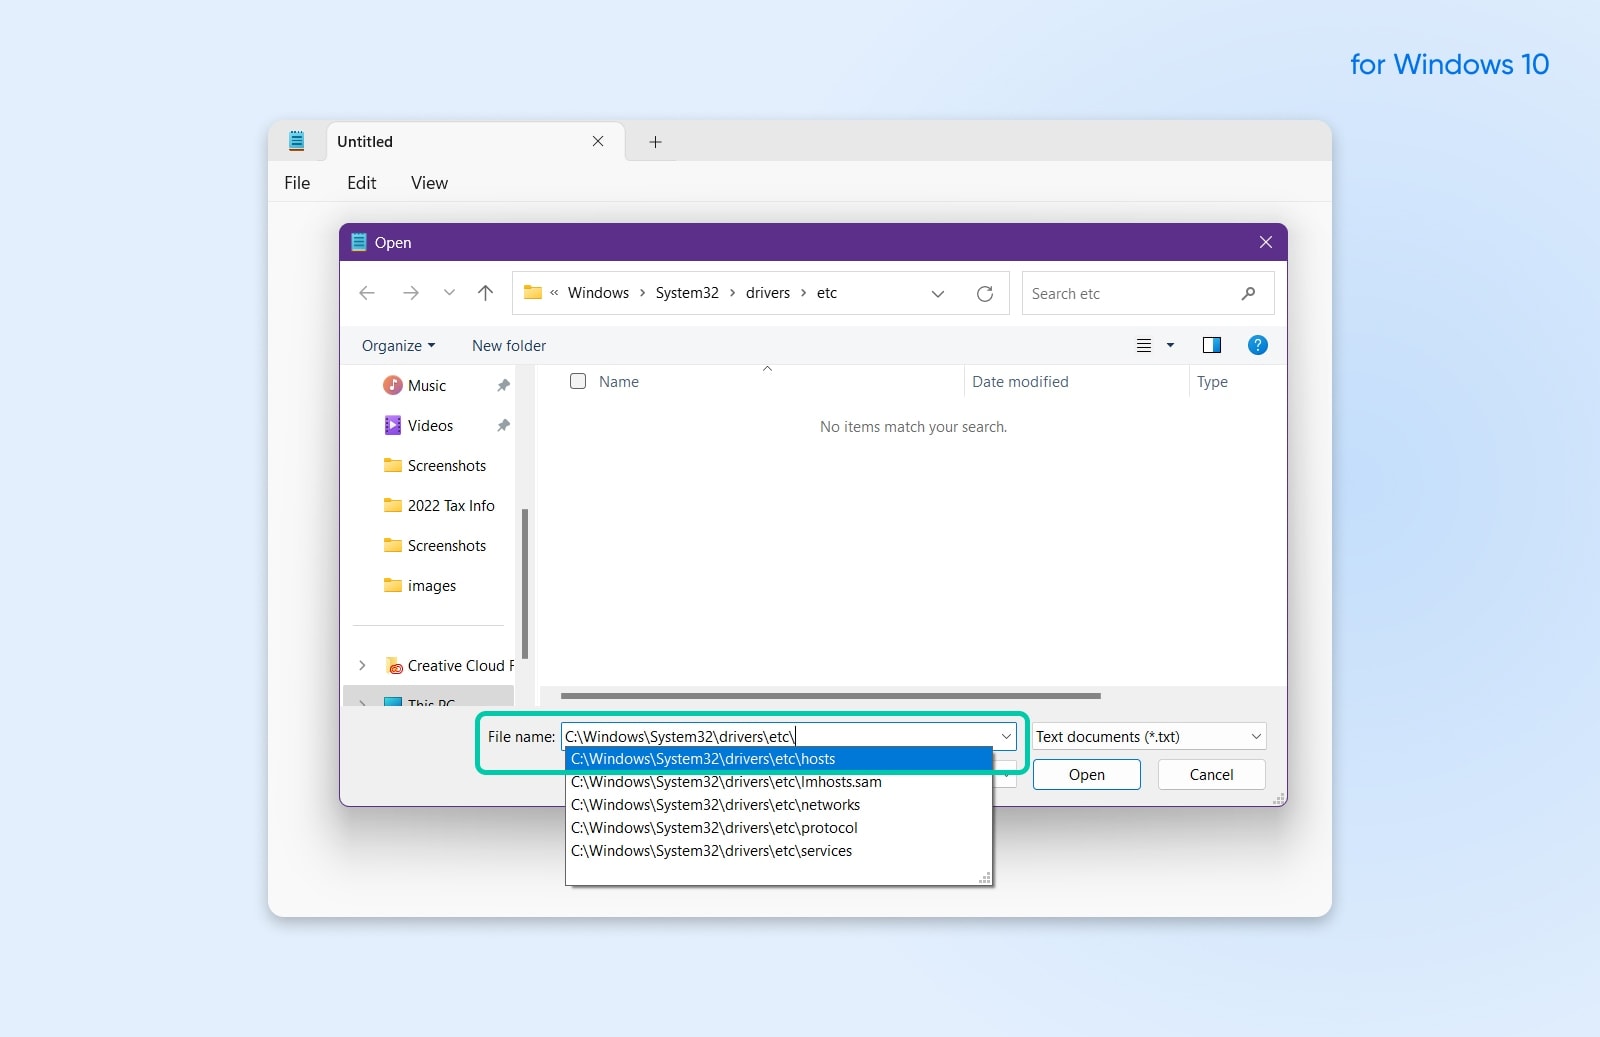
Select the hosts file. The list of blocked sites will be below the last line that starts with the “#” sign. Delete them and save your changes.
On Mac, open the Terminal, insert the line below, and hit enter:
sudo nano /private/etc/hosts
Remove all the websites below the “::1” line.
Troubleshooting At The WordPress Site Or Server Level
If none of the above fixes solved your Connection Timed Out error, it could be an issue with your WordPress site or server. Below are some of the most common server-side issues and how to troubleshoot them.
Step 1: Temporarily Disable Plugins
WordPress plugins are a great way to expand your site’s functionality, but they can also be problematic, especially if they come from an unreliable source or if you install more plugins than your site can handle.
Plugin
WordPress plugins are add-ons that enable you to extend the Content Management System’s (CMS) functionality. You can use plugins for almost everything, from adding e-commerce features to WordPress to implementing page builders or using Search Engine Optimization (SEO) tools.
Read More
That’s why temporarily disabling plugins is a great first step if you believe a Connection Timed Out error is originating from an issue with your site. If you recently installed any new plugins that you suspect could be the cause, start there.
However, if you’re unable to load your site, that typically also means you can’t access your WordPress admin area. That means you’ll need to access your site using SFTP. We recommend using FileZilla, since it’s free and open source. Once you’ve connected to your site, you’ll need to find your wp-content directory, and inside it, a folder called plugins. Change the name of the plugins folder to something like plugins-discontinued (make sure you remember the name so you can find it later). Reload your site. If you no longer get the Connection Timed Out error, you now know one of your plugins was the culprit. You just need to find out which one.
To do so, head back to SFTP and rename the plugins folder back to its old name. Inside the folder, you’ll see a folder for each individual plugin. Do the same thing, but this time, rename each individual plugin’s folder, then try to reload your site. This will isolate the exact plugin that’s causing the error.
SFTP
Secure File Transfer Protocol (SFTP) is a safer version of the FTP protocol that uses a secure shell data stream.
Read More
Step 2: Check The Maximum Execution Time
Maximum execution time is the total duration a php script can run on a site before it times out. If your site is reaching its maximum execution time before it can fully load, that could be the cause of your Connection Timed Out error.
PHP
PHP (Hypertext Preprocessor) is an open-source scripting language. It’s widely used in web development and can be embedded in HTML. Several popular Content Management Systems (CMS), such as WordPress, are built with PHP.
Read More
On most sites, this is set to 30 seconds as a default. However, you can increase it. You have a few options here, but they depend on how your hosting provider has set up their servers:
- Find the php.ini file in your home directory, then find the max_execution_time parameter within it and increase it.
- Edit your .htaccess file to include php_value max_execution_time set to your preferred value.
- Reach out to your hosting provider and ask them to increase your maximum execution time.
Step 3: Increase Your PHP Memory Limit
PHP allows a default amount of memory to be used when processing a website. Some sites need more than that, which could be the cause of the Connection Timed Out error you’ve been seeing. In this case, increasing your PHP memory limit would be the solution.
You’ll need to access your site via SFTP to increase your PHP memory limit. Access your site’s directory, then find the wp-config.php file. Edit the wp-config.php file to include the following lines before the wp-settings.php inclusion:
define( ‘WP_MEMORY_LIMIT’, ‘300M’ );define( ‘WP_MAX_MEMORY_LIMIT’, ‘300M’ );
/** Sets up WordPress vars and included files. */require_once(ABSPATH . ‘wp-settings.php’);
Keep in mind that you can’t increase your site’s PHP memory infinitely. If you try to increase it too much, you may receive an error telling you that you’ve reached its limit. If this happens and you still need more memory, you may need to upgrade your hosting plan.
Step 4: Revert To The Default Theme
If you’ve ruled out plugins, execution time, and PHP memory limits, the next place to look is your WordPress theme. Similar to plugins, themes can break or cause compatibility issues with websites, which could be the cause of a Connection Timed Out error.
To check if your theme is causing problems, connect to your site through SFTP and revert to the default theme. Then, reload your site to see if the error is still there.
Step 5: Upgrade Your Hosting Plan
If you’ve tried all the troubleshooting steps above and you’re still getting an ERR_CONNECTION_TIMED_OUT error, it’s time to reach out to your hosting provider. They can help you troubleshoot the issue more deeply and look for less common problems that might take more specialized expertise to solve.
In some cases, this error might even just mean it’s time to upgrade your hosting plan. For example, if you use shared hosting, another site could be hogging your server’s resources. Another potential cause? Your site may have simply exceeded its maximum allowed bandwidth.
Shared Hosting
Shared hosting is a web hosting plan in which multiple websites share the same server. This is typically the most affordable hosting plan, as the expense of server maintenance is distributed among multiple consumers.
Read More
A higher-tier hosting plan can help your site avoid slowdowns and downtime since it will dedicate more server resources directly to your site. It will also ensure that your site isn’t affected when other sites have traffic surges.
Ready to explore better hosting plans? DreamPress offers reliable, lightning-fast hosting solutions specifically optimized for WordPress – plus free migration for existing WordPress sites.
ERR_CONNECTION_TIMED_OUT Error FAQs
What Does The ERR_CONNECTION_TIMED_OUT Error Mean?
Getting this error indicates that a requested web page or resource took too long to respond, leading the browser to terminate the connection attempt due to a timeout.
Is The Error A Problem With My Device Or The Website I’m Trying To Visit?
It could be either. The error could be due to server-side issues, but it could also be a result of issues with your network, browser, firewall, DNS, or other client-side problems.
Does This Error Compromise My Security?
The ERR_CONNECTION_TIMED_OUT error itself doesn’t compromise your security. Still, it’s always a good idea to ensure that your browser, OS, and security software are up-to-date to protect against potential threats.
Can VPNs Cause This Error?
Yes, sometimes a VPN might cause connection issues. If you’re using a VPN and encounter this error, try disconnecting from the VPN and accessing the site again to see if that resolves the issue.
The Website I’m Trying To Access Works For Others But Not For Me. Why?
This suggests that the issue might be on your end. It could be due to localized network problems, your ISP, specific settings on your computer, or other client-side factors.
How Long Should I Wait Before Trying To Access The Website Again?
If it’s a server-side issue, it’s hard to say. You can wait a few minutes and try again. If you really need to access the site right away, you should consider reaching out to the site’s administrator or support for more information.
Get Content Delivered Straight to Your Inbox
Subscribe to our blog and receive great content just like this delivered straight to your inbox.


