How to Create a Wholesale Order Form in WordPress (3 Ways)
Want to learn how to create a wholesale order form in WordPress?
The standard WooCommerce shop layout isn’t designed for B2B purchases. That’s because B2B buyers have distinct requirements, which is why you need a wholesale order form to accommodate their needs. A wholesale form lets buyers purchase in bulk and customize the products to fit their brand.
In this article, we’ll discuss how to create a wholesale order form in WordPress so customers can buy your products in bulk faster.
Why Use a Wholesale Order Form?
If you have an online store and can fulfill orders in large quantities, you may want to set up a bulk order form with whole pricing to allow your customers to purchase in bulk.
Many B2B and dropshipping businesses are looking for wholesale prices so they can profit from selling your products as well.
Wholesale order forms simplify the ordering process for your customers. They can quickly select the products they need, specify quantities, and place orders.
WooCommerce is the most popular eCommerce platform in the market, used by millions of small and large businesses. It’s a great tool for setting up beautiful stores with product pages and managing orders.
But if you want a simple solution to accommodating resellers, then you’ll want to add a wholesale order form to your WordPress site.
You can just click the links below to jump to any method you want to use.
Method 1: How to Create Wholesale Order Forms with Wholesale Suite
In this section, we’ll be sharing our preferred method of creating wholesale order forms online. First off, you’ll need to install Wholesale Suite.
Wholesale Suite is a collection of plugins that easily add wholesale to your WooCommerce store. The beauty of it is that it works with WooCommerce, making it a viable option for online store owners, not just WordPress users.
There are three plugins that make up the suite:
Note: You can just create a wholesale order form online using only the Wholesale Order Form plugin. However, the Wholesale Suite works best as a package since it comes with many more features, so you can get your store to work just the way that you want it to.
To get started, you’ll need to download the Wholesale Order Form plugin. If you need help with that, follow our tutorial on how to install a WordPress plugin.
From there, you can go to Wholesale Order » Forms in your WordPress admin area. Then, click on the ‘Add Form’ to create a new form.
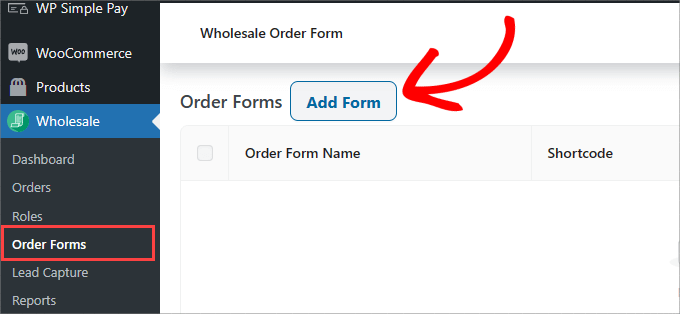
This will automatically redirect you to the Form Editor page. You’ll want to customize the ‘Order Form Table.’
This is where you can design how your products will appear to buyers on the front end.
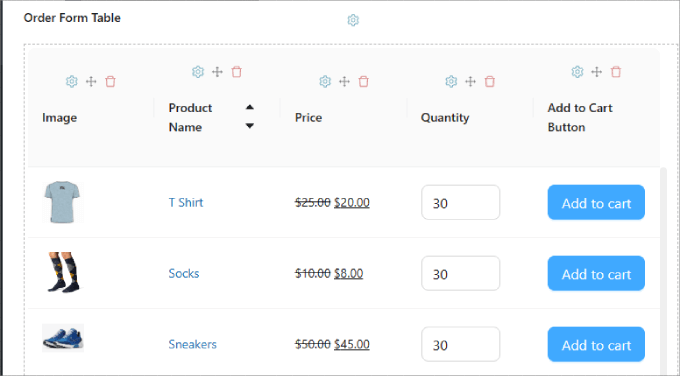
It should automatically populate the products under the ‘Order Form Table.’ If you don’t have any products in your WooCommerce store, you’ll need to add them to your store first.
If you need help with that, we recommend reading our Ultimate Guide to WooCommerce.
All you have to do is drag and drop modules from the table elements under the ‘Edit Form’ tab, located on the right panel of the editor. Then, drop them into the form.
There are tons of elements you can add, starting with ‘Header/Footer Elements.’ This includes the search input, category filter, add selected products to cart, cart subtotal, and more.
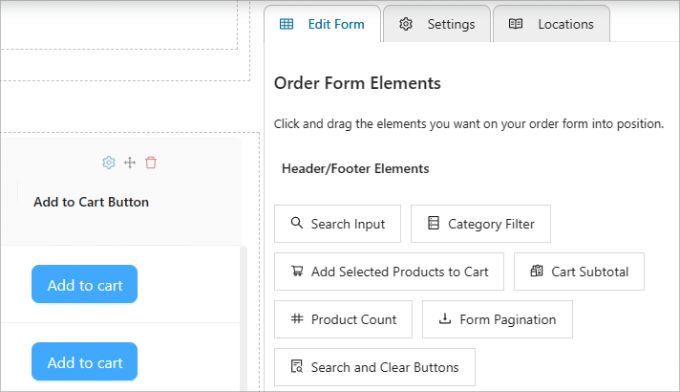
These elements are particularly useful if you have a long list of products, which can help users find what they’re looking for or see the total cost at the top or bottom of the order form.
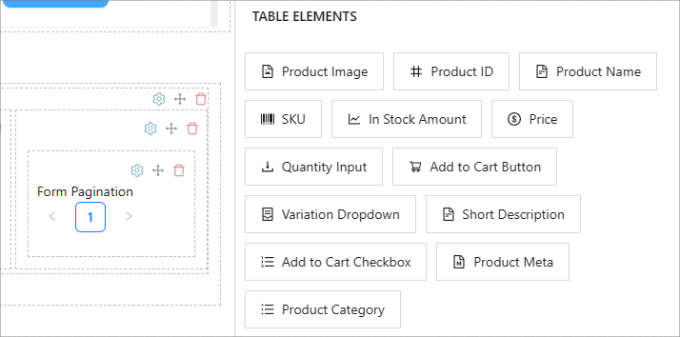
Also, you can customize table elements, everything from product images and names to prices, in-stock amounts, and more.
Of course, don’t forget to include the ‘Add to Cart Button’ for each item so shoppers can add your products to their carts.
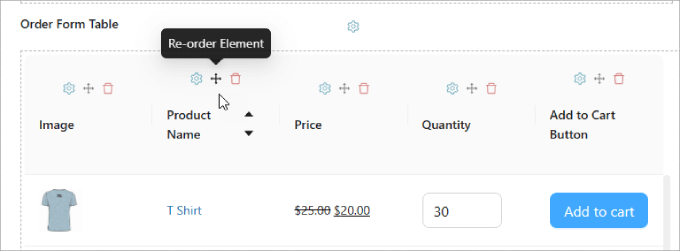
If you want to rearrange the positioning of the form columns, all you have to do is click the ‘Re-order Element icon’ at the top of each column.
This will allow you to drag the column right and left. The trash icon will allow you to delete columns as well.
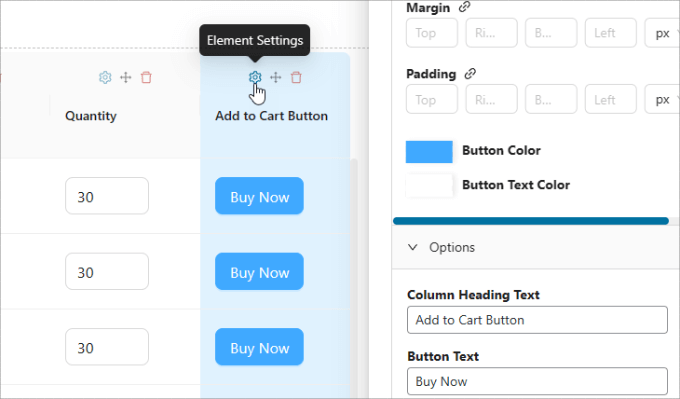
If you want to change the text or adjust the styles of any input field, just hit the ‘Element Settings’ icon, and a sidebar will appear.
For example, you can choose a different button color or change the ‘Button Text’ to ‘Buy Now.’
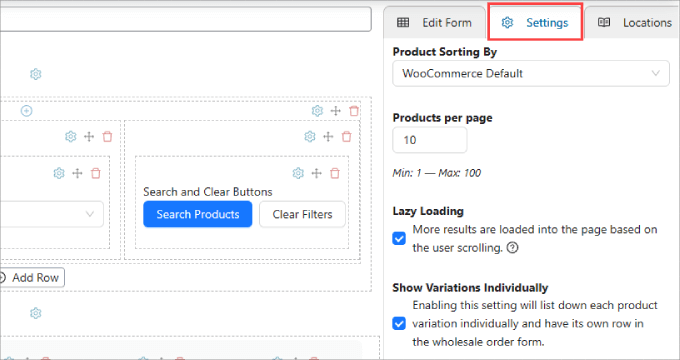
In the ‘Settings’ tab of the right side panel, you can choose to customize how you want the products to be sorted in the form, how many products are loaded per page, and whether all variations are shown individually.
The ‘Lazy Loading’ option is where more products will load as the user scrolls so that they don’t have to click on the next page to see more items.
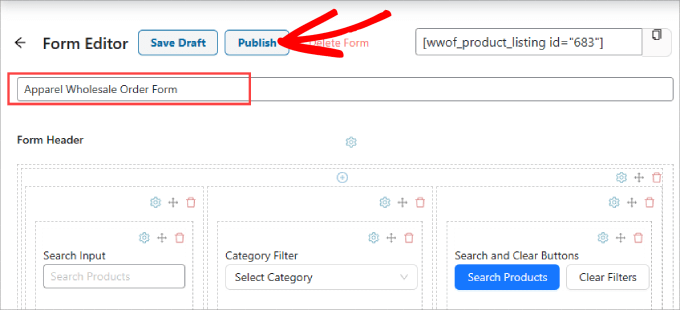
Once you’re done customizing your order form, don’t forget to give it a name.
And you can hit the ‘Publish’ button when you’re ready for it to go live.
Now, all that is left to do is to embed the order form to any post or page in your WooCommerce store. We recommend placing it on a landing page or user registration page.
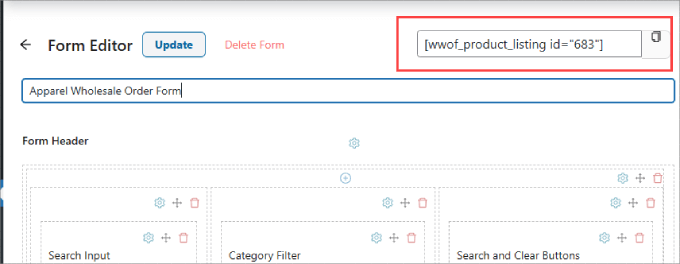
First, you’ll need to copy the shortcode at the top of the order form.
Then, head over to the page you’d like to add the form to on your site.
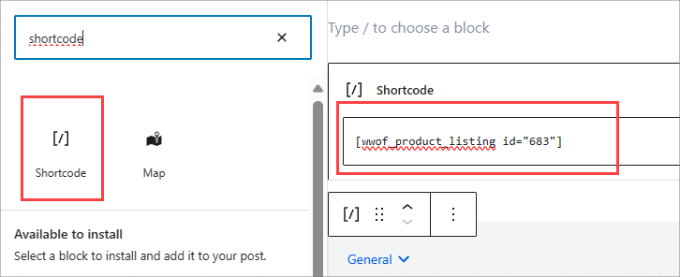
Hit the ‘+’ icon on the top left corner of the editor.

From there, add the ‘Shortcode’ widget.
And then, you can paste the shortcode for your wholesale order form.
Feel free to add any other important information to the page that could help boost conversions or give buyers more information. For example, adding shipping and delivery information or security and trust badges could help.
Go ahead and hit ‘Publish’ or ‘Update’ at the top right corner to make it live.
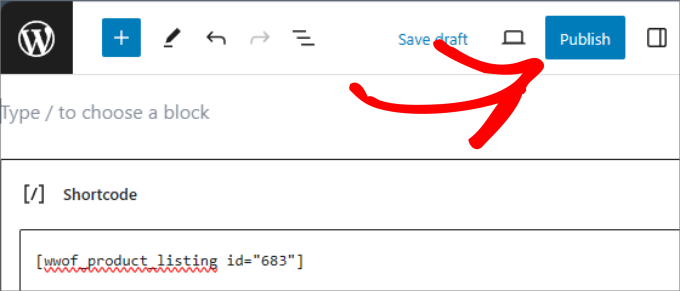
From there, you can check to ensure everything looks and runs smoothly.
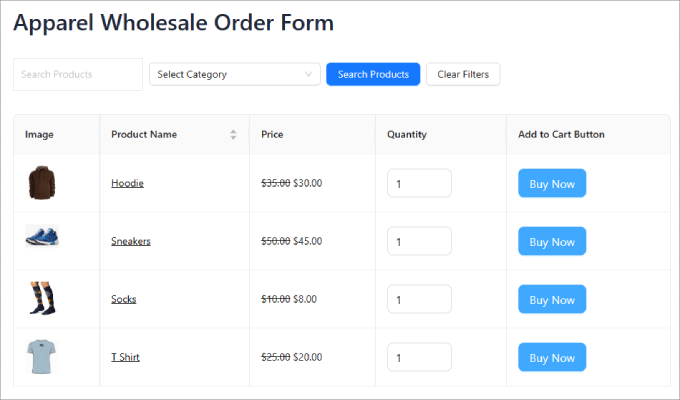
Here’s what it should look like. Unlike the other methods, this one gives users a better experience, since they can search products or filter them by category.
Method 2: How to Create Wholesale Order Forms With WPForms
WPForms is the most powerful drag-and-drop WordPress form plugin out there. It allows you to easily create all types of forms, including contact forms, payment forms, and wholesale order forms, all without any coding.
To get started, you’ll need to install the WPForms plugin. For detailed instructions, you may want to follow our step by step guide on how to install a WordPress plugin.
Note: While there is a WPForms free version, you’ll need the WPForms Pro version to use the wholesale order form template.
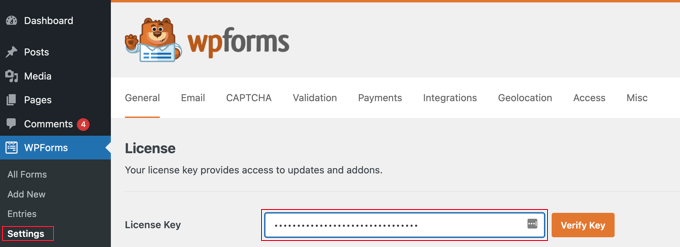
Upon activation, you need to visit the WPForms » Settings page from the WordPress admin sidebar to enter your license key.
Once you’ve done that, head over to the WPForms » Add New screen from the WordPress dashboard.
This will take you to the WPForms drag and drop builder.
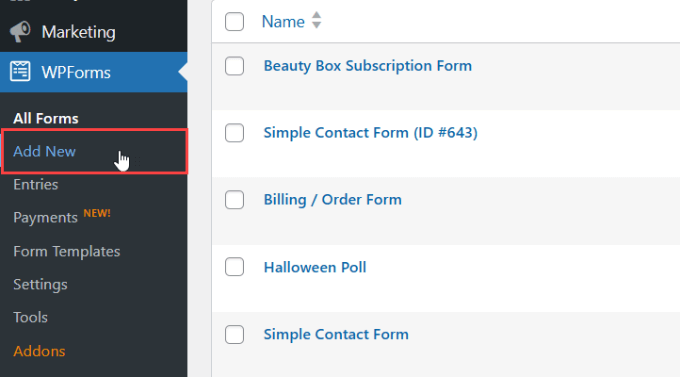
Customize your wholesale order form.
This will take you to the ‘Select a Template’ page.
Here you can begin by typing a name for your form.
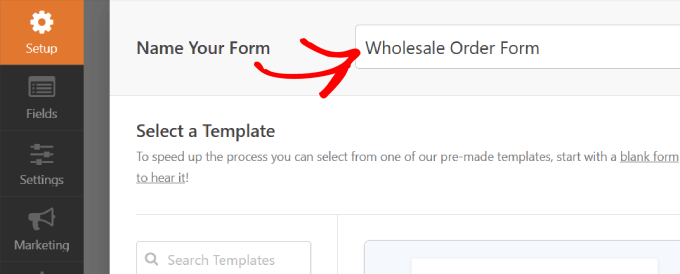
After that, you can choose the ‘Wholesale Order Form’ template that you want.
Hover over the form and click the ‘Use Template’ button.
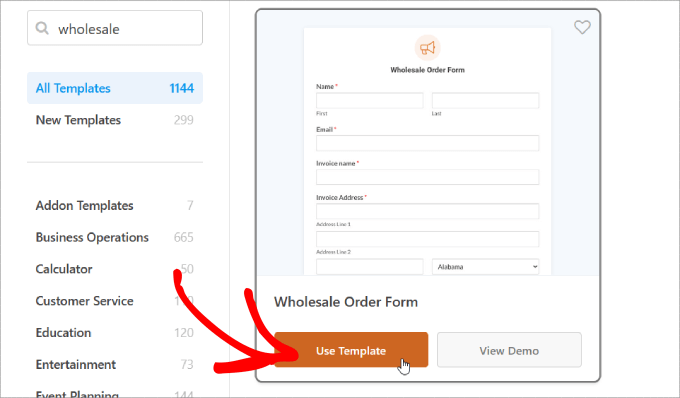
Next, the template will be generated for you, and you can start editing the fields.
Start by scrolling down on your form to the ‘Your Order’ section.
Then, you’ll want to click on one of the dropdown item fields to open its setting in the left-hand panel.
Here, you’ll be able to rename the Label to whatever your product name is and adjust the quantities and prices accordingly.
You can add more buying options by clicking the ‘+’ button to add another choice to your ‘Dropdown Items’ field.
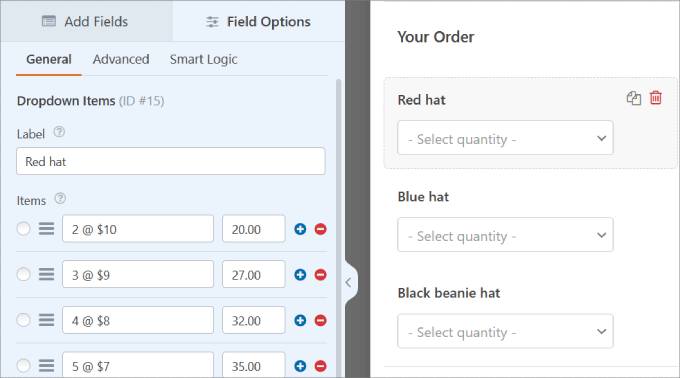
If you want to add more products, drag and drop the ‘Dropdown Items’ field to the form preview.
Then, you can edit the name, quantities, and prices the same way.
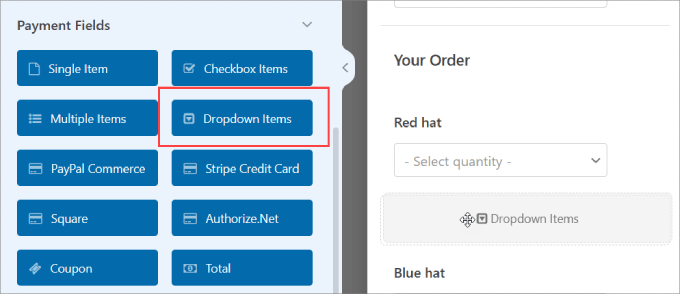
Repeat these steps for each of the dropdown item fields for all the items that you want to sell at wholesale prices.
You can add or remove fields to your order form by dragging them from the left panel to the right panel.
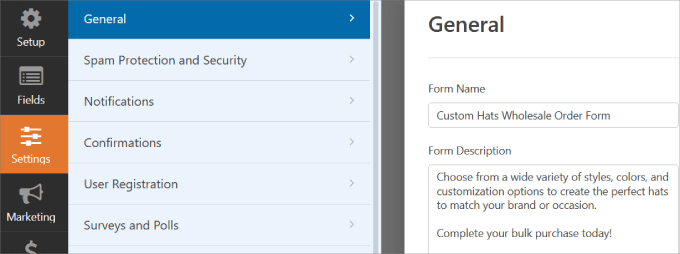
Beyond that, you can update the ‘Form Name’ and ‘Form Description’ to tell visitors what this form is and provide any important information.
To make these changes, just go to the ‘General’ tab under the Settings panel.
Configure your form notifications.
Once you’ve finished customizing the wholesale order form, you’ll want to receive notifications every time someone has completed the form. That way, you can notify your suppliers or in-house inventory team and process the orders quickly.
Emails are an easy way to send a notification whenever someone submits the online wholesale form on your site.
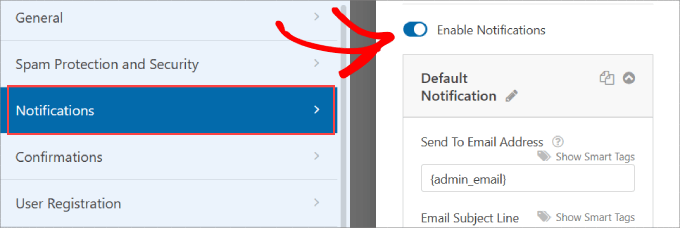
In the left side panel, click on ‘Notifications.’ From there, you’ll need to toggle the ‘Enable Notifications’ to the right.
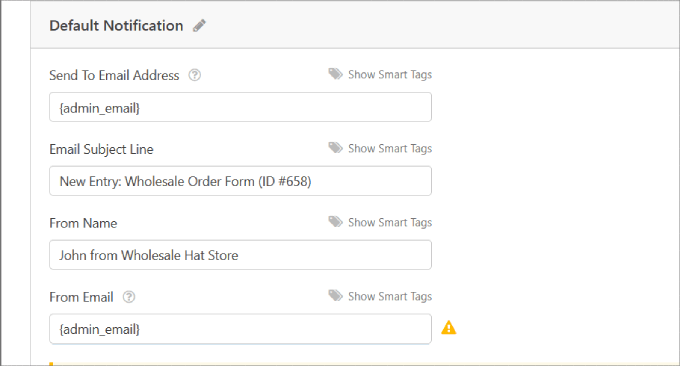
After that, you can customize the ‘Send to Email Address,’ ‘Email Subject Line,’ ‘From Name,’ ‘From Email,’ and ‘Email Message.’
WPForm automatically uses your site’s admin email by default.
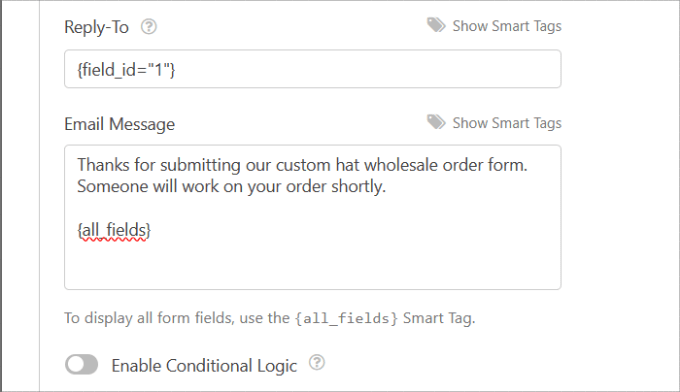
In the email message, you can let them know that you’ve received their order form and that someone will start working on it shortly.
By default, the Email Message field contacts the ‘{all_fields}’ Smart Tag, which shows all the user-entered fields and their labels from the form itself.
Once you’re done, scroll up to the top of the WPForms editor.
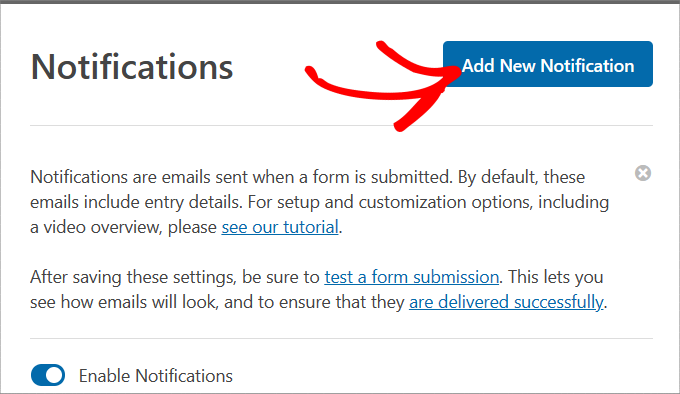
Then, hit the ‘Add New Notifications’ button.
Customize your form confirmations.
Form confirmations are shown to site visitors once they have submitted the wholesale order form on your site. They let people know that the request has gone through and provide them with any information about the next steps.
It is similar to the form notifications message, except this will appear on-screen for your user.
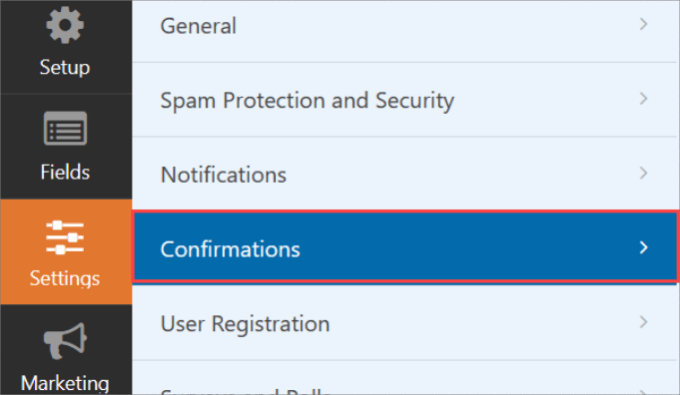
Under ‘Settings,’ you’ll need to select ‘Confirmations.’
From here, you can choose the ‘Confirmation Type.’ There are three types to choose from.
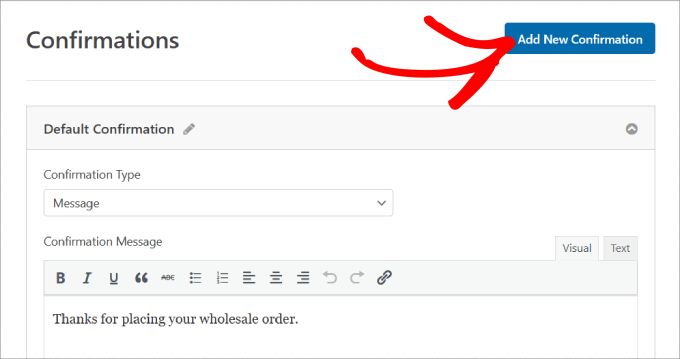
From there, you can update the ‘Confirmation Message’ to your liking.
Once you’re satisfied with the message, click the ‘Add New Confirmation’ button up top.
Set up payment settings.
If you want to make bulk order checkouts fast and easy, you’ll have to enable a payment gateway on your site.
WPForms works with Stripe, PaPal, Authorize.Net, and Square. Since you’re working with potentially huge orders, you may want to offer multiple payment methods.
For this tutorial, we’ll use Stripe. Once you have set up the Stripe addon, drag the ‘Stripe Credit Card’ field under the ‘Payment Fields’ onto the form editor.
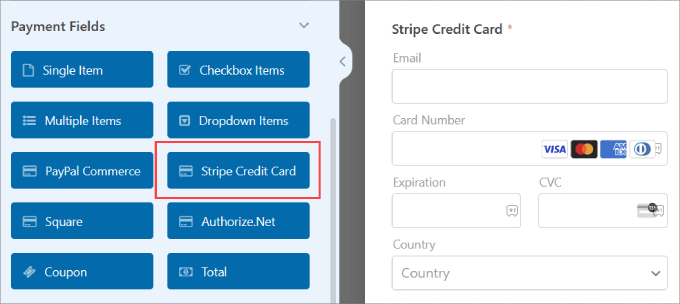
To learn more about connecting your payment method to WPForms, follow our tutorial on how to create a WordPress form with payment options.
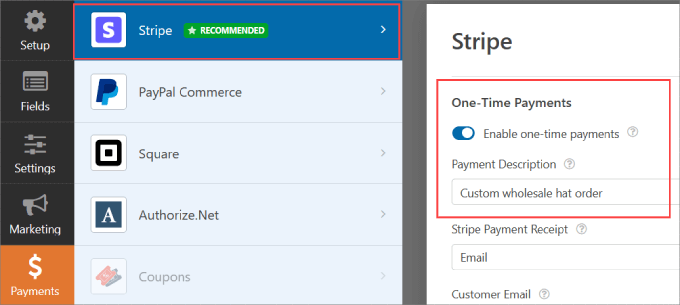
On the left panel, go to the ‘Payments’ section of the form builder. Then, you’ll need to select your payment gateway. In this case, we’re using Stripe.
Toggle the ‘Enable one-time payments’ to the right to accept payments from your form. Then, you’ll need to fill out the ‘Payment Description’ so customers know why their card was charged.
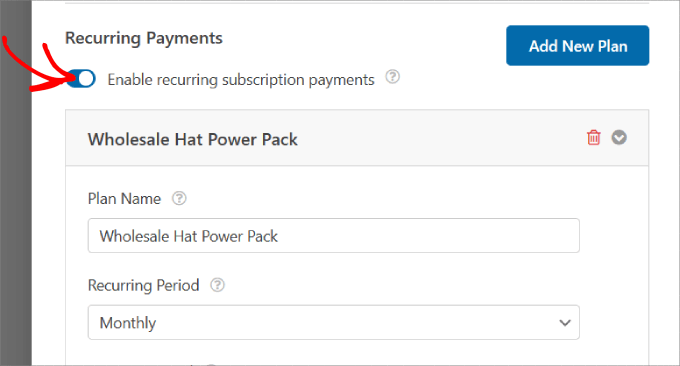
Scroll down, and you’ll also be able to ‘Enable recurring subscription payments.’ You can change the ‘Plan Name’ and set the ‘Recurring Period’ to any time period you wish.
If you have multiple subscription offerings or tiered plans, you can just hit the ‘Add New Plan.’
If you want to protect your form from spam, refer to our guide on how to block contact form spam in WordPress. That way, you won’t have to worry about fraudulent submissions.
Add the wholesale order form to your website.
After you’ve created the form, you’ll need to add it to your WordPress site. WPForms lets you quickly add your forms to any location on your website, including your pages, blog posts, and even the sidebar menu.
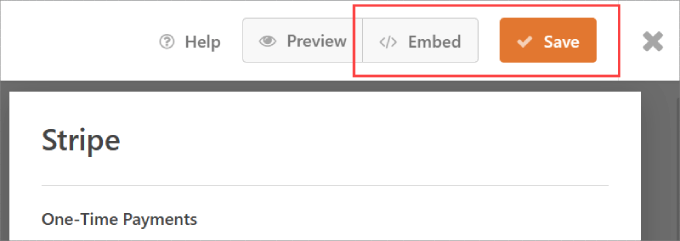
Don’t forget to hit the ‘Save’ button at the top right corner so you don’t lose any changes you’ve made. From there, also hit the ‘Embed’ button.
A pop-up window will appear asking whether you’d like to ‘Select Existing Page’ or ‘Create New Page.’ Either option will work fine, but for this tutorial, let’s click on ‘Create a New Page.’
Next, you will be asked to name your page.
Pick a name and hit the ‘Let’s Go!’ button.
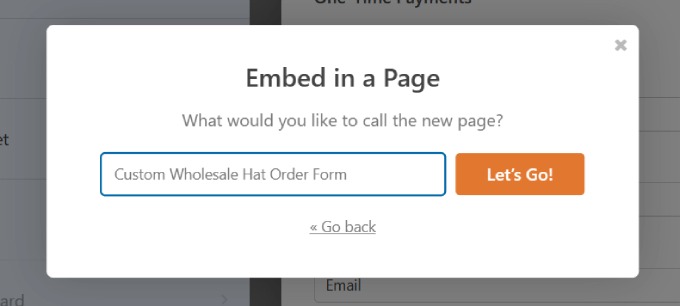
The form should automatically be embedded onto your page. Review the form and make any changes to the page.
If you click on the form, you’ll be able to edit the ‘Block’ on the right-side panel. From here, you can toggle the ‘Show Title’ and ‘Show Description’ buttons.
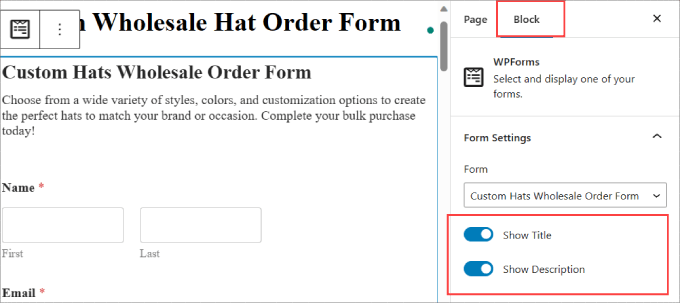
This tells your visitors what your form is all about.
Once you’ve made the necessary changes to the site, you can hit the ‘Publish’ button.
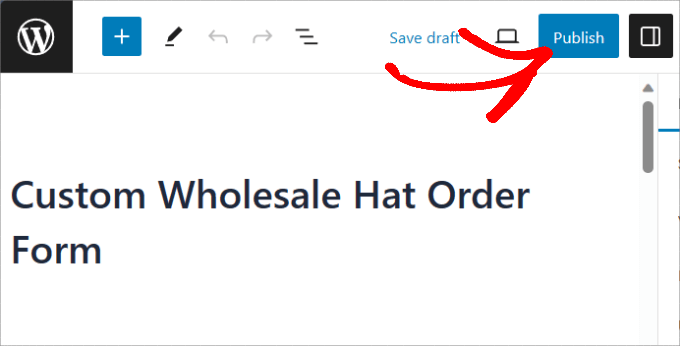
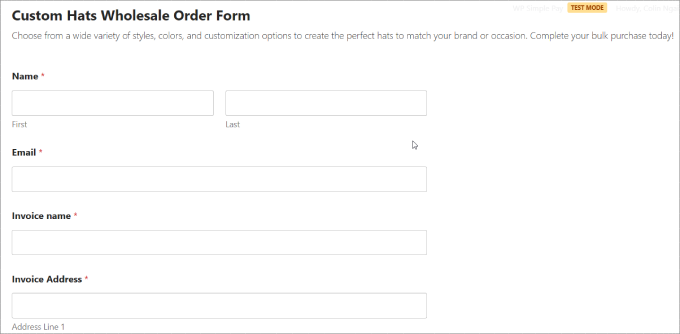
Now, you’ve successfully created a wholesale hat order form from WPForms!
Here’s what it should look like.
Method 3: How to Create Wholesale Order Forms With WP Simple Pay
If you’re looking for a plugin that accepts more than the standard options like Stripe or PayPal, you may want to consider a dedicated payment plugin app to create your wholesale order forms.
WP Simple Pay is the best Stripes payment plugin for WordPress that lets you quickly collect one-time and recurring payments directly from your site.
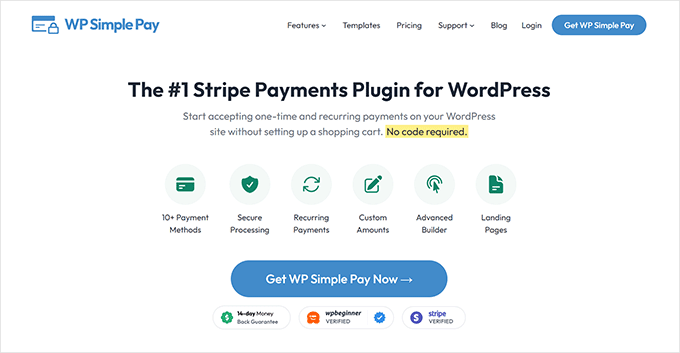
While it’s advertised as a Stripe payment plugin, it’s so much more. You can accept 10+ payment methods, including most major credit cards, Google Pay, Apple Pay, Afterpay, Alipay, Klarner, ACH Direct Debit, and more.
This is especially important for wholesale buyers since many of them will pay via ACH direct debit. But others may want ‘Buy Now Pay Later‘ options like Klarna or Afterpay.
Allowing resellers to pay in installments will make your wholesale products accessible to more businesses.
To get started, you’ll need to download the WP Simple Pay plugin. If you need help, then please see our guide on how to install a WordPress plugin.
Note: There’s also a free version of WP Simple Pay, which allows you to only accept Stripe payments. However, if you want to take other forms of payment methods or have access to premium features, we recommend the paid version.
Connect Stripe to Your Site.
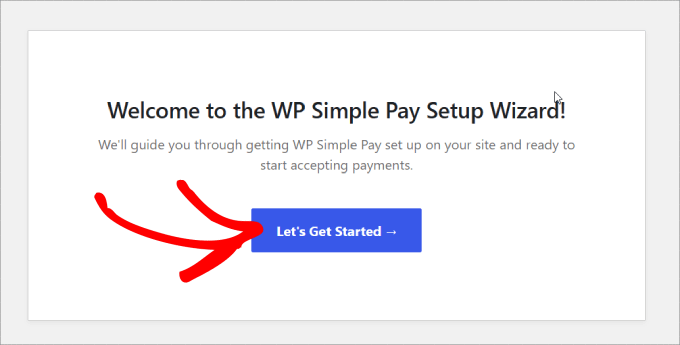
Upon activation, you’ll be directed to the setup wizard. This lets you set up your Stripe account and connect it to your website.
In the setup wizard, hit the ‘Let’s Get Started’ button.
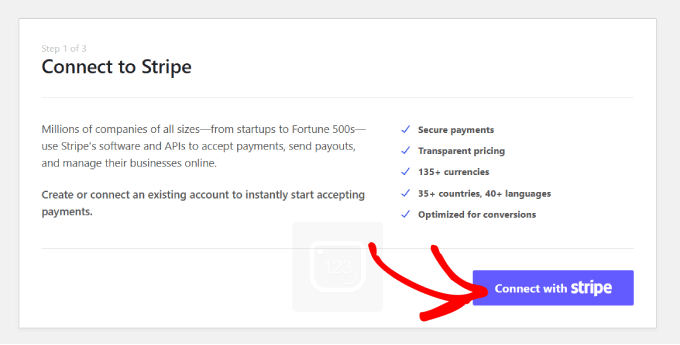
Just click on the ‘Connect with Stripe’ button, which will allow you to accept online payments from your wholesale order form.
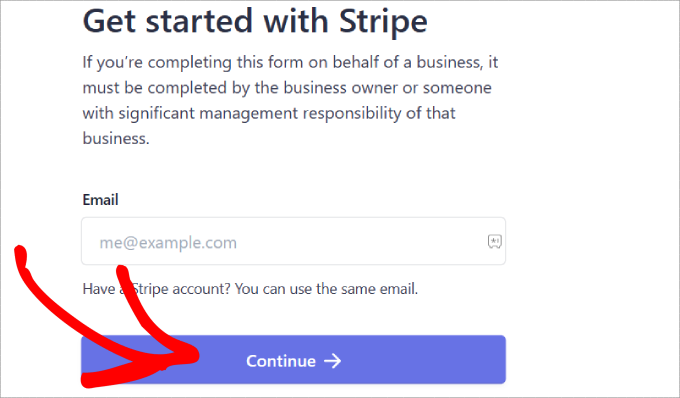
Next up, enter the email address you’ll be using for your Stripe account and then hit ‘Continue.’
If you don’t have a Stripe account, you can easily create one.
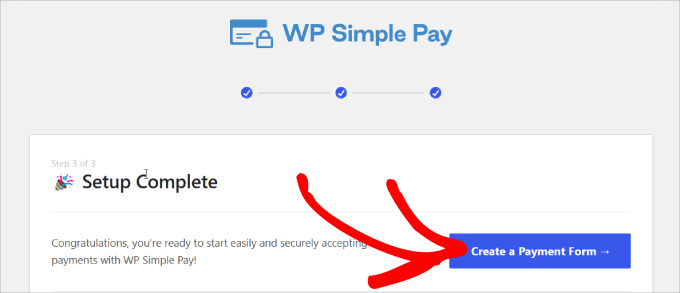
Once you’ve completed this process, you’ll be sent to a success page that says ‘Setup Complete.’
After that, you’ll need to build an order form. Go ahead and click on the ‘Create a Payment Form’ button.
Customize Your Wholesale Order Form
Now that you’ve connected your website to Stripe, you can start creating an order form.
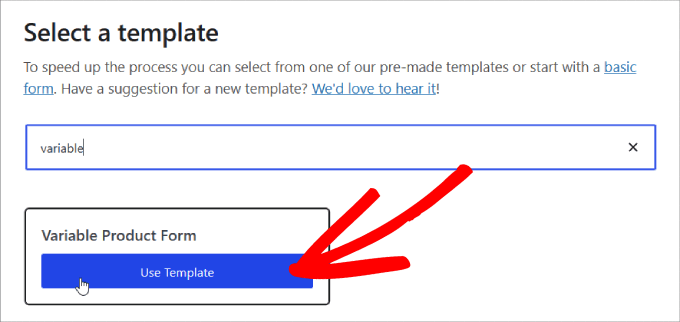
For this tutorial, you’ll want to find and select the ‘Variable Product Form’ template. This template has all the form elements you need to sell products.
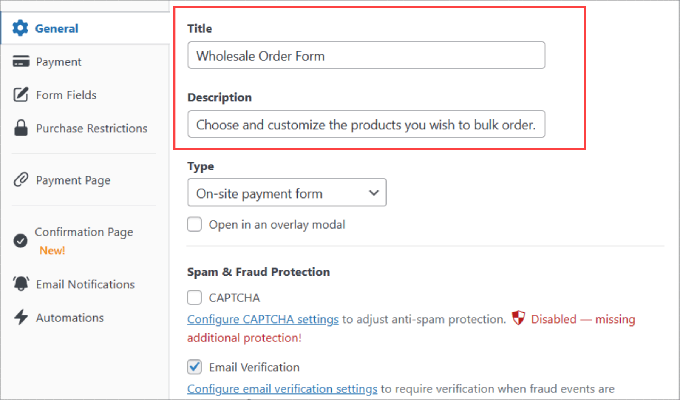
After choosing the template, you’ll be shown a payment form page where you can add a title and description.
Below that, you can also add CAPTCHA and email verification to protect against fraud or fake orders.
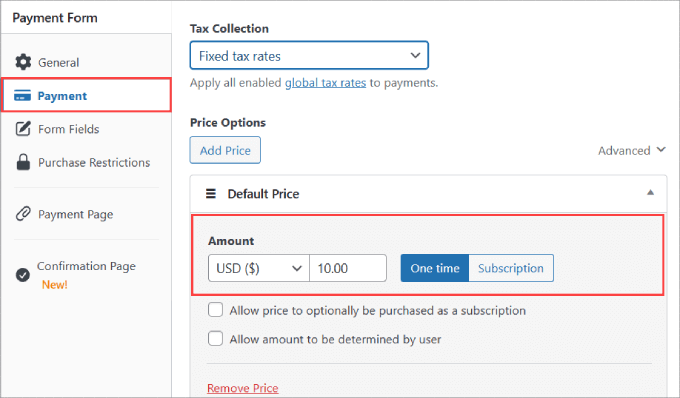
Once you’ve chosen where to send your customers, click on the ‘Payment’ option from the left panel.
From here, you’ll be able to change the currency, amount, and even pick between on-time and subscription payments.
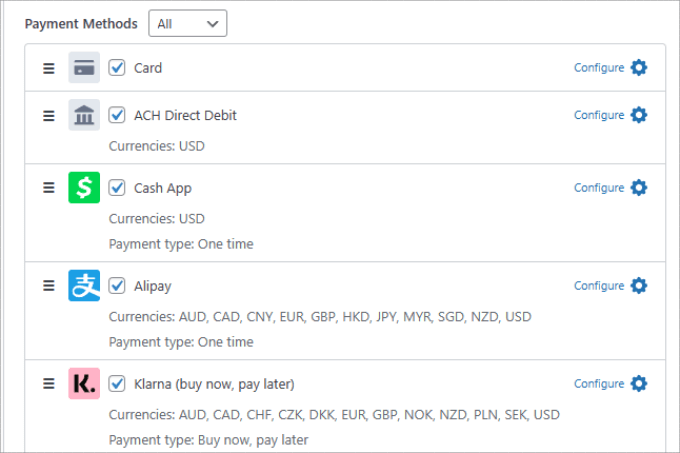
Also, scroll down to ‘Payment Methods’ and check all of the boxes of the payment options you are willing to accept.
By accepting more payment methods, you appeal to a wider audience.
In the ‘Form Field’ tab, you can add, remove, or customize any form fields you want.
The ‘Variable Product Form’ template we’ve selected has many of the important form fields you would need in an order form. This includes fields such as:
- Quantity
- Size
- Color
- Amount
- Full Name
- Email Address
- Phone Number
- Address
- Payment Methods
- Checkout Button
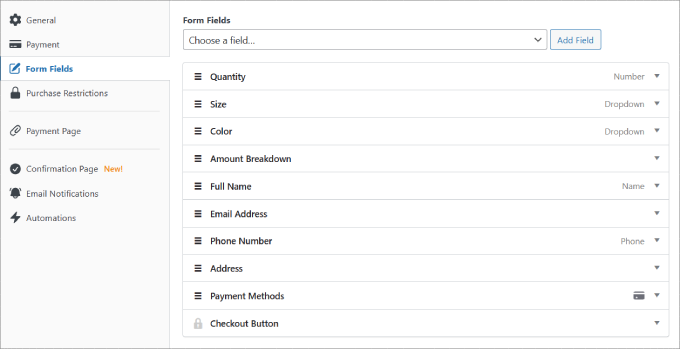
Go ahead and customize each of the fields by hitting the dropdown area until you’re satisfied.
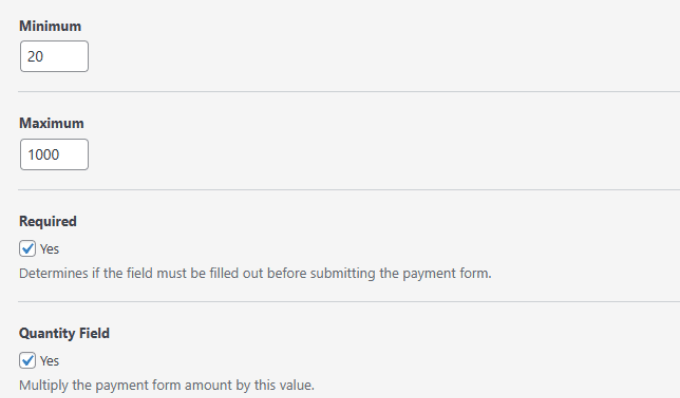
In the ‘Quantity’ field, you can specify the maximum and minimum quantity customers can buy.
In the ‘Size’ field, you can decide all the different variants or options you want. Then, separate them with a comma.
The same goes for the ‘Color’ field as well.

Keep in mind you can change any ‘Label’ name to any option you want, based on the type of product you’re selling.
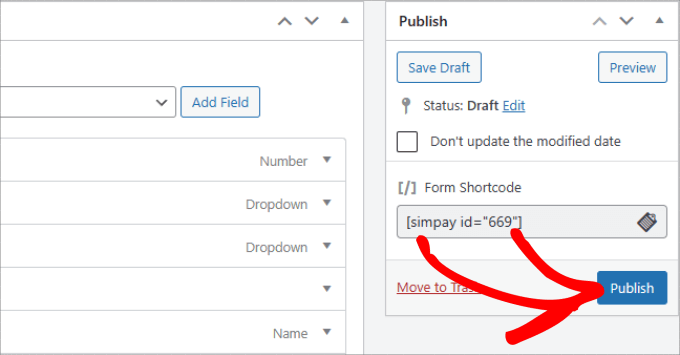
When you’re done customizing your form, don’t save hit ‘Publish’ on the right side of the page.
Add the Payment Form to a Page
Now that your wholesale order form is ready, it’s time to embed it on your site. To embed the form, simply go to the post or page where you want to publish it.
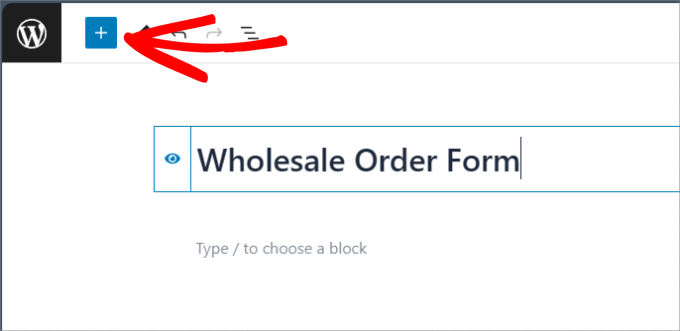
Then click the ‘+’ icon at the top left corner of the page editor.
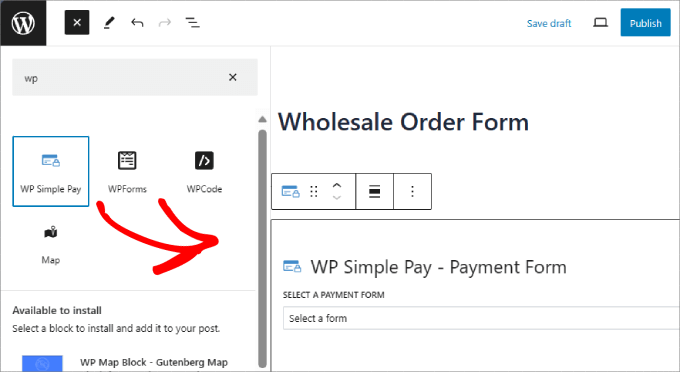
Find and select the WP Simple Pay block to add it to the page.
It should appear in the editor.
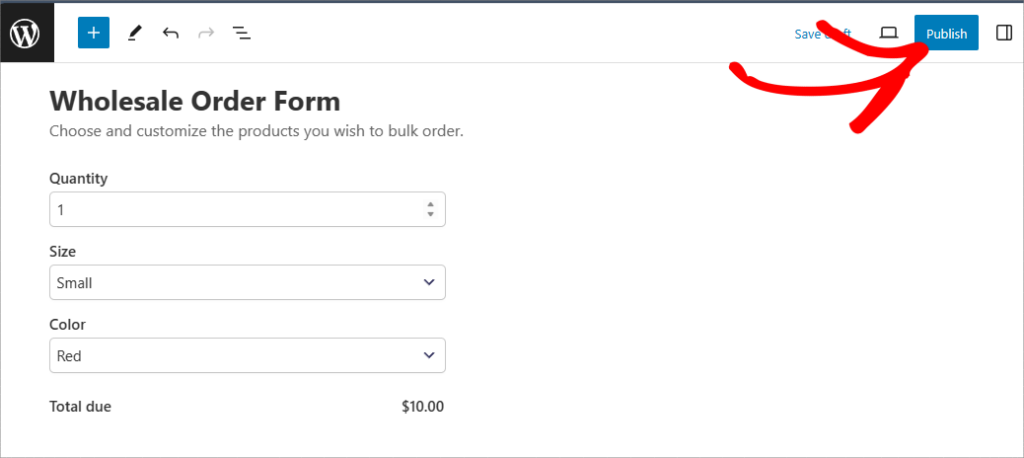
From here, you can choose the wholesale order form you’ve just created. Finally, just click the ‘Publish’ or ‘Update’ button.
That’s all there is to it!
Bonus: How to Add Wholesale Pricing in WooCommerce
Now you know how to successfully create a wholesale order form! That being said, you still may want to give distributors the option to purchase in bulk without needing to complete the form.
For example, the order form can be used for buyers looking to add branding or specify their unique requirements, while bulk purchases can be bought directly from your WooCommerce store.
In that case, you’ll be using the Wholesale Suite plugin. Head over to WooCommerce » All Products. You can edit any product of your choice. Under the ‘Product data’ section, you can set the ‘Regular price.’
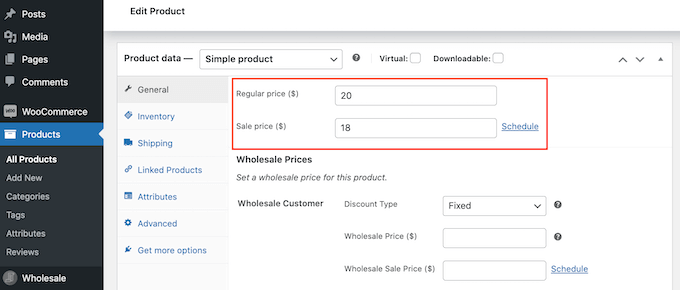
From that, you can scroll down to the ‘Wholesale Prices’ section and open the ‘Discount Type’ dropdown.
After that, you can now select the ‘Discount Type,’ ‘Discount (%),’ and the ‘Wholesale Price ($)’ to offer.
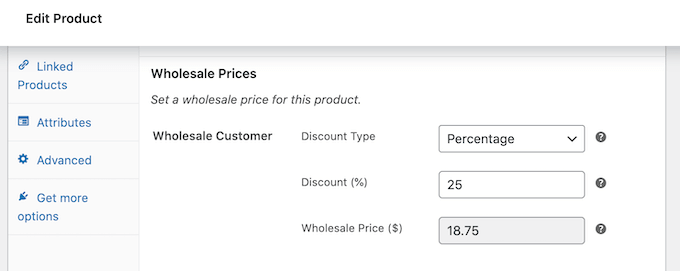
On the same page, you’ll even be able to set the minimum quantity needed to receive wholesale pricing.
For more details, you can see our in-depth tutorial on how to add wholesale pricing in WooCommerce.
We hope this article helped you learn how to create a wholesale order form. You may want to read our post on the best WooCommerce plugins for your store or check out the best WooCommerce dropshipping plugins.
If you liked this article, then please subscribe to our YouTube Channel for WordPress video tutorials. You can also find us on Twitter and Facebook.


