How To Use Google Tag Manager

Do you know how visitors interact with your website?
Understanding which pages people frequent, how long they’re there, and what pages they click can help you understand what’s working and what isn’t.
But collecting (and analyzing) all that data can feel like a mountain to climb if you don’t have the experience. And on top of everything else you’re trying to manage in your business, who has the time?
That’s where Google Tag Manager (GTM) comes in.
GTM provides a free and beginner-friendly way for marketers (or anyone else who isn’t a web developer) to create and manage tags for their websites without knowing how to code. Once you’ve mastered GTM, you can set up tags with specific triggers and variables to collect data on a wide range of visitor behaviors, even as far down as nuanced movements like specific clicks and scrolls.
In turn, that data can help you optimize your site to boost sales, capture more leads, and create a more inviting (and customer-friendly) experience.
Ready to learn how to use GTM? Let’s get into it.
What Is Google Tag Manager?
GTM is a free tool that allows you to install, store, update, and manage marketing tags without needing to know how to modify your website code. Marketing tags are code snippets that collect data to track user actions. For example, Google Analytics tags track user interactions on your site, AdWords tags help track ad performance, and heat map tools track user engagement across different parts of a webpage.
Google Analytics
Google Analytics is a web analytics service offered by Google that tracks and reports website traffic. It is currently a program within the Google Marketing Platform brand.
Read More
Platforms like Google Analytics require tags to collect the data they need. However, if you tried to place them within your website’s code yourself, it may open your site up to a lot of risks (like forgotten, lost, or broken tags and other web elements). GTM eliminates that risk by installing, deploying, and managing tags from within its software instead of your site’s code. This also makes it possible for people who don’t know how to code to manage tags – bridging the gap between developers and digital marketers, analysts, and other stakeholders.
How Google Tag Manager Works
Google Tag Manager operates through a container tag that you place on your website. Once installed, the container acts as a middleman between your site and the tracking tools you want to implement. Instead of adding each tracking code directly to your site, you add them to the GTM container via the GTM interface. The container holds all the tags you want to implement and fires them on your site based on triggers you define, such as clicks, form submissions, or page loads.
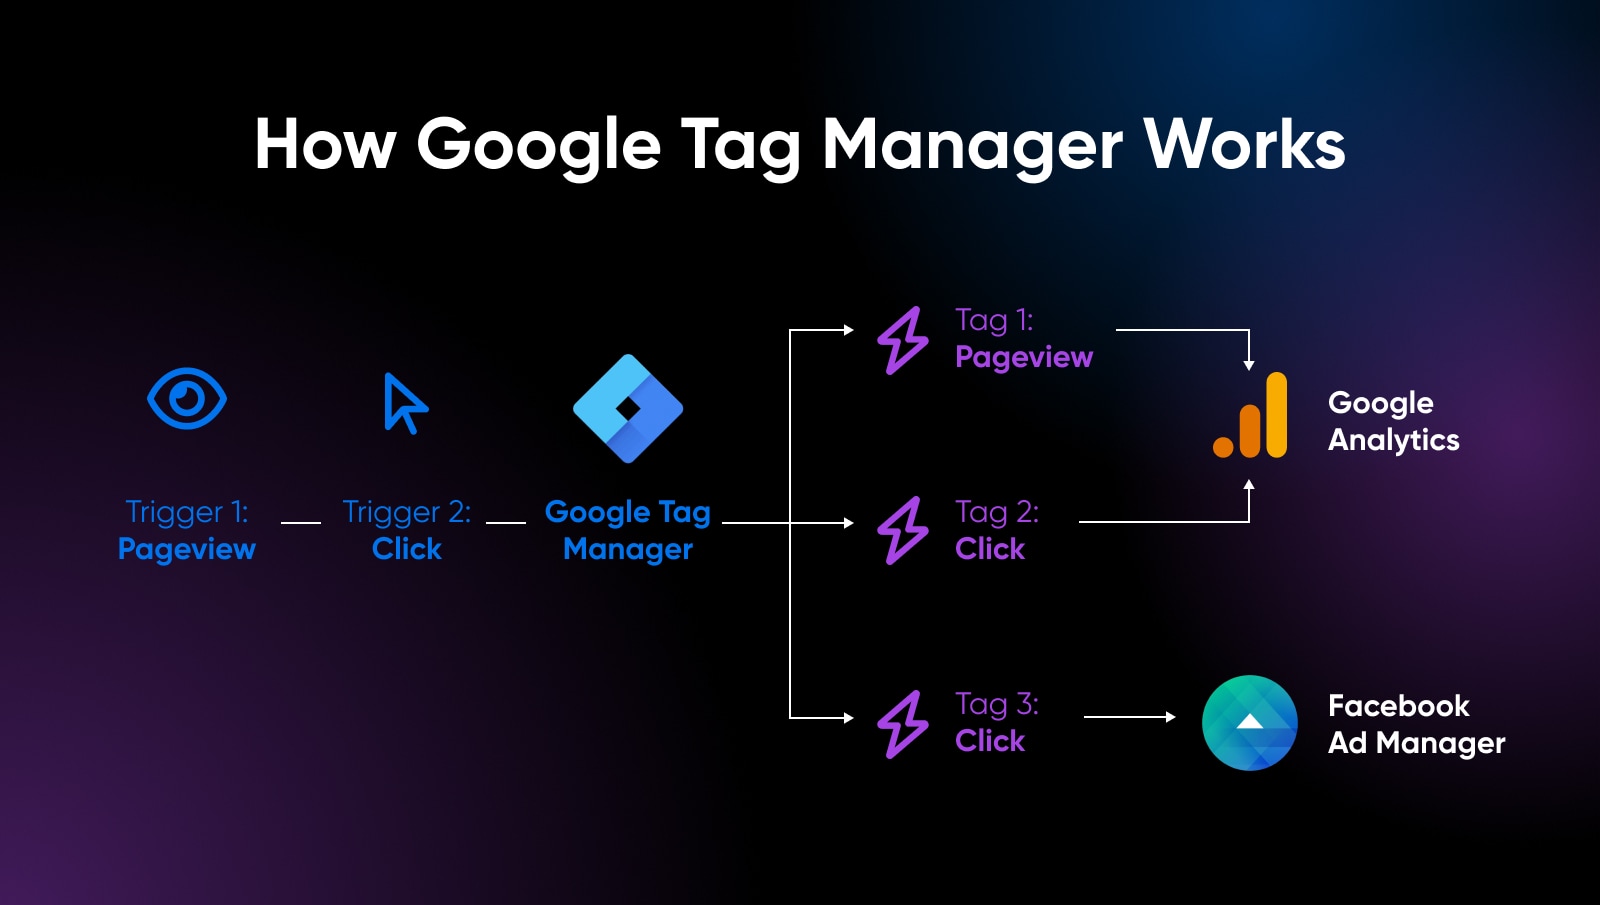
This not only streamlines the process of managing multiple tags, but also gives you control over when and how the tags are triggered. With GTM, you can set detailed rules and conditions for each tag, ensuring that they collect data precisely as needed. This level of customization is crucial for data accuracy and aligning with user privacy and consent regulations.
During the process, Google Tag Manager functions by bringing together three critical components: Tags, Triggers, and Variables. Each plays a unique role in the process of collecting and sending information. To understand how GTM operates, you need to know these elements and how they interact with each other.
Understanding Tags
Tags are the heart of Google Tag Manager. They are snippets of code or tracking pixels from third-party tools (like Google Analytics, Facebook Pixel, etc.) that collect and send information from your website to another data collection system. Each tag is designed to gather specific types of data: page views, form submissions, e-commerce transactions, etc. GTM serves as a centralized platform where you can manage all these tags without having to manually add them to your website’s code.
When you set up a tag in GTM, you specify when and where the tag should fire on your site, which is controlled by Triggers.
Examples Of Tags
- Google Analytics 4 Configuration Tag: Sets up tracking for the latest version of Google Analytics, capturing a wide range of user interactions.
- Google Ads Conversion Tracking Tag: Tracks conversions from Google Ads campaigns, such as form submissions or purchases.
- Facebook/Meta Pixel Tag: Tracks user behavior and conversions for Facebook ad campaigns.
- Hotjar Tracking Tag: Records user behavior and creates heatmaps for user interaction analysis.
- LinkedIn Insight Tag: Tracks conversions, website demographics, and retargeting for LinkedIn ad campaigns.
Get Content Delivered Straight to Your Inbox
Subscribe to our blog and receive great content just like this delivered straight to your inbox.
Understanding Triggers
Triggers are the conditions you set for when a tag should execute its code on your website. Essentially, they tell GTM when to fire a tag.
You can create triggers based on various user interactions or behaviors, such as clicks, form submissions, pageviews, or even when a user has scrolled to a certain point on a webpage.
Triggers can be very specific, allowing you to target certain elements on a page, or they can be broad, applying to multiple scenarios. By combining different triggers, you can precisely control your tags, ensuring that they fire only under the right circumstances to collect the correct data.
Examples Of Triggers
- Page View Trigger: Fires tags when a user views a page. It can be set for all pages or specific ones.
- Click Triggers: Fires tags when a user clicks on an element. It can be further specified for all clicks, some clicks, just links, or just buttons.
- Form Submission Trigger: Activates when a user submits a form on your website.
- Scroll Depth Trigger: Fires tags based on how far down a user scrolls on a page.
- Timer Trigger: Fires tags at set time intervals or after a certain amount of time has passed.
![]()
Understanding Variables
Variables are the third pillar of Google Tag Manager, providing additional flexibility and precision for your data collection. They are named placeholders for values that change, such as a URL, a form input, or a click ID. Variables can be used both in triggers and tags to define and capture specific data that you want to use. For example, a variable can be used to capture the URL of a page when a user submits a form, allowing you to know which page was the source of the conversion.
Variables can make triggers more intelligent. For example, instead of triggering a tag on all clicks, you can use a variable to specify that it should only fire when a user clicks on a button with a specific label or ID. This level of detail ensures that tags fire only in the right context, enhancing the accuracy of your data collection.
Examples Of Variables
- URL Variable: Captures and stores the URL of the current page.
- Referrer Variable: Holds the URL of the referring website.
- Click Text Variable: Stores the text of the clicked element.
- Form Element Variable: Captures the values entered into a form.
- First Party Cookie Variable: Reads the value of a specified first-party cookie.
Why Use Google Tag Manager? (Benefits)
Google Tag Manager has been a game changer for marketers and other non-developers who need to manage tags on their websites and mobile apps. Here are some of its main benefits.
Simplified Tag Management
GTM streamlines the process of adding and updating tags. Without GTM, you would have to manually code each tag into your website, which can be time-consuming and prone to errors. GTM’s user-friendly interface allows you to manage all your tags in one place, reducing the need for complex coding and simplifying the overall tag management process.
No Need To Rely On Developers For Every Change
One of the most significant benefits of GTM is the independence it offers marketers from the IT or web development team. Once the GTM container code is added to your site, marketers can add, edit, and deactivate tags without any further code changes to the website. This speeds up the process and allows for quick implementation of tracking tags, which is especially beneficial in fast-paced marketing environments.
Improved Site Speed
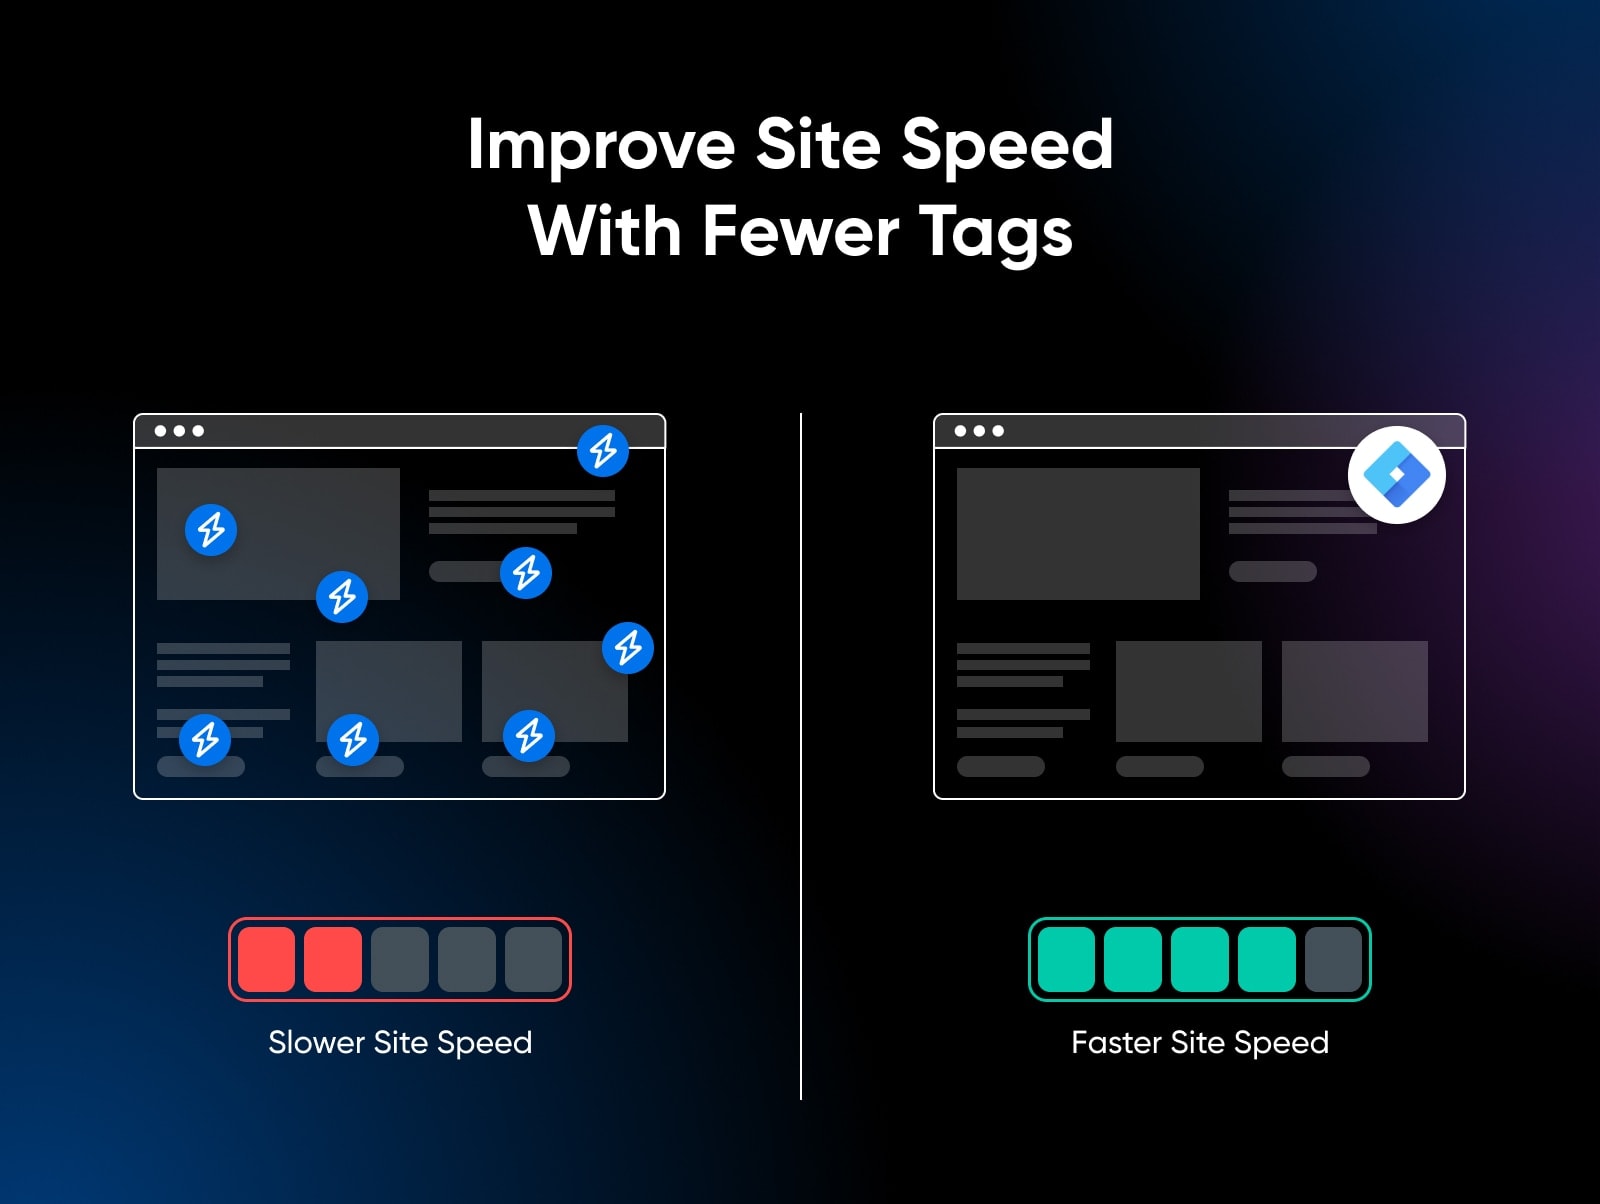
Too many tags can slow down your website, affecting user experience and SEO. GTM helps in this aspect by allowing tags to fire asynchronously. This means that tags can load independently without affecting the loading time of other elements on the page. The result is a faster website and a better experience for your visitors.
Better Data Accuracy
GTM’s precise triggering options ensure that tags fire only under the right conditions. This precision helps you collect the most accurate data possible. GTM also offers built-in error checking and debugging tools, which help ensure that your tags are working correctly before they go live.
Version Control And User Permissions
Every change made in GTM is saved as a new version. This means you can easily roll back to a previous version if something goes wrong with a new implementation. GTM also allows you to set user permissions, giving you control over who can view, edit, or publish tags. This is particularly useful for larger teams and agencies.
Built-In Testing And Debugging Tools
GTM comes with a robust set of testing and debugging tools, including a preview mode that allows you to test tags on your site before publishing them. This helps you catch any issues early and ensures that your data collection is accurate.
Debugging
Debugging is the process of finding and fixing errors in software. This process can involve looking for defective code that causes issues or overlooked human errors.
Read More
Compliance With Data Privacy And Consent Requirements
With increasing emphasis on user privacy and data protection laws like GDPR and CCPA, GTM aids in compliance. It allows for easy implementation of consent management platforms and ensures that tags only fire when consent is given, respecting user preferences and legal requirements.
Cross-Platform Tracking
GTM is not just limited to websites: it also supports mobile apps. You can use it to manage tags in Android and iOS apps, providing a unified tag management solution across web and mobile platforms.
Cost-Effectiveness
Finally, Google Tag Manager is a free tool. Despite its powerful features, there are no direct costs associated with using the basic version of GTM, making it accessible for businesses of all sizes.
How To Add Google Tag Manager To Your Site
1. To set up Google Tag Manager, log in to your Google account, go to Tag Manager, and click Create Account.
2. Enter your “Account Name.” Google recommends that a business only have one Tag Manager account, even if it has multiple websites, so your company name can be your account name. At this page, you’ll also select your country.
3. Enter your “Container Name.” The container is the piece of code you’ll add to your site to make Google Tag Manager work, and you’ll typically create a unique container for each website, so your container name can be your site name or URL.
4. Select your “Target Platform”. For websites, choose Web.
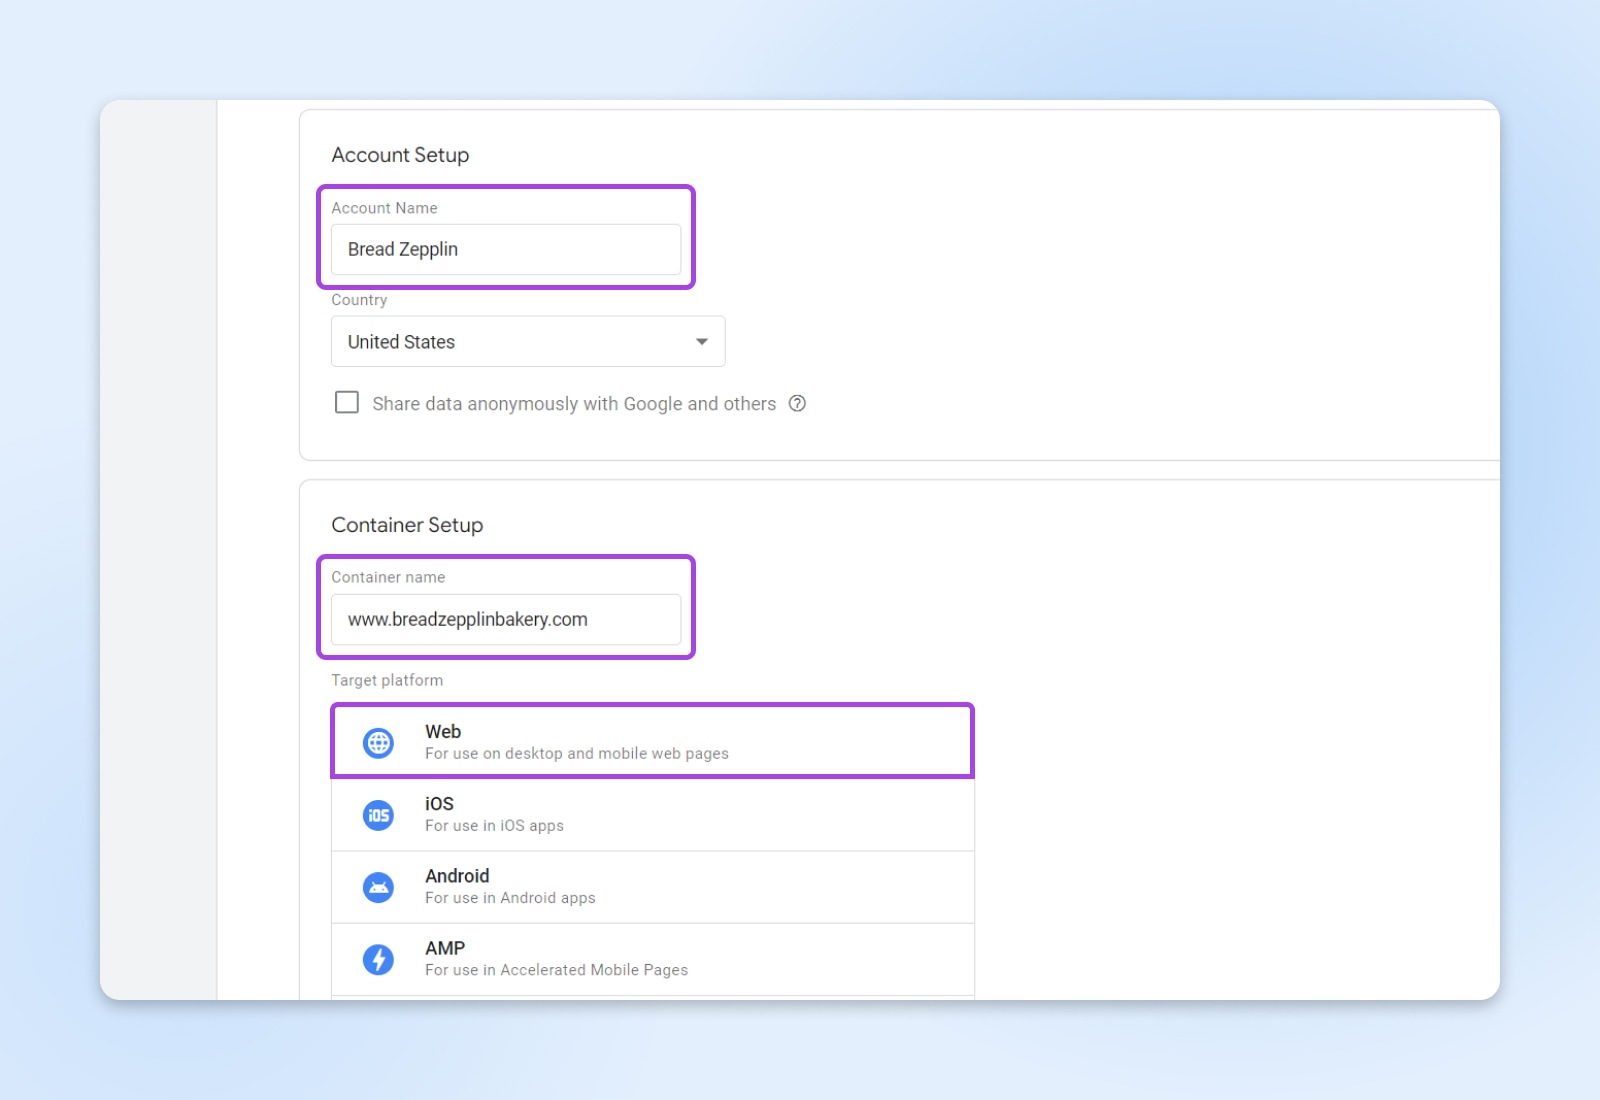
5. Click Create. This will finish your Tag Manager account and create your first container. You’ll see two pop-ups.
The first one is the Google Tag Manager Terms of Service Agreement. You’ll need to check the box at the bottom of the page and click the Yes at the top right corner to accept the terms.

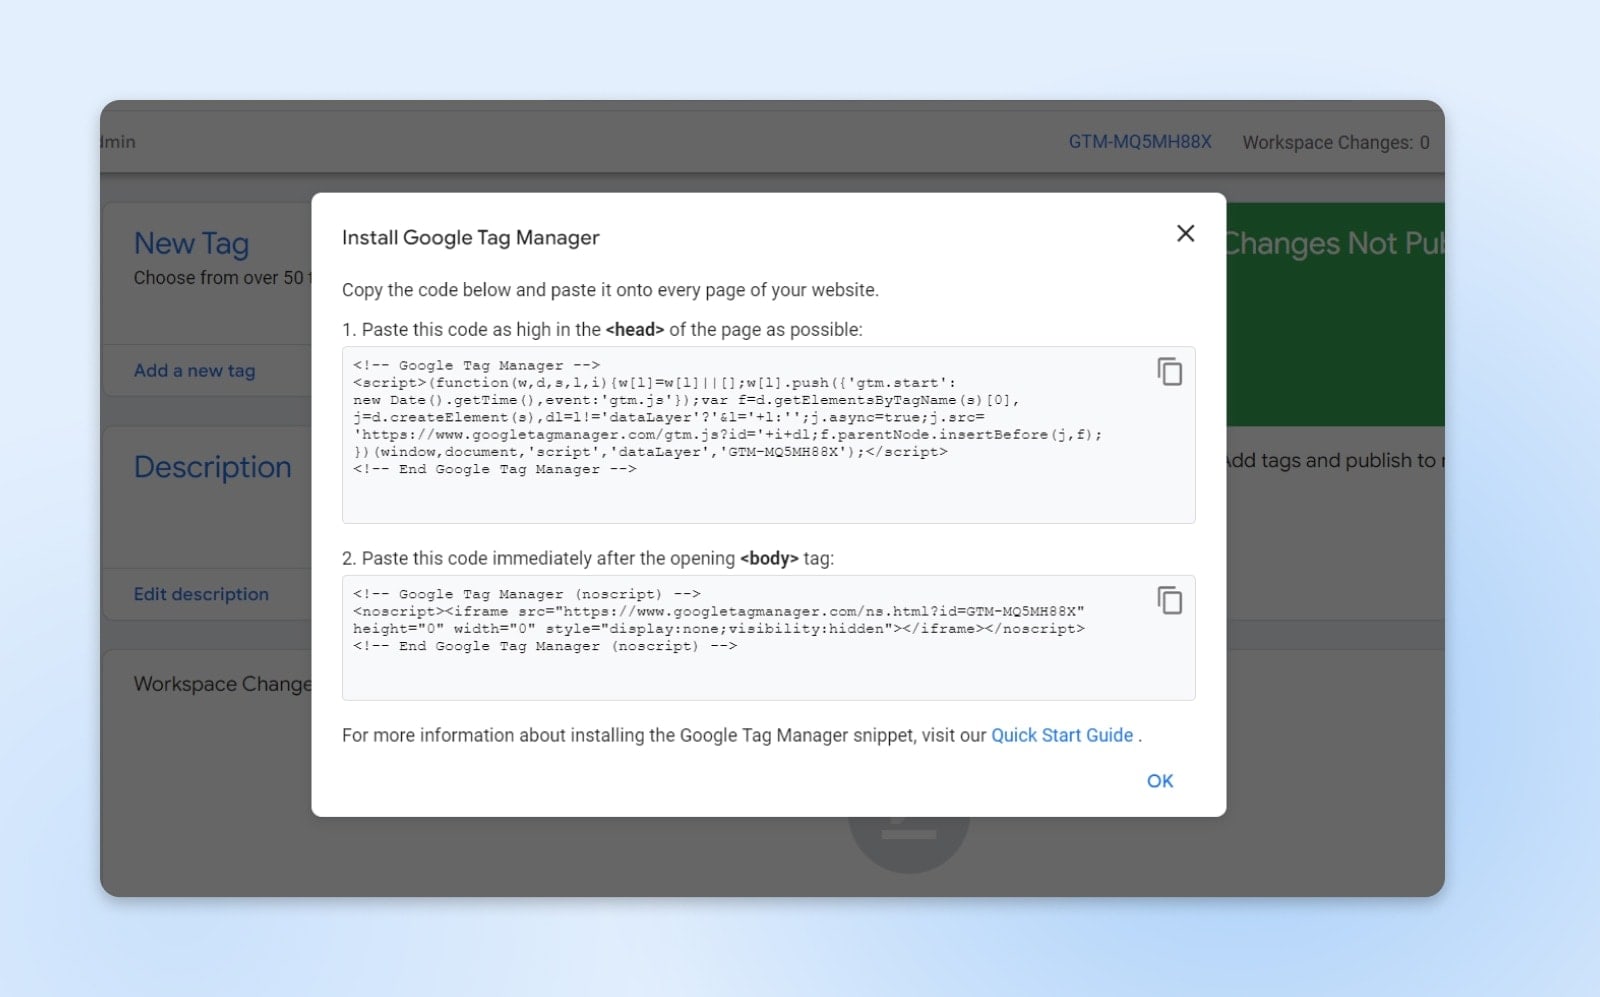
The second is a how-to guide with the code snippets you need to install your first container on your site. It explains where to copy and paste the two snippets (the first one as high up in the <head> of the page as possible, and the second one immediately after the opening <body> tag). It also links to Google’s quick start guide in case you need more help.
How To Add A Tag
You can add more than 50 different types of tags, but we’ll walk you through the process of adding a Google Analytics 4 Tag, one of the most commonly used tags. Before following the steps below, make sure to remove any Google Analytics code from your website (otherwise, once you add the GA4 tag, your analytics may register double hits).
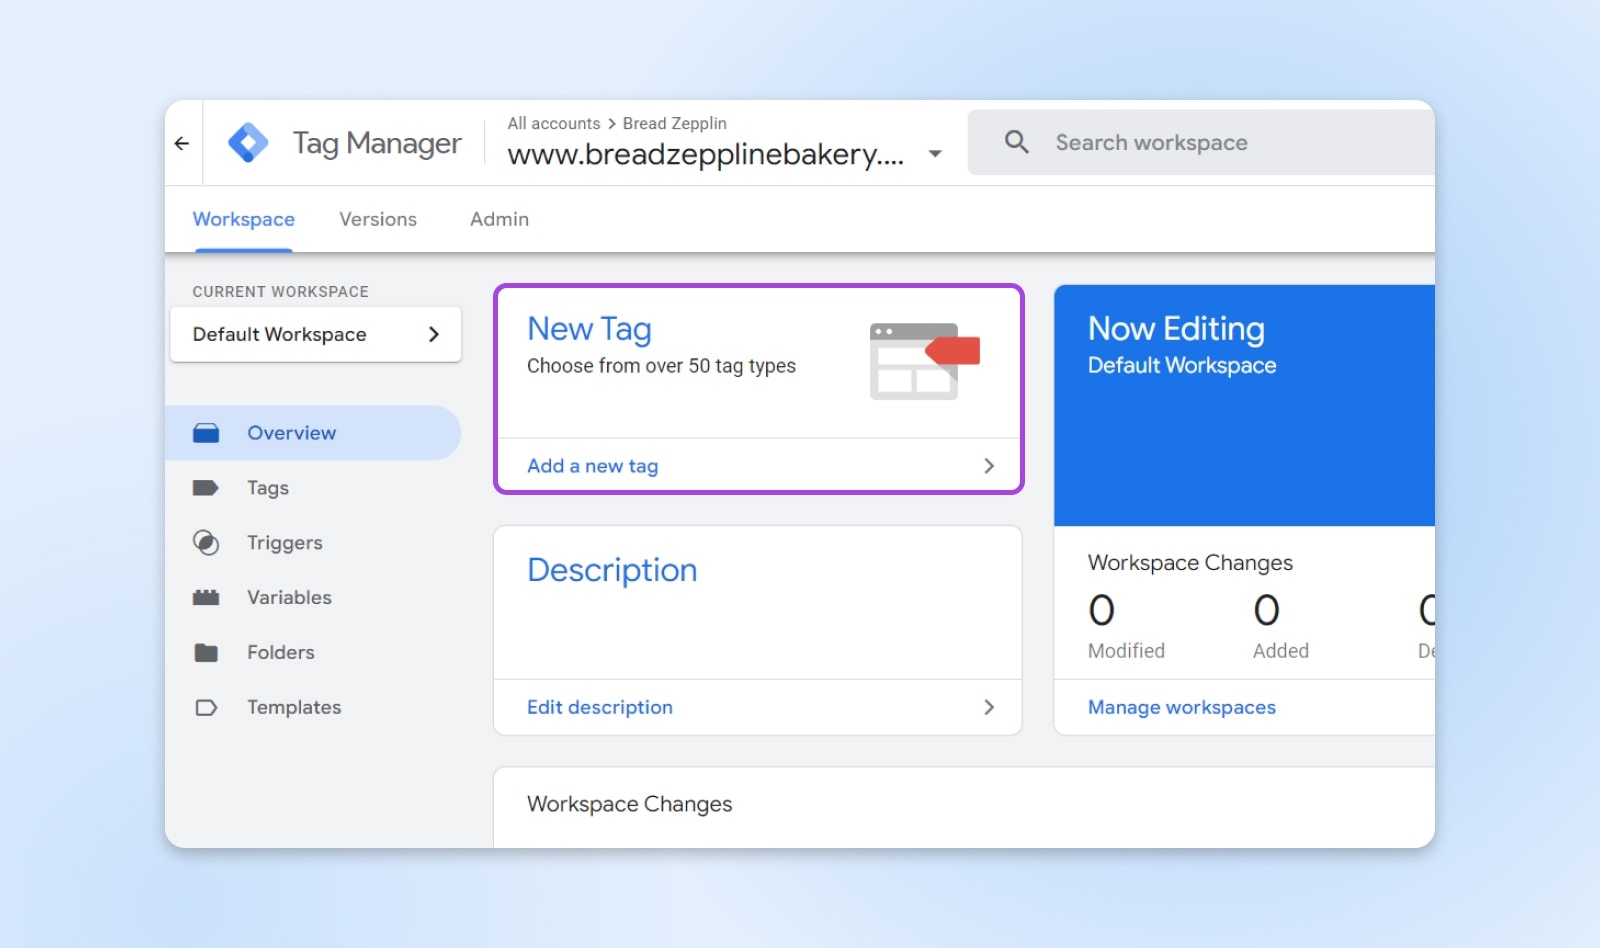
1. Log in to your Google Tag Manager account. Click the Container name. Once on your GTM dashboard, click New Tag or Add New Tag.
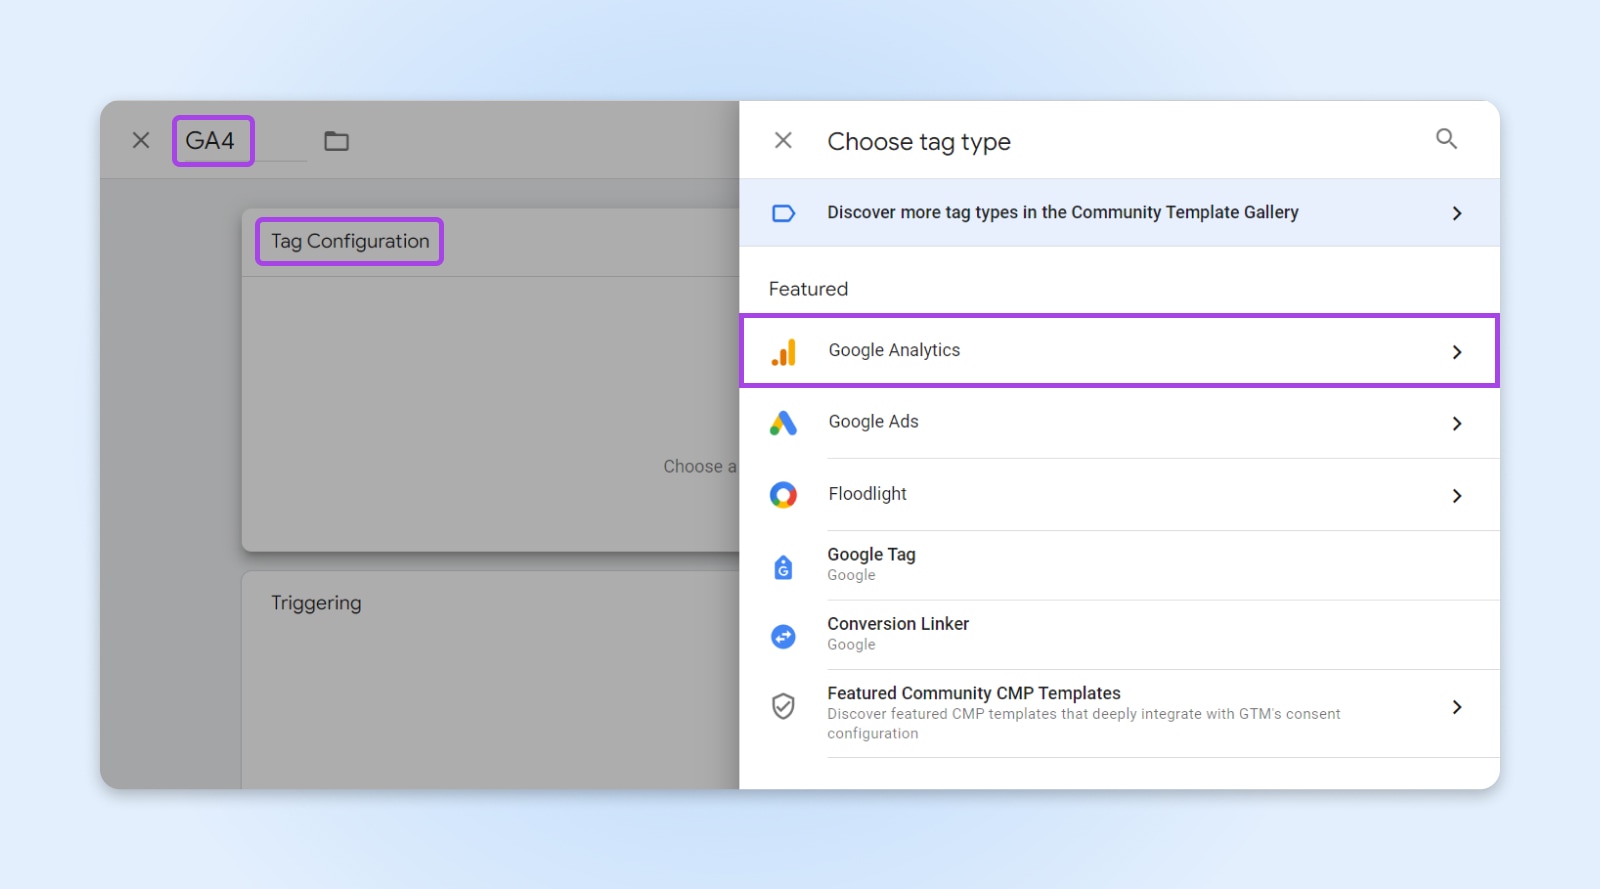
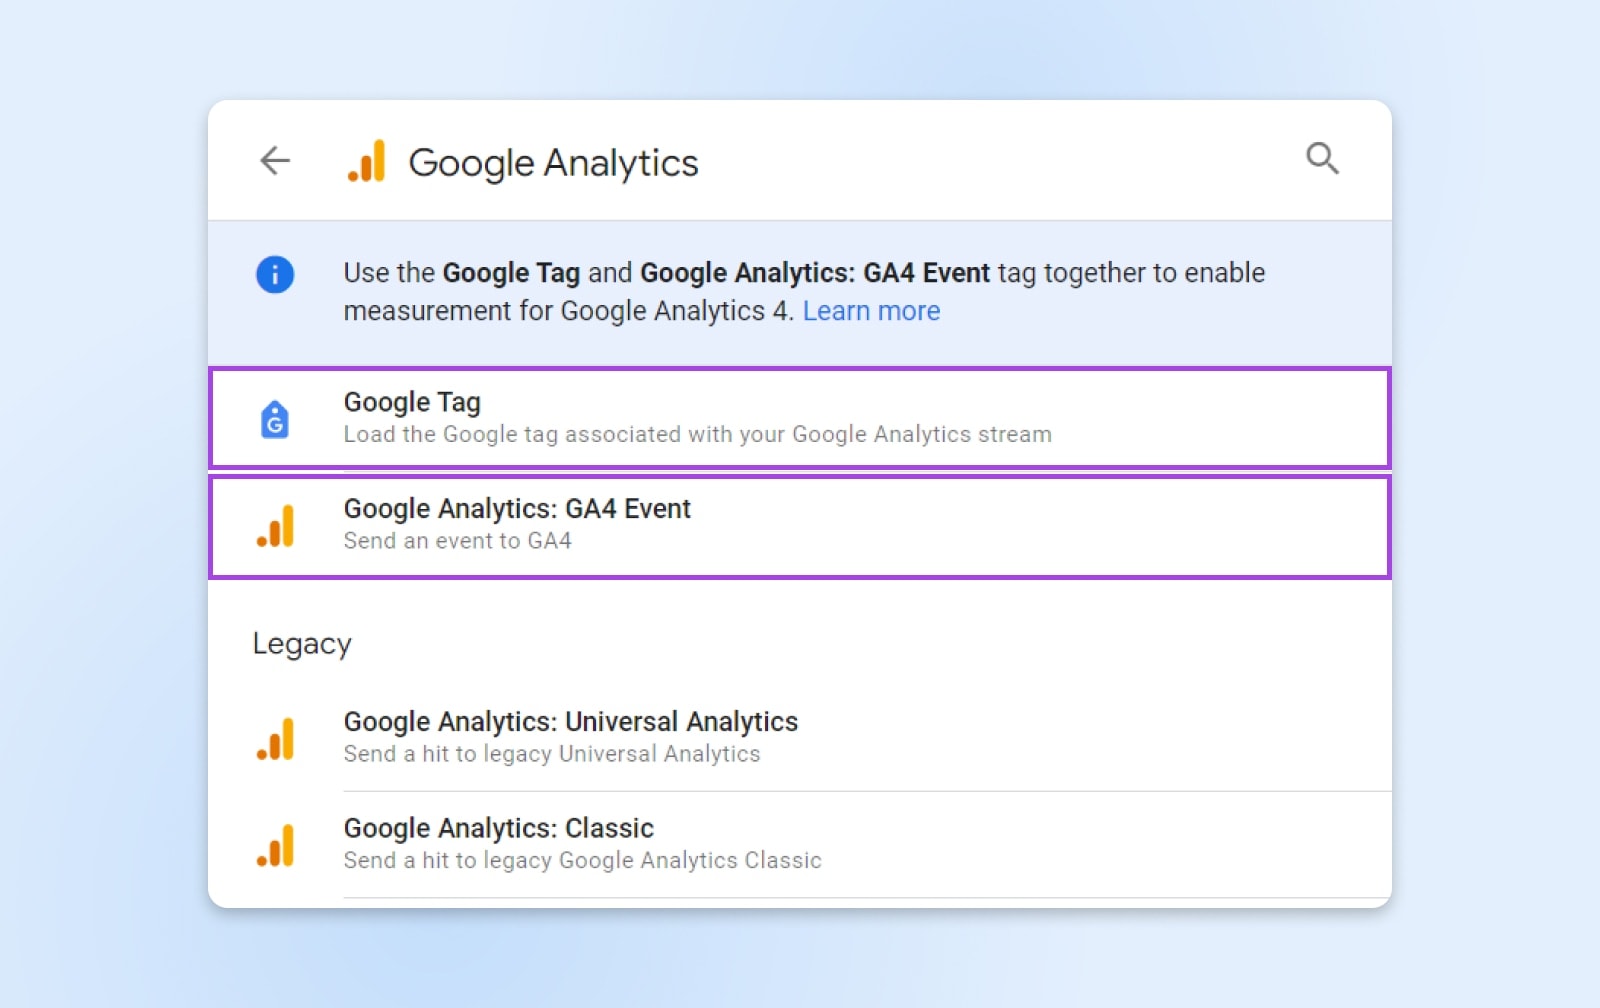
2. Add a name for your tag. For a GA4 tag, use something descriptive, like “GA4” or “GA4 Configuration.” In the Tag Configuration box, select Google Tag. In the Tag ID field, enter your Google tag ID. Click Save.
3. Click the “Triggering” box, select “All Pages” from the list, and click “Save.”
4. Go back to your workspace overview page and click “Preview.” Enter your website’s URL in the next screen and click “Connect.” This will open your site in a new window so you can test your new changes and debug them if needed. Keeping this new window open, return to the preview page, which should say “Connected!” Click “Continue.” You should then be able to see your new GA4 tags firing on the preview page as you navigate your site in the other window. This means your tag implementation was successful.
5. Go back to your page overview and click “Submit.” Give your version a name and description, then click “Publish” to push the new changes to your live website. This will publish a new version of your container to your site and allow you to start collecting GA4 data as visitors navigate it.
5 Ways To Use Google Tag Manager For Tracking
There are too many ways to use Google Tag Manager for us to cover in this article. But below, we’ve listed a few that can get you started.
1. Track page views and user behavior
- With Google Analytics: The most common use of GTM is to deploy Google Analytics (GA) tracking. By adding the GA tag in GTM, you can track page views, user time on site, bounce rates, and other standard metrics.
- With heatmap tools: Integrate heatmap tools like Hotjar or Crazy Egg using GTM to understand how users interact with your website.
2. Track events and conversions
- With button clicks: Track clicks on specific buttons, like “Buy Now” or “Sign Up” to understand user engagement and conversion.
- With form submissions: Monitor when users submit forms on your site, which is crucial for lead generation tracking.
- With file downloads: Keep tabs on how often users download PDFs or other resources from your site.
3. Track e-commerce transactions
- With Google Analytics Enhanced E-commerce: Use GTM to implement Enhanced E-commerce tracking for a detailed analysis of user interactions with your e-commerce site, including product views, adding items to carts, and completed transactions.
- With third party e-commerce platforms: Integrate tags from platforms like Shopify or WooCommerce to align your ecommerce tracking with your analytics platforms.
WooCommerce
WooCommerce is a WordPress plugin designed for e-commerce needs. This tool can enable website owners to start selling products in a flexible, customizable online store.
Read More
4. Implement remarketing and advertising tracking
- With Google Ads Remarketing: Add the Google Ads remarketing tag through GTM to show ads to users who have previously visited your website.
- With Facebook/Meta Pixel: Use GTM to implement Facebook/Meta Pixel on your site, which helps track conversions from Facebook ads, optimize ads, build targeted audiences, and remarket to people who have already taken some kind of action on your site.
5. Ensure GDPR compliance and consent management
- With cookie consent management: Implement tags for cookie consent management platforms through GTM. These tags can be set up to fire only when the user has given consent, helping you stay compliant with GDPR and other privacy regulations.
Google Tag Manager Vs. Google Analytics: What’s the Difference?
Google Tag Manager (GTM) and Google Analytics (GA) are both powerful tools offered by Google, but they serve very different purposes. It’s important to understand the differences between them so you can effectively leverage both in your digital strategy.
Google Tag Manager
Purpose: GTM is a tag management system that allows you to quickly and easily update measurement codes and related code fragments collectively known as tags on your website or mobile app. The main functionality of GTM is to host and manage JavaScript and HTML tags used for tracking and analytics on websites.
Functionality: It simplifies the process of adding and editing tags without the need to modify the code on your website. GTM handles not just Google tags but third-party tags as well. It enables you to deploy and manage various marketing and analytics tags, including Google Analytics, Google Ads, Hotjar, and many others.
Google Analytics
Purpose: GA is an analytics service that provides insights into website traffic, user behavior, and other key metrics. Its primary function is to collect data from your website and compile it into comprehensive reports that help you understand how visitors interact with your site.
Functionality: Google Analytics tracks things like page views, user sessions, bounce rates, and user demographics. It can also track more complex interactions like e-commerce transactions, events (such as clicks on a button or video plays), and goals (like form submissions or downloads).
Key differences
Data handling: GTM is essentially a middleman that helps you manage how various tracking codes are implemented on your website. It doesn’t collect or store any data itself. In contrast, GA is all about data; it collects, stores, and analyzes data about your website’s visitors and their behaviors.
Implementation: To collect data using Google Analytics, you need to implement the GA tracking code on your website. This can be done directly in the site’s code or via Google Tag Manager. GTM simplifies the implementation process by allowing you to inject the GA tracking code (alongside other tags) through its interface without needing to alter the site’s codebase directly.
Data presentation: GTM does not present data; it simply deploys tags based on your configuration. Google Analytics, however, has a robust interface for data analysis and visualization, with various reports and tools to interpret the data collected from your website.
Frequently Asked Questions
Why Is Google Tag Manager Important For SEO?
Google Tag Manager itself doesn’t directly impact SEO, but it facilitates better data collection and tracking. By providing accurate user behavior data, it helps SEO specialists make informed decisions to improve the website’s performance and user experience, which are critical factors in SEO.
What Is Google Tag Manager Used For?
Google Tag Manager is used for efficiently managing and deploying tracking and marketing tags on a website or mobile app without the need to modify the code. It’s used for tracking conversions, site analytics, remarketing, and much more.
Are There Any Reasons Not to Use Google Tag Manager?
While GTM has many benefits, some potential reasons not to use it could include:
- Complexity: For very simple websites with minimal tracking needs, GTM might add unnecessary complexity.
- Learning curve: There is a learning curve associated with understanding how to use GTM effectively.
- Control and security: Some organizations prefer to have direct control over all code that goes on their website, including tracking codes, for security or policy reasons.
Get More Visitors, Grow Your Business
Our marketing experts will help you earn more traffic and convert more website visitors so you can focus on running your business.


