Using Google Public DNS – Web Host Pro Blog – Web Hosting, VPS, CPanel, dedicated servers


What is Google public DNS?
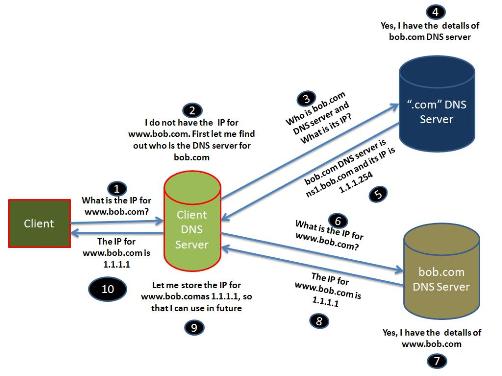
In basic terms, Google Public DNS is a service provided by Google that helps your computer or device find and access websites on the internet. When you type a website address (like www.webhostpro.com) into your browser, your device needs to convert that human-readable address into an IP address (a series of numbers) that computers use to locate websites on the internet.
Google Public DNS is like a phonebook for the internet. Instead of relying on your internet service provider’s DNS servers, you can choose to use Google’s DNS servers, which are designed to be fast and reliable. By using Google Public DNS, you might experience quicker website loading times and potentially better security and privacy features.
It’s an option you can set in your device’s settings, and it helps improve the speed and reliability of your internet browsing by efficiently translating website names into their corresponding IP addresses.
Google now offers free DNS resolvers, they claim this will speed up the entire internet. These new DNS servers will replace your ISP’s domain name servers. You can also simply use them as additional resolvers and keep your current DNS as the primary. DNS basically stores every domain name’s IP. Here is the full page: Google DNS
Adding them is easy and we recommend giving it a try:
Microsoft Windows
DNS settings are specified in the TCP/IP Properties window for the selected network connection.
Example: Changing DNS server settings on Microsoft Windows Vista
1. Go to the Control Panel.2. Click Network and Internet, then Network and Sharing Center, then Manage network connections.3. Select the connection for which you want to configure Google Public DNS. For example:* To change the settings for an Ethernet connection, right-click Local Area Connection, and click Properties.* To change the settings for a wireless connection, right-click Wireless Network Connection, and click Properties.
If you are prompted for an administrator password or confirmation, type the password or provide confirmation.4. Select the Networking tab. Under This connection uses the following items, click Internet Protocol Version 4 (TCP/IPv4), and then click Properties.5. Click Advanced and select the DNS tab. If there are any DNS server IP addresses listed there, write them down for future reference, and remove them from this window.6. Click OK.7. Select Use the following DNS server addresses. If there are any IP addresses listed in the Preferred DNS server or Alternate DNS server, write them down for future reference.8. Replace those addresses with the IP addresses of the Google DNS servers: 8.8.8.8 and 8.8.4.4.9. Restart the connection you selected in step 3.10. Test that your setup is working correctly; see Testing your new settings below.11. Repeat the procedure for additional network connections you want to change.
Mac OS X
DNS settings are specified in the Network window.
Example: Changing DNS server settings on Mac OS 10.5
1. From the Apple menu, click System Preferences, then click Network. If you are prompted for an administrator password or confirmation, type the password or provide confirmation.2. Select the connection for which you want to configure Google Public DNS. For example:* To change the settings for an Ethernet connection, select Built-In Ethernet, and click Advanced.* To change the settings for a wireless connection, select Airport, and click Advanced.3. Select the DNS tab.4. Click + to replace any listed addresses with, or add, the Google IP addresses at the top of the list: 8.8.8.8 and 8.8.4.4.5. Click Apply and OK.6. Test that your setup is working correctly; see Testing your new settings below.7. Repeat the procedure for additional network connections you want to change.
Linux
DNS settings are specified in /etc/resolv.conf in most distributions.
Example: Changing DNS server settings on Ubuntu
1. Edit /etc/resolv.conf:
sudo vi /etc/resolv.conf
2. If any nameserver lines appear, write down the IP addresses for future reference.3. Replace the nameserver lines with, or add, the following lines:
nameserver 8.8.8.8
nameserver 8.8.4.4
4. Save and exit.5. Restart any Internet clients you are using.6. Test that your setup is working correctly; see Testing your new settings below.
If you are using DHCP client software that overwrites the settings in /etc/resolv.conf, you will need to set up the client accordingly by editing the client’s configuration file.
Example: Configuring DHCP client software on Ubuntu
1. Back up /etc/resolv.conf:
sudo cp /etc/resolv.conf /etc/resolv.conf.auto
2. Edit /etc/dhcp3/dhcpclient.conf:
sudo vi /etc/dhcp3/dhcpclient.conf
3. If there is a line containing domain-name-servers, write down the IP addresses for future reference.4. Replace that line with, or add, the following line:
prepend domain-name-servers 8.8.8.8, 8.8.4.4;
5. Save and exit.6. Restart any Internet clients you are using.7. Test that your setup is working correctly; see Testing your new settings below.
——————————————————————————————————————————
To test that the Google DNS resolver is working:
1. From your browser, type in a hostname, such as http://www.google.com. If it resolves correctly, bookmark the page, and try accessing the page from the bookmark. If both of these tests work, everything is working correctly. If not, go to step 2.2. From your browser, type in a fixed IP address. You can use http://18.62.1.6/ (which points to the website https://eecs.mit.edu/) as the URL*. If this works correctly, bookmark the page, and try accessing the page from the bookmark. If these tests work (but step 1 fails), then there is a problem with your DNS configuration; check the steps above to make sure you have configured everything correctly. If these tests do not work, go to step 3.3. Roll back the DNS changes you made and run the tests again. If the tests still do not work, then there is a problem with your network settings; contact your ISP or network administrator for assistance.


