Beginner’s Guide to Scaling a VPS for Traffic Surges


You finally did it. A blog post is blowing up. A product launch is getting clicks. Your campaign is driving traffic like never before. This is the moment you’ve been working toward —and your site is… loading… still loading…completely down.
Going viral is great. Unless your site faceplants in front of thousands of people because it can’t handle the traffic.
If you’re hosting on a VPS and gearing up for a big traffic event, now’s the time to ask: “Can my server handle this?” The good news is, with the right preparation, the answer can be a confident yes.
In this guide, we’ll walk you through everything you need to know to scale your VPS for traffic surges — without panic, guesswork, or praying to the server gods. Let’s dive in.
What Is a VPS (and Why Does It Matter When Traffic Spikes)?
A Virtual Private Server (VPS) is a type of web hosting that gives you dedicated resources on a server shared with other users. Unlike shared hosting, where websites compete for the same resources, a VPS uses virtualization technology to create isolated environments — giving you more control, better performance, and the flexibility to scale your site as needed.
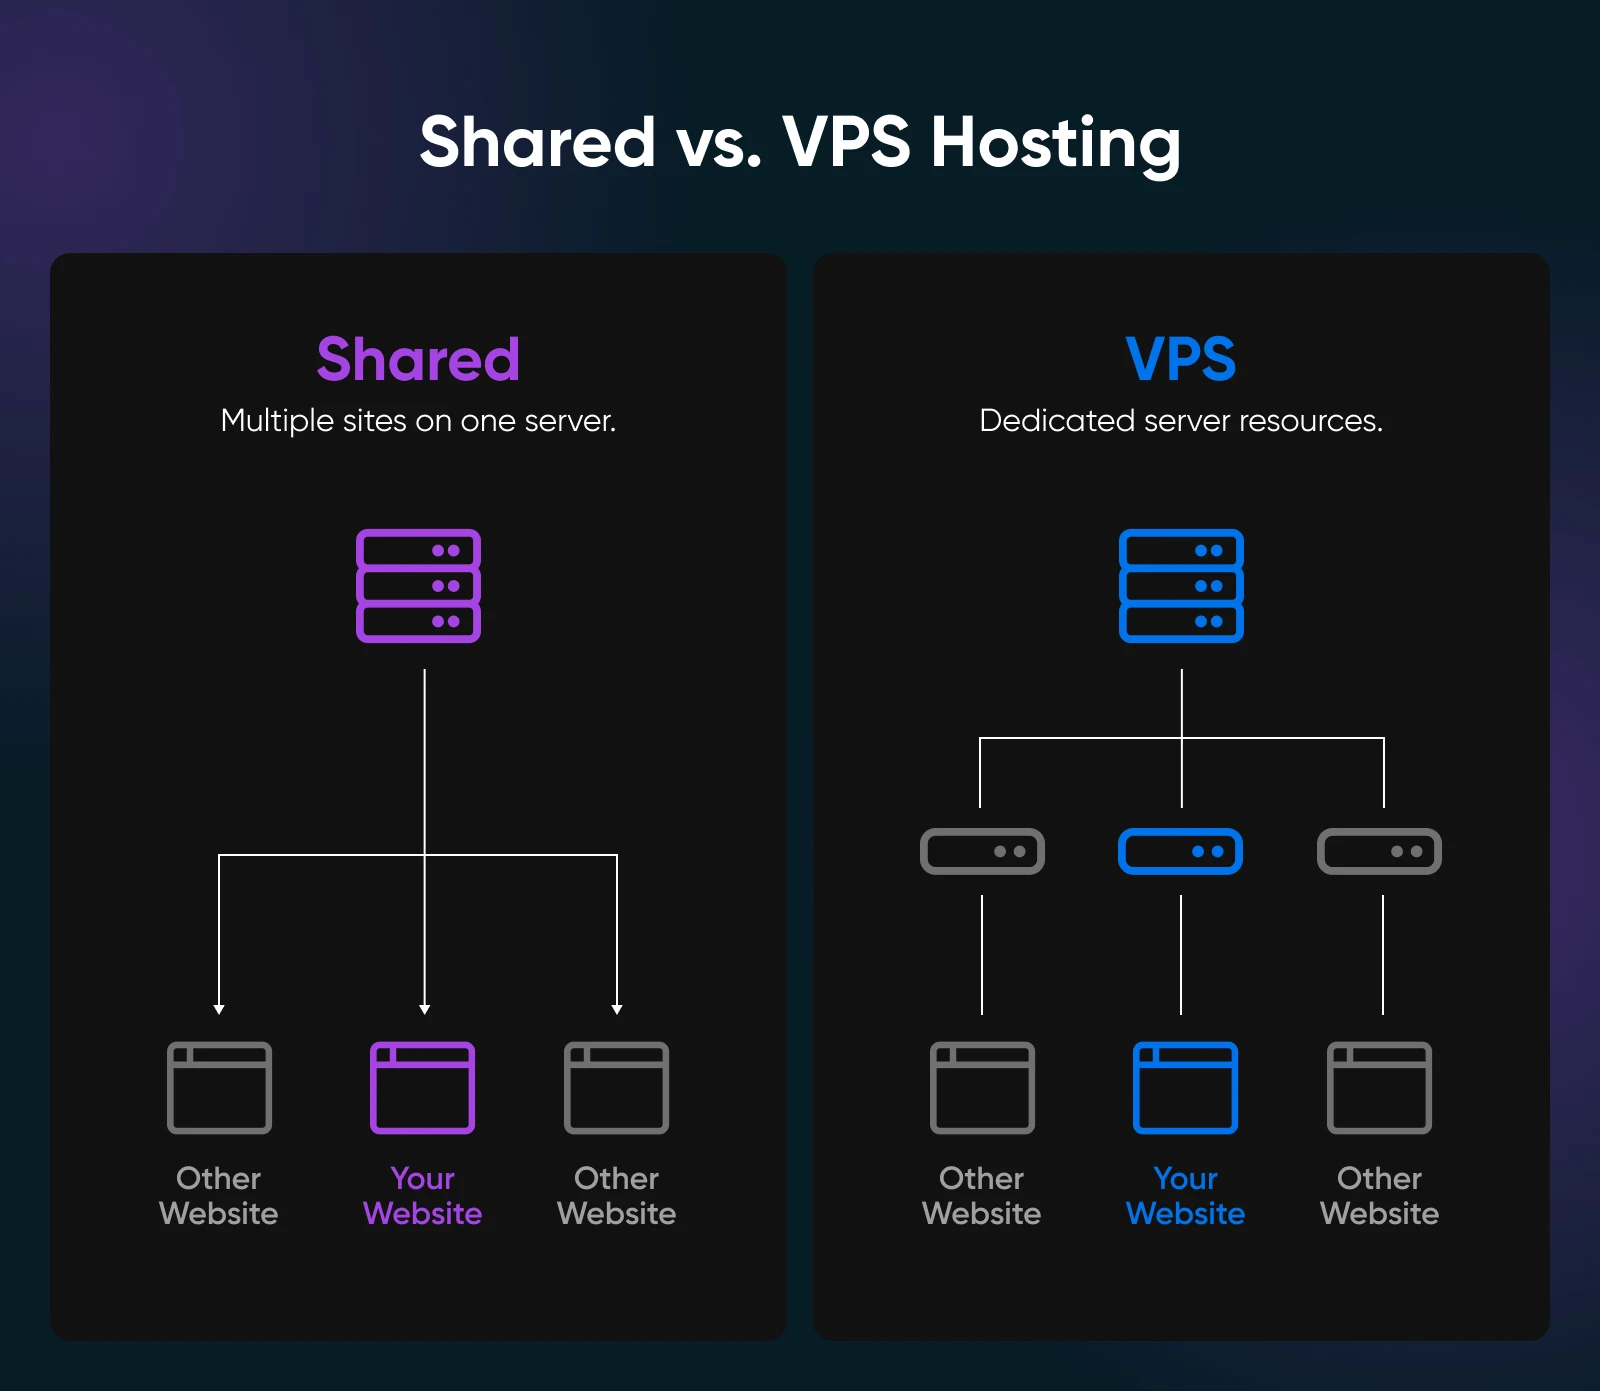
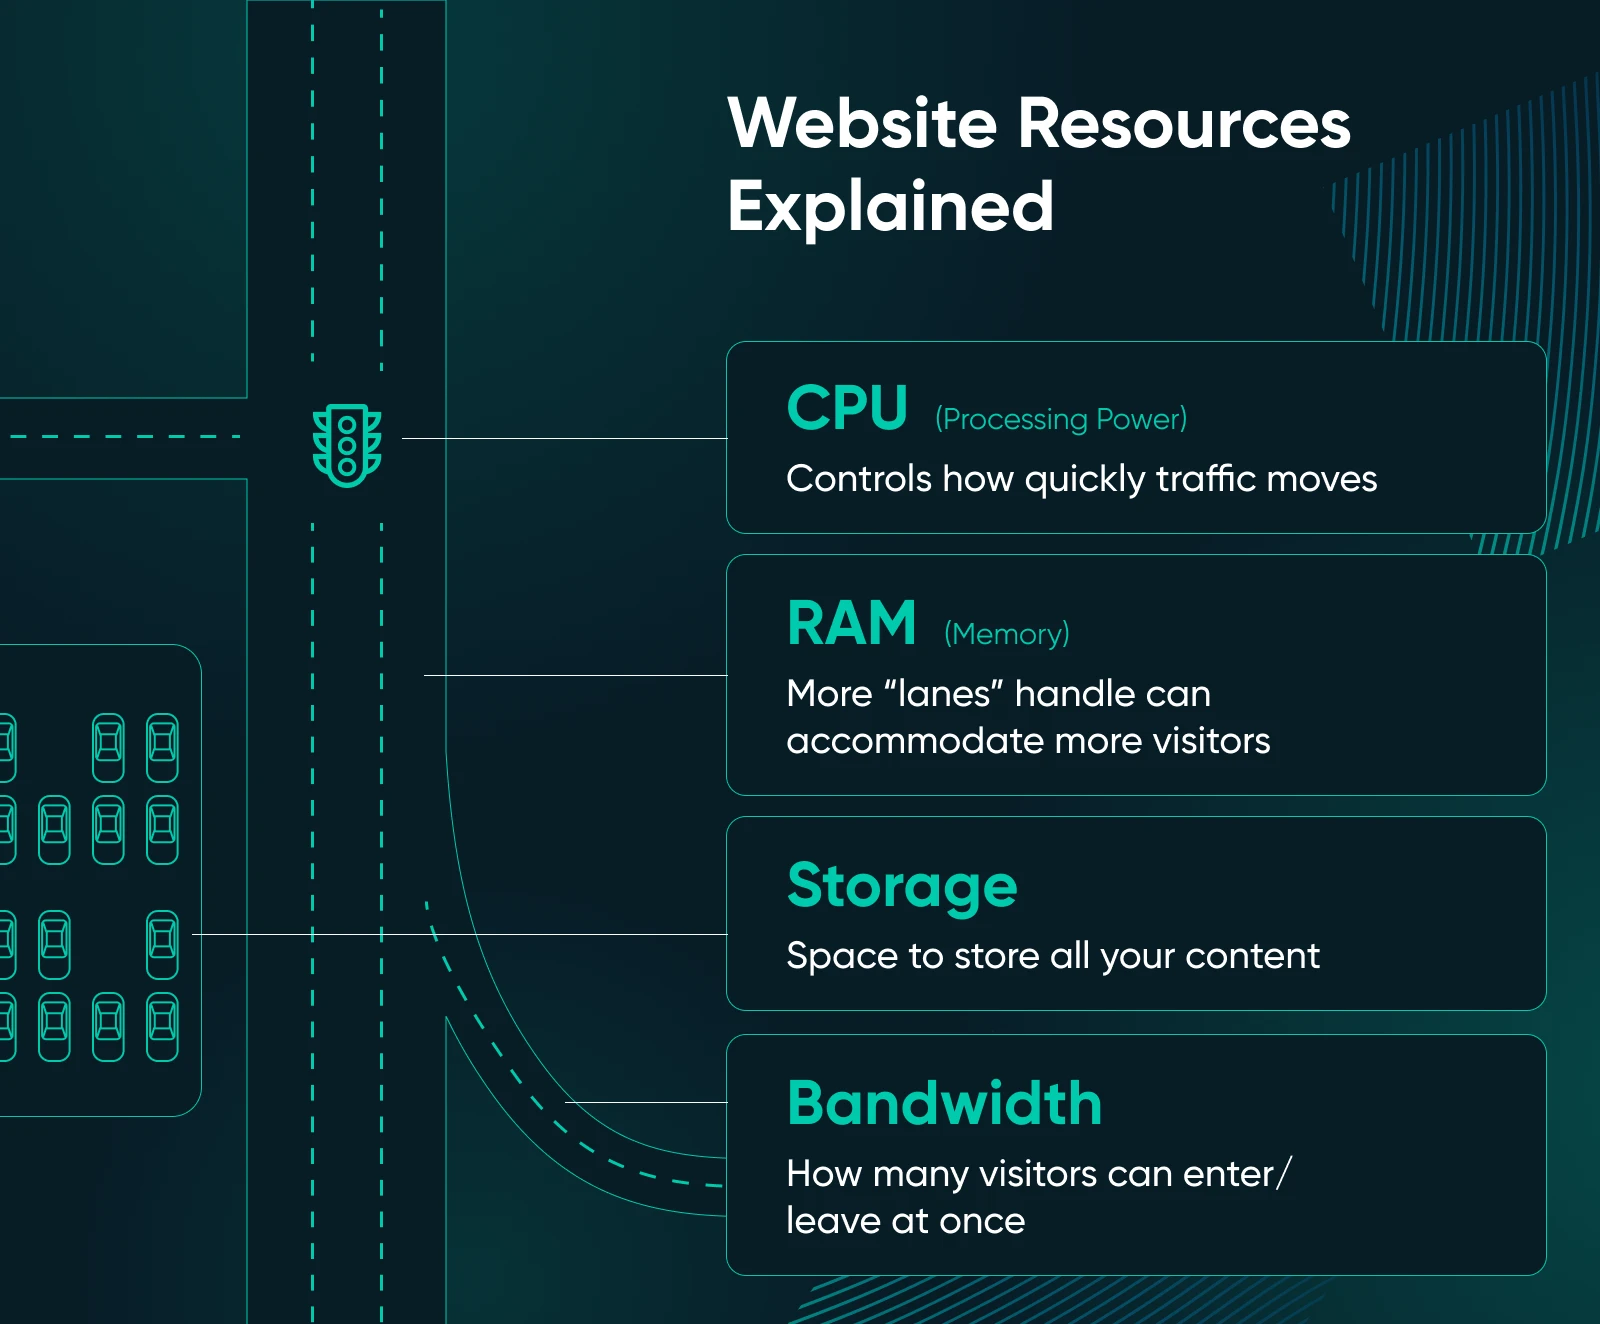
In other words, you get dedicated slices of resources (memory, CPU, storage) that aren’t shared with other sites —as opposed to shared hosting, where your neighbors can hog the server, meaning if one site has a huge spike in traffic, it can slow down everyone else. With a VPS, your site lives in its own isolated “container” with guaranteed resources, so other websites’ traffic surges won’t directly affect you.
Why is this important for scaling? Because while a VPS gives you more control and stability, you still have finite resources allocated to your site.
If your site suddenly needs more CPU or RAM than your plan includes, it can still suffer. But VPS plans are usually very scalable — you can easily add more RAM, CPU, or disk space as your site grows. In other words, a VPS is built to grow with you.

Proactively scaling your VPS before a big traffic event means increasing those resources (and optimizing your setup) ahead of time, so your site stays smooth when the visitors pour in.
It’s kind of like preparing a restaurant for a big dinner rush by adding more tables and staff and prepping ingredients ahead of time. You don’t want to wait until customers are crammed in the lobby to react.
Step-by-Step: How To Scale Your VPS for Traffic Surges
Now, let’s roll up our sleeves and get into why you’re here —this is how you scale your VPS if you anticipate your site will need more of those resources in the near future.
Step 1: Monitor Your Current Traffic and Set a Baseline
You can’t scale what you don’t measure. Start by auditing your current traffic to establish a performance baseline. Use your analytics to review how many visitors you get on a normal day and what your peak traffic looks like. If you use a DreamHost managed hosting plan (including VPS), you can now see built-in traffic analytics on the Traffic Dashboard, seamlessly integrated into the “Manage Websites” section of your customer control panel.
For example, find your average daily visitors and note the times or events when traffic spikes —maybe during past sales or campaigns. Knowing your “normal” versus “busy” traffic levels will help you quantify how big an upcoming surge might be.
Why do this? If you normally have 500 daily users and expect 5,000 during a launch, that’s a 10× jump —a huge strain if you’re unprepared. By identifying patterns (say, traffic doubles every day at 8 p.m., or tends to spike right after you send a newsletter), you can plan server resources for those loads. You want to establish a traffic baseline so you can recognize a true surge and scale accordingly.
Pro tip: Set up real-time analytics or server monitoring now. This will alert you if traffic starts ramping up unexpectedly before the big event.
Step 2: Choose a Flexible VPS Hosting Plan
Next, evaluate your hosting plan. Is your VPS plan flexible enough to handle a spike?
Not all VPS hosts are created equal —you’ll want one that lets you easily dial resources up or down. Check if your provider offers quick upgrades (or even automatic scaling) for CPU, RAM, and bandwidth. The goal is to avoid being stuck on a plan that can’t expand when you need it.
If your current host limits how fast you can scale, consider migrating to one that specializes in scalability (many cloud-based VPS providers allow near-instant resource adjustments). Some VPS hosting plans even have auto-scaling, meaning if traffic increases, the system can allocate more resources on the fly to keep your site stable.
At minimum, make sure you can manually upgrade your VPS plan quickly (within minutes or hours, not days).
Step 3: Allocate Sufficient Resources
Now it’s time to give your VPS those extra lanes of traffic we talked about. Well before the surge hits, allocate more server resources to handle the load. This might mean upgrading your VPS to add RAM, vCPUs (virtual processors), or increasing network bandwidth limits. A smart rule of thumb is to add a healthy buffer on top of your expected needs —roughly 50% extra capacity as a cushion.
For example, if your baseline monitoring from Step 1 suggests you’ll need around 2 GB of RAM to handle normal traffic, consider scaling to ~3 GB RAM for the surge, just to be safe. This margin gives you enough wiggle room to make sure you won’t max out resources if the spike is bigger than predicted.
Pro tip: It’s far better to have a bit too much capacity than to watch your site slow to a crawl or crash because it ran out of RAM.
Step 4: Implement Caching to Reduce Server Strain
Want a quick win for scalability? Enable caching on your site. Caching stores copies of your site’s pages and content so that repeat requests can be served quickly without your VPS doing all the work each time.
In practice, when caching is enabled, the first visitor generates the content (for example, running PHP and database queries for a page) and a static version is saved. Subsequent visitors are then served that pre-built page from the cache, so your server doesn’t have to crank out the same page over and over.
The result: faster load times for users and much less stress on your VPS’s CPU and database.
There are a few types of caching to consider:
- Page caching stores full HTML pages.
- Object or database caching stores frequent query results.
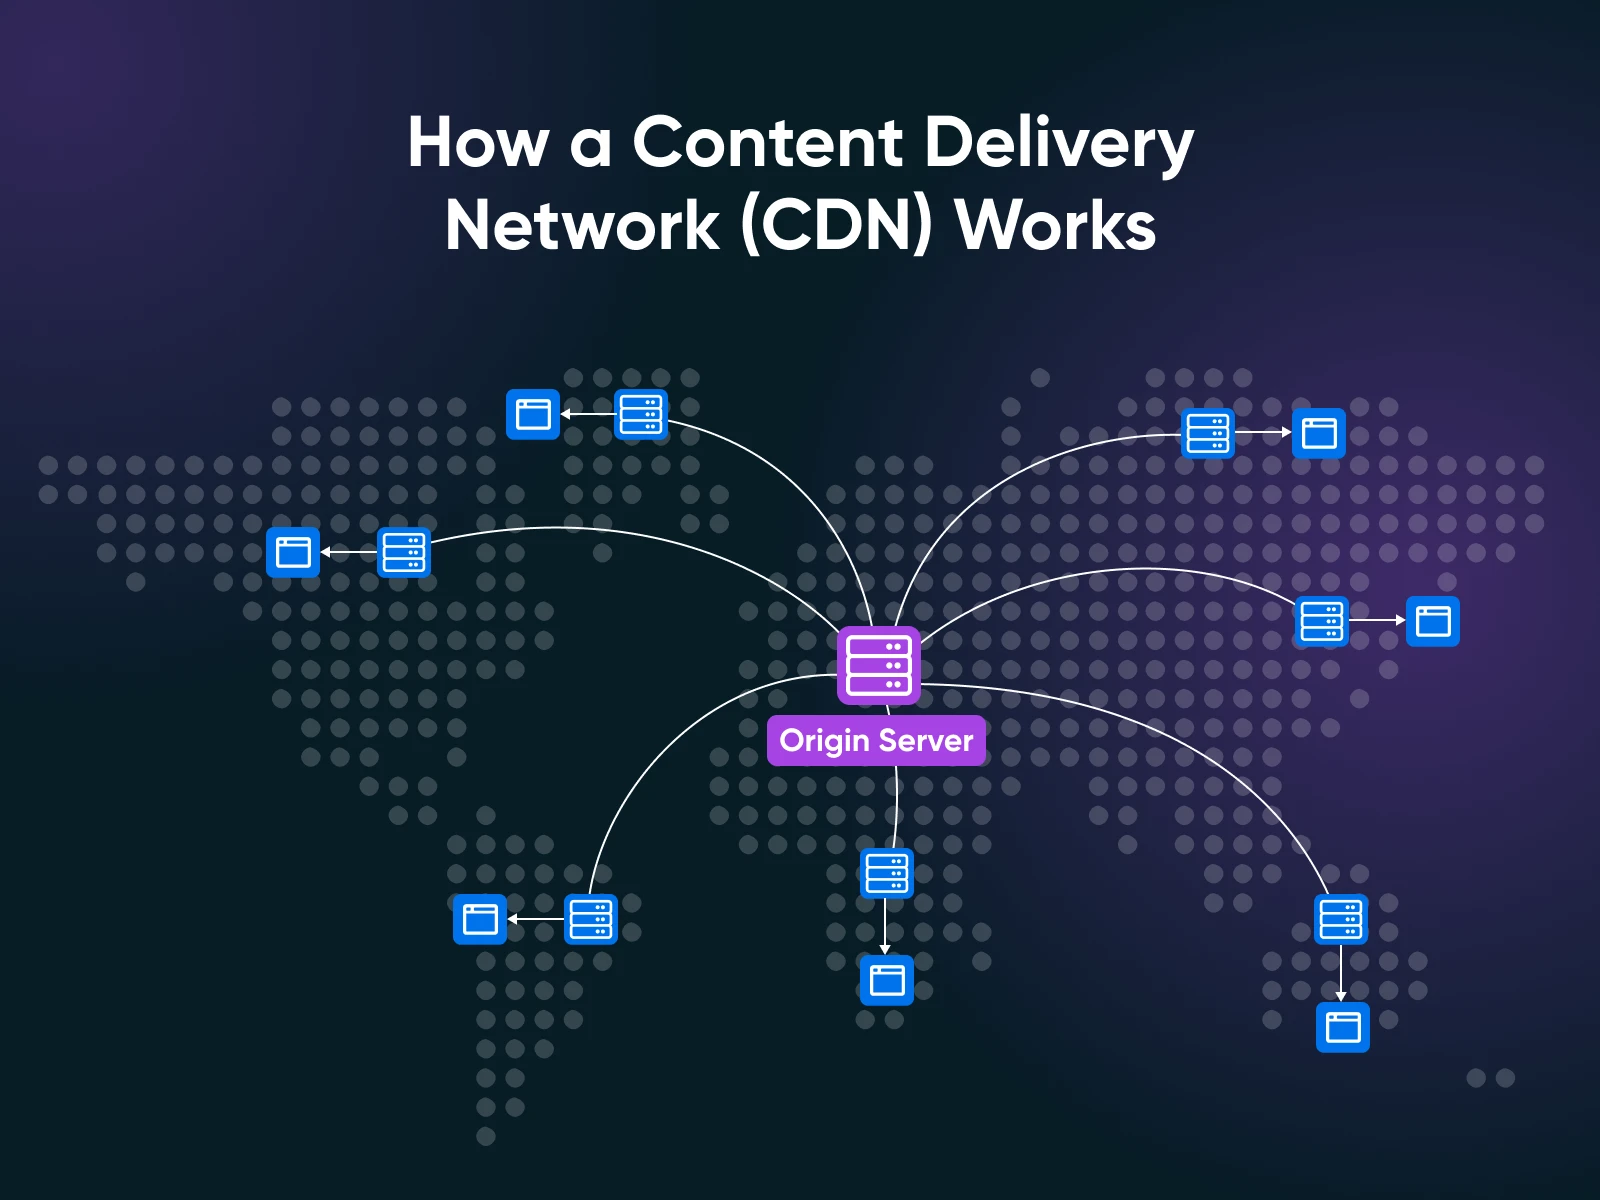
- CDN (Content Delivery Network) caches static files (images, CSS, etc.) on servers around the world.
An easy route to take is installing a caching plugin for WordPress. Your host may also offer built-in caching. By caching content, you avoid overworking your server during high traffic and can handle far more visitors with the same VPS specs.
Pro tip: Using a CDN alongside caching offloads even more traffic from your VPS, since the CDN will serve images and other files to users, leaving your server free to handle the harder tasks.
Step 5: Consider Load Balancing if One Server Isn’t Enough
What if you anticipate a massive surge that one VPS alone can’t handle, even with more resources and caching? It might be time to think beyond a single server. Load balancing is a technique where you use multiple servers to share the traffic load.
Essentially, you put a load balancer in front of your VPS that distributes incoming visitors across two or more servers, preventing any single machine from getting overwhelmed. This setup can drastically increase the amount of traffic you can handle by leveraging multiple VPS instances in tandem.
A load balancer might send half your visitors to “Server A” and half to “Server B” (and even spin up more servers if needed). This not only increases capacity but also adds redundancy — if one server goes down, others can pick up the slack, improving reliability.
Know that you typically won’t need load balancing unless you expect truly high traffic or need high availability. It does introduce more complexity (and cost).
But it’s good to understand the concept: when one VPS isn’t enough, you can always add more servers behind a load balancer to add virtually unlimited capacity. Some hosting providers offer easy load balancing or cloud instances that auto-scale out —if your big event is going to be huge, this is an option to discuss with your host.
Step 6: Test Your Setup
Don’t wait until launch day to find out if your scaling efforts worked. Simulate a traffic surge on your site to see how they hold up.
This is commonly done via load testing or stress testing tools. These tools send a large number of simulated visitors or requests to your website to mimic a flood of real traffic. The goal is to push your VPS to the limit in a controlled way and observe what happens.
During load testing, monitor your server’s response times, CPU/RAM usage, and whether any errors occur.
Do pages start failing at a certain number of concurrent users? Is the database choking on too many queries?
A test might reveal, for example, that your site slows down drastically beyond 1,000 simultaneous users — indicating you may need to further optimize or add resources. It’s much better to discover these bottlenecks now instead of during the actual traffic spike, when real customers are on the line.
There are many tools (both free and paid) to do this: Apache JMeter, BlazeMeter, Loader.io, etc.
Run a few tests approaching the traffic levels you expect. This will identify any weak links in your setup (like a particular plugin or script that crashes under load, for example). You can then fix those issues —whether it’s tweaking database indexes or further boosting your resources —before you get big surges in real traffic.
Step 7: Monitor Your VPS in Real Time During the Surge
The day of your campaign or launch is here!
As visitors start flocking in, make sure you’re watching your VPS metrics in real time. Almost all VPS platforms have monitoring tools or dashboards (and if not, third-party monitoring tools can fill the gap). Keep an eye on your CPU usage, memory consumption, disk I/O, and network traffic in real time.
You may want to set up alerts too. For example, get an email or text alert if CPU usage stays above 90% for more than a few minutes, or if memory is running low. These can act as an early warning system so you can take action (like allocating more resources or optimizing something on the fly) before you run into a potentially catastrophic issue.
By monitoring actively, you avoid flying blind. Real-time analytics also let you validate that your preparations are working, and it’s actually pretty fun to watch the numbers if everything is running smoothly.
And if something starts breaking, you’ll be glad you noticed it immediately. Remember, you can’t manage what you don’t monitor.
After the Surge: Review, Right-Size, and Improve
Congratulations on making it through your viral moment! Once the traffic surge subsides, don’t just pat yourself on the back and forget about it. This is a golden opportunity to review and learn from the experience.
- Start with a post-surge analysis: Dig into your server logs and performance metrics to see how things went.
- Identify any bottlenecks or errors that occurred when traffic was at its peak: For example, did the CPU hit 100%? Did response times spike anywhere? Maybe one of your pages still loaded slowly due to an uncached element. Analyzing this data will pinpoint what worked well and what could still be improved.
- Gather plenty of feedback: if you had team members or users report issues (“Checkout was slow” or “the site timed out for me at 1 p.m.”), take note. All of this information helps you refine your plan for the future. Adjust your infrastructure and configuration based on what you learned.
If you found you over-provisioned (for example, you doubled your RAM but only used 60% of it), you might scale the VPS back down slightly to save on costs until the next big event. On the other hand, if you were near the limits, you might decide to upgrade to a larger VPS plan permanently, so you’re ready for growth.
This is also a great opportunity to update your contingency plans. Did your alerting and monitoring cover everything? Do you need to add a database replica or tweak your caching settings next time?
Use the experience to improve your playbook for future traffic surges: both planned and unexpected.
Scale Confidently With the Right Hosting
By now, you should feel more confident about scaling your VPS to handle traffic surges. We’ve covered everything from understanding your baseline, beefing up resources, clever caching tricks, to testing and real-time monitoring.
The key takeaway? Preparation beats panic.
When you take these proactive steps, you’re not just hoping your site will survive. You know it will. So, the next time your marketing campaign pays off or your post goes viral, you can celebrate the traffic spike instead of dreading it.
If you’re looking for a hosting partner that makes this entire process easier, consider scaling with DreamHost. DreamHost Managed VPS Hosting offers dedicated resources and a scalable, flexible platform designed for growing sites. With four plans to choose from and features like built-in analytics, free WordPress migrations, expandable RAM and storage, and more, you can trust DreamHost to help your site perform under pressure.

VPS Hosting
Take Charge with Flexible VPS Hosting
Here’s how DreamHost’s VPS offering stands apart: 24/7 customer support, an intuitive panel, scalable RAM, unlimited bandwidth, unlimited hosting domains, and SSD storage.
Choose Your VPS Plan
