How to Improve Core Web Vitals


You build a beautiful website with engaging content and start sending customers there.
You’re in an exciting situation, especially if you’re just starting online.
But after a week of being online, you noticed your site’s loading slower than a sloth on a lazy Sunday, and visitors are bouncing faster than a kangaroo on caffeine.
Sound familiar? Well, you need to start thinking about what Google calls the Core Web Vitals (CWV).
According to the latest Chrome reports, over 50.1% of websites already have good Core Web Vitals scores. And this number continues to grow month-over-month, which means more and more savvy site owners are catching on to this performance-boosting secret.
Here’s the kicker: if you’re not part of that 50% yet, you’re risking your Google rankings, frustrating your visitors, and potentially leaving money on the table.
Let’s change that, shall we?
What Are Core Web Vitals, Anyway?
Think of Core Web Vitals as your website’s report card.
As you drive traffic to your website, Google uses these metrics to gauge how user-friendly your site is. Basically, it’s measuring your website’s speed, responsiveness, and visual stability.
There are three Core Web Vitals metrics:
These may not make sense right now — Let’s try to understand each of them separately.
Largest Contentful Paint (LCP)
Imagine you’re at a restaurant, and the waiter brings out your appetizer almost instantly.
That’s what a good LCP does for your website.
Largest Contentful Paint
Largest Contentful Paint (LCP) is a metric that tells you how long it takes for the largest content element on a page to load. LCP is one of the three Google Core Web Vitals metrics.
Read More
It measures how quickly the largest content element — the hero image, a large video, or a big chunk of text — loads on your page.
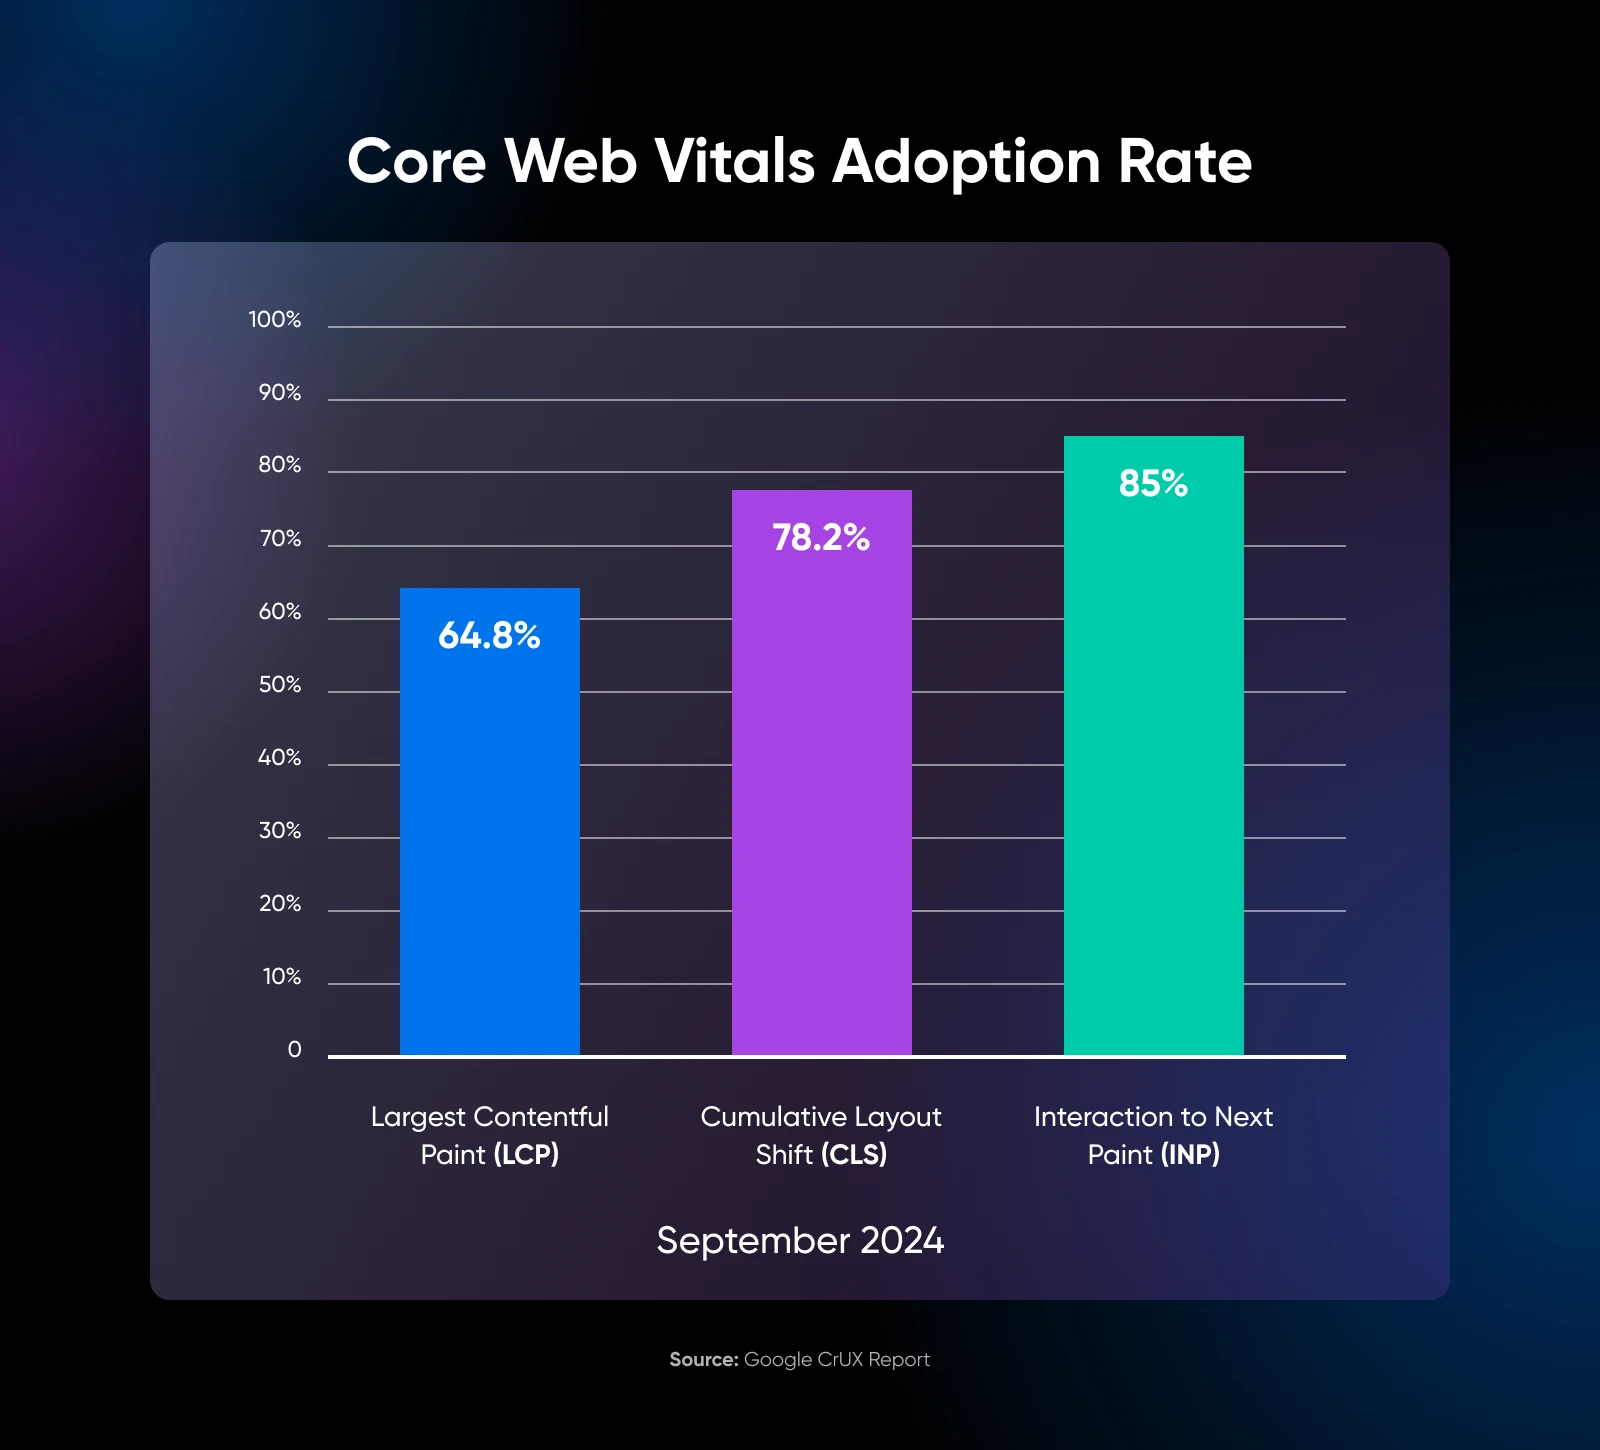
According to the same Chrome Core Web Vitals report, 64.8% of websites have already achieved their LCP scores. And more new sites are serving up their main content faster every month.
If you want to join the LCP hall of fame, you need to aim for a load time of 2.5 seconds or less to increase your website’s conversion rate.
Anything above four seconds, and you’re losing customers.
Cumulative Layout Shift (CLS)
Think of times when you might have clicked a button on a mobile site — and another element loaded in its place, making the button disappear — and you clicked that element instead.
It’s not fun. The CLS score aims to eliminate this.
It measures how much your page elements move around as the page loads. A low CLS score means that your layout stays pretty stable throughout the entire loading process.
You can consider your website mobile optimized if the layout does not shift during load.
As of September 2024, 78.2% of websites have achieved good CLS scores, with a consistent increase in the numbers month-over-month. This shows that more developers are prioritizing a smooth, shift-free user experience.
So, if you want a stable user experience, aim for a CLS score of 0.1 or less. Anything above 0.25, and your users will feel like the entire page is moving around.
Interaction to Next Paint (INP)
INP was added on March 12, 2024, to the Core Web Vitals framework, replacing the older First Input Delay (FID) metric. While FID only measures the first user interaction, INP looks at all interactions throughout a page visit.
Chrome report data shows that 85% of websites are already scoring good INP scores. It’s likely that if you’re optimizing your site for the previous two scores well, INP will fall into place.
To keep your users happy and engaged, aim for an INP of 200 milliseconds or less. If you’re hovering between 200 and 500 milliseconds, you’ve got some work to do.
Anything above 500 milliseconds, and you are giving your visitors the dial-up experience.
How To Measure Core Web Vitals
Before you start working on improving your Core Web Vitals scores, it’s wise to get an idea of where your site currently stands. This way, you’ll be able to measure your progress. Regularly assessing your scores can be a valuable part of your website maintenance.
Let’s look at a few different ways to measure your website’s performance.
PageSpeed Insights
There are a handful of online tools you can use to measure Core Web Vitals, including Pingdom and GTmetrix. However, we recommend using Google PageSpeed Insights.
To get started, enter the URL of your website, and then click on the Analyze button.

When it’s done analyzing your site, it will provide a summary of some of the key data and the site’s Core Web Vitals data. As you can see in the image above, the default Google website has:
- LCP: 0.7 seconds
- INP: 63 milliseconds
- CLS: 0
PageSpeed Insights tests both mobile and desktop scores at the same time, and you can switch between them right below where you entered the website.
If you scroll further, you’ll also find some diagnostics and suggestions for improvements. Based on the score of your site, PageSpeed Insights offers a handful of recommendations that you can use to increase your score and improve your site’s performance.
Chrome User Experience Report
You can also access your Core Web Vitals through your Chrome User Experience Report. This can be particularly helpful for developers and webmasters.
This report is available through Google Search Console and provides real data and insights from your visitors. It helps you understand how your users use the web and interact with your site.
To view it, you’ll need to head to your Google Search Console’s dashboard. Then, navigate to Core Web Vitals, which is located under the “Experience” section.
Core Web Vitals Chrome Extension
If you’re a Chrome user, you can use the Web Vitals Chrome extension to assess your Core Web Vitals for any website you’re on.
Just add the extension to Chrome, and you’re ready to go!
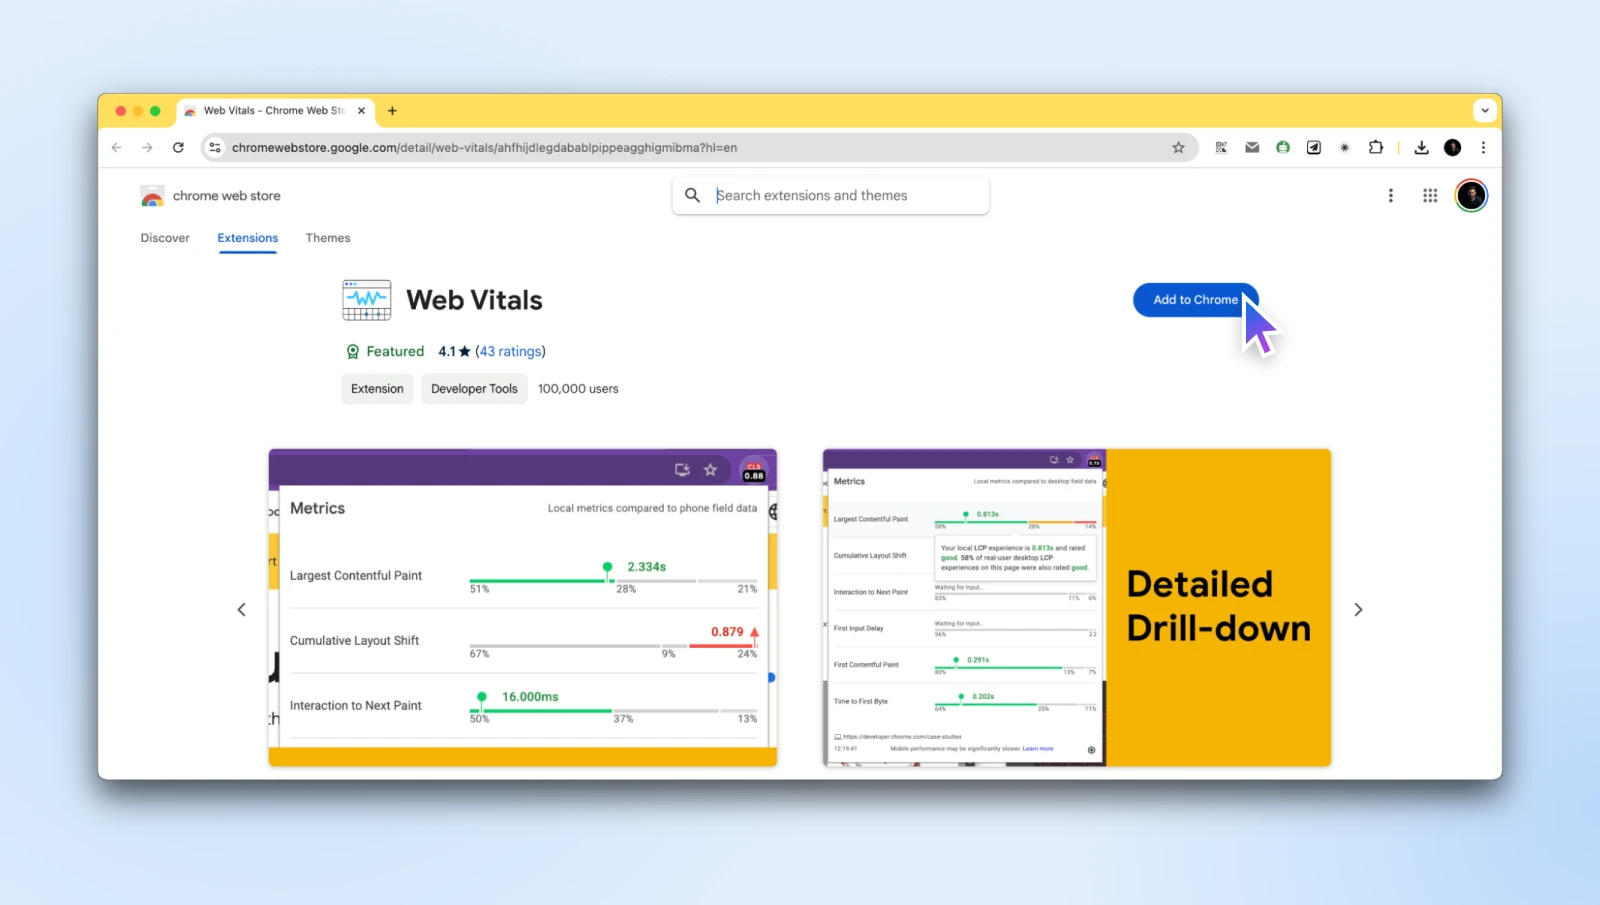
Next time you’re on a website, simply click on the extension icon at the top of your page, and you’ll see the Core Web Vitals score for that website.
Here’s what the output from the extension looks like:
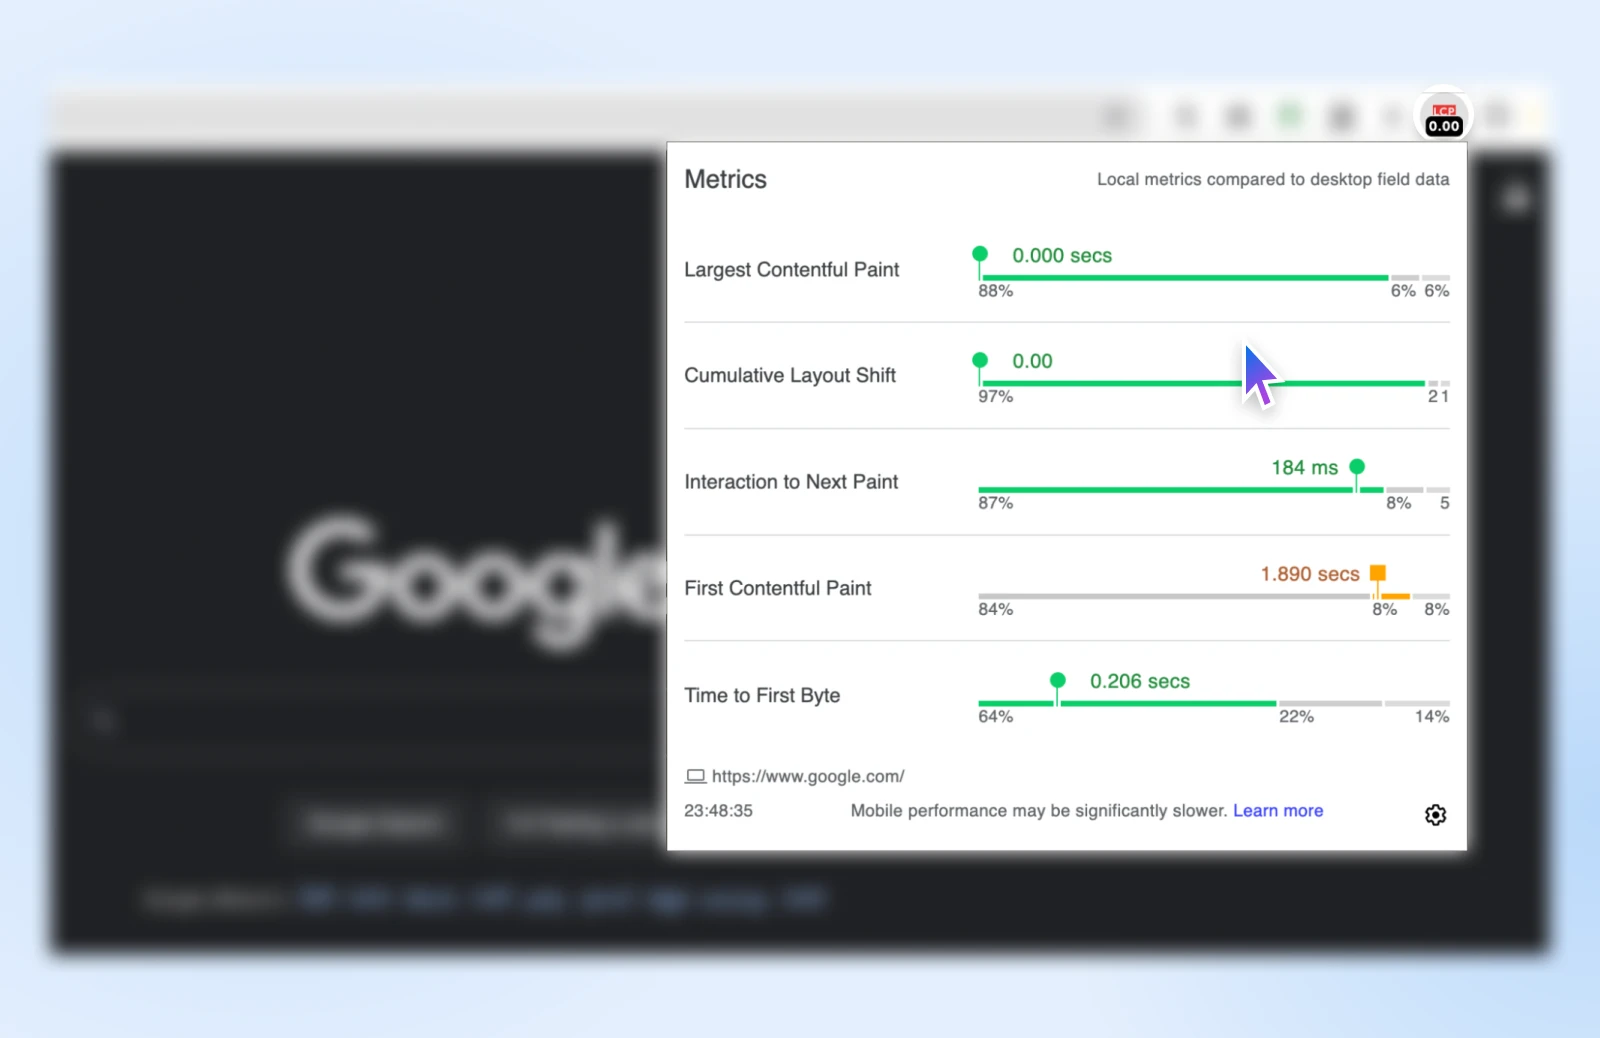
You’ll see the LCP, CLS, and INP scores at a glance without visiting the PageSpeed insights page every time.
How To Improve Core Web Vitals for Better Google Scores?
Now that we’ve got the basics down, let’s dive into some best practices to boost your page’s Core Web Vitals scores. Remember, this isn’t just about impressing Google — it’s about creating a website your visitors will love using.
1. Use Modern Image Formats
We’re visual creatures, but those beautiful, high-resolution images can kill website performance if not compressed properly.
You need to optimize images and then upload the optimized images to your website instead of using server-side solutions.
To solve this issue and make the web faster, Google launched the WebP format. It retains a lot of the image details while significantly reducing image sizes.
WebP can be the go-to format for photographs and complex images. It offers better compression than JPEG or PNG, meaning you can have smaller file sizes without sacrificing quality. WebP images are about 30% smaller than their JPEG counterparts. So, you’re saving a lot of bandwidth and the time it takes to load the page.
At DreamHost, we love using Squoosh to convert images to WebP or just compress them to save space.
Here are some additional image optimization plugins to consider:
Along with WebP, we’d recommend using SVG for icons, logos, and illustrations.
SVGs (Scalable Vector Graphics) aren’t images per se. Compared to regular image formats like JPEG, PNG, WebP, etc., SVGs are an XML-based markup language that describes the image on a 2D geometric plane.
SVG
An SVG file, or Scalable Vector Graphic file, is a file format that renders two-dimensional images. It describes how the image should appear using an XML text format.
Read More
This description text is then sent to the user, and the user’s browser converts it into an “image” after receiving the full SVG markup.
All this makes SVGs extremely lightweight — since they’re essentially just small blocks of text.
Also, since it’s created based on math, SVG images can scale infinitely without losing quality, and they look crisp on any device, from a tiny smartphone to a giant 4K monitor.
SVGs are called vector formats while WebP is a raster format, and you can see how both react to zooming in.
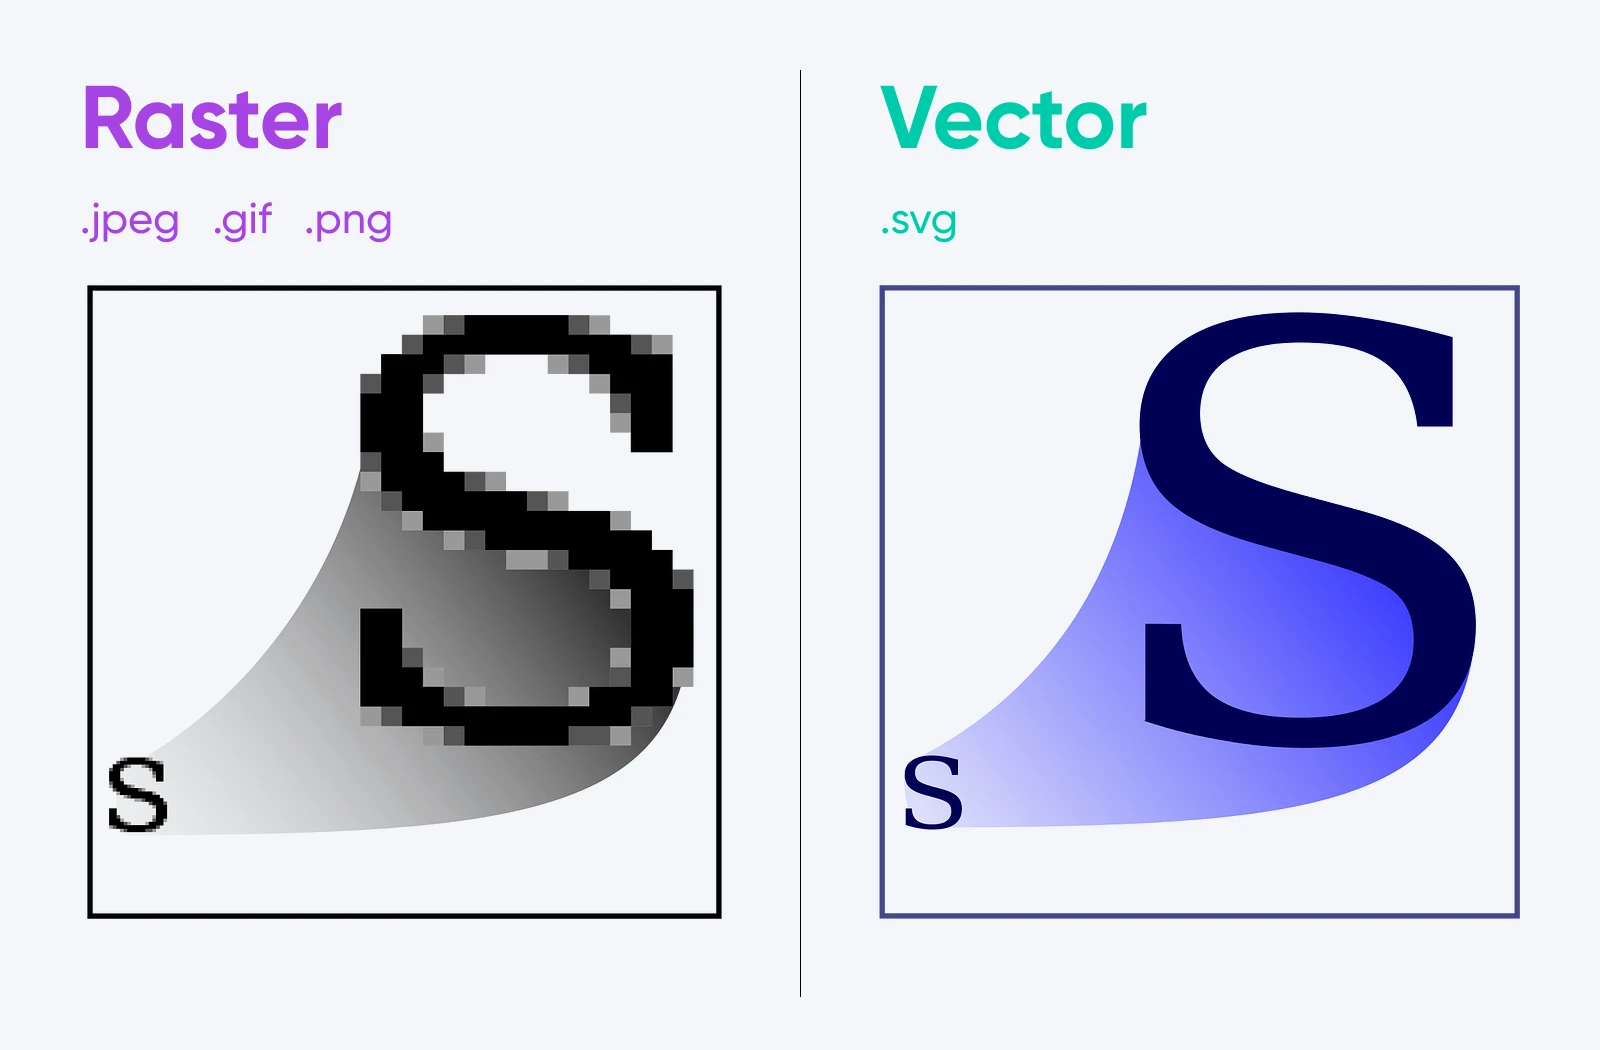
The font is a prime example of a vector in daily use. You can zoom into fonts as much as you want, but they won’t pixelate. While we’re on the topic of fonts, another way you can optimize your website for Core Web Vitals is to use fewer fonts.
2. Optimizing Fonts for CWV Performance
Fonts can make or break your website’s design. But when it comes to optimizing fonts for performance, fewer fonts are often better.
Here are a few tips to optimize fonts for your website:
- Limit the number of fonts: Stick to two main fonts across your website—one for headings and one for body text. This reduces the number of HTTP requests and simplifies your design. Also, be selective with font weights; only include the ones you need.
- When possible, use system fonts: Most devices already have system fonts like Arial, Helvetica, or Georgia installed. They load instantly and eliminate the need for additional font downloads.
- Preload critical fonts: Adding a preload link in your HTML can instruct the browser to fetch your most important fonts early in the loading process. This can significantly improve text rendering times.
- Optimize custom fonts to prevent CLS: The browser doesn’t know the exact dimensions of custom fonts until it downloads them, leading to layout shifts. Some open-source tools, such as Font Pie, help generate CSS that eliminates or at least reduces the CLS.
- Subset your fonts: Remove unused characters from your font files—like non-Latin characters if your site doesn’t use them. This reduces file sizes and speeds up load times.
We’ll be covering some advanced font optimization strategies in the future, but for now, using this quick list should help you get the website fonts ready for better scores.
3. Think Twice Before Using Google Tag Manager
We know what you’re thinking: “But Google Tag Manager makes my life so easy!”
And you’re not wrong.
It’s a fantastic tool for managing multiple tags without diving into code. However, it can present both advantages and disadvantages when it comes to Core Web Vitals.
While Google Tag Manager is excellent for organizing your tags, it can potentially slow down your site if not used judiciously. Each tag adds a little bit of load time, and those milliseconds can add up faster than your coffee bill at a developer conference.
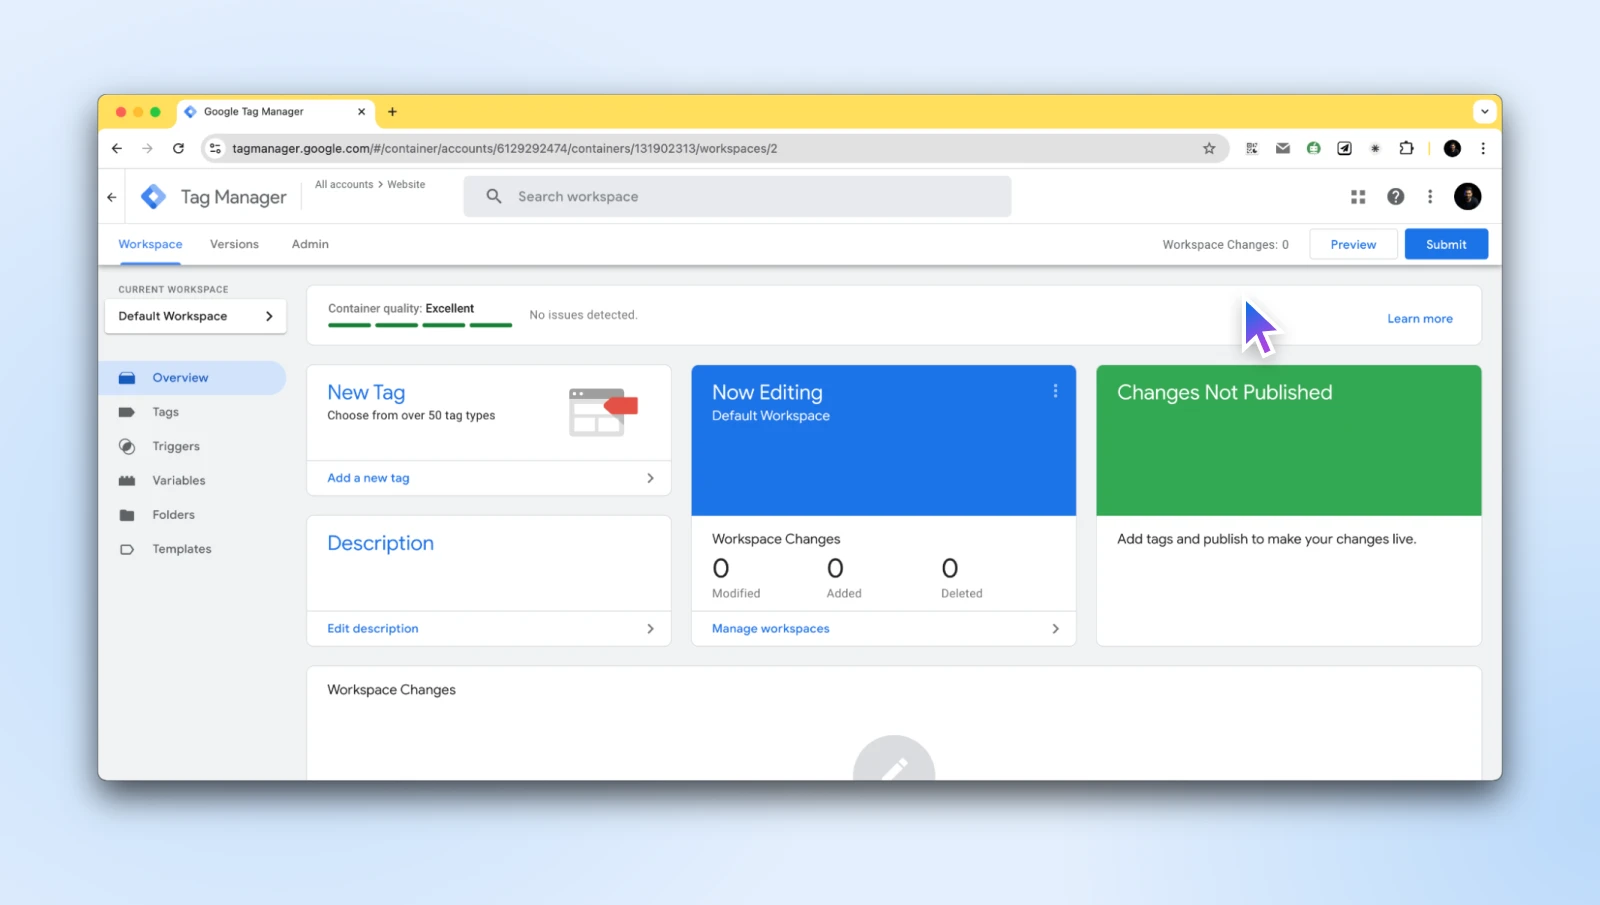
Ask yourself: do you really need all those tags firing on every page load? Could some of them be implemented manually for better control over when they load?
As a thumb rule, use Google Tag Manager for essential, site-wide tags only and implement less critical or page-specific tags manually.
4. Implement a Caching Solution
Think of caching as your website’s short-term memory. Instead of generating every page from scratch for each visitor, caching stores a copy of the page and serves it up lightning-fast.
Implementing caching can dramatically improve your LCP scores, especially for dynamic websites. There are various levels of caching you can consider:
- Browser caching: Tells browsers to store certain files locally.
- Server-side caching: Stores generated pages or database queries.
- Object caching: Caches individual elements like widgets or menus.
Depending on your web host, you may be able to leverage caching on the server level.
By default, DreamPress plans include built-in caching to reduce the load of uncached visits without the need to add any caching plugins to your site yourself.
Also, suppose you’re using WordPress as your website’s content management system (CMS). In that case, plugins like W3 Total Cache or WP Super Cache can help you implement additional layers of caching, including browser and object caches, further improving website speed.
5. Eliminate Render-Blocking Resources
Render-blocking elements refer to the static HTML, CSS, and JavaScript files needed to render a page on your site. Each of these files contains scripts that can prevent your users from viewing content.
Typically, they’re created from third-party plugins and tools such as Google Analytics.
However, one way to avoid these scripts hurting your UX (and, in turn, help improve Core Web Vitals) is to eliminate render-blocking resources and minify and remove any unused CSS or scripts.
There are multiple techniques you can use to go about this.
One is to minify your JavaScript and CSS by eliminating any white spaces or unnecessary comments.
You can use a tool such as CSS Minifier to make this easier:
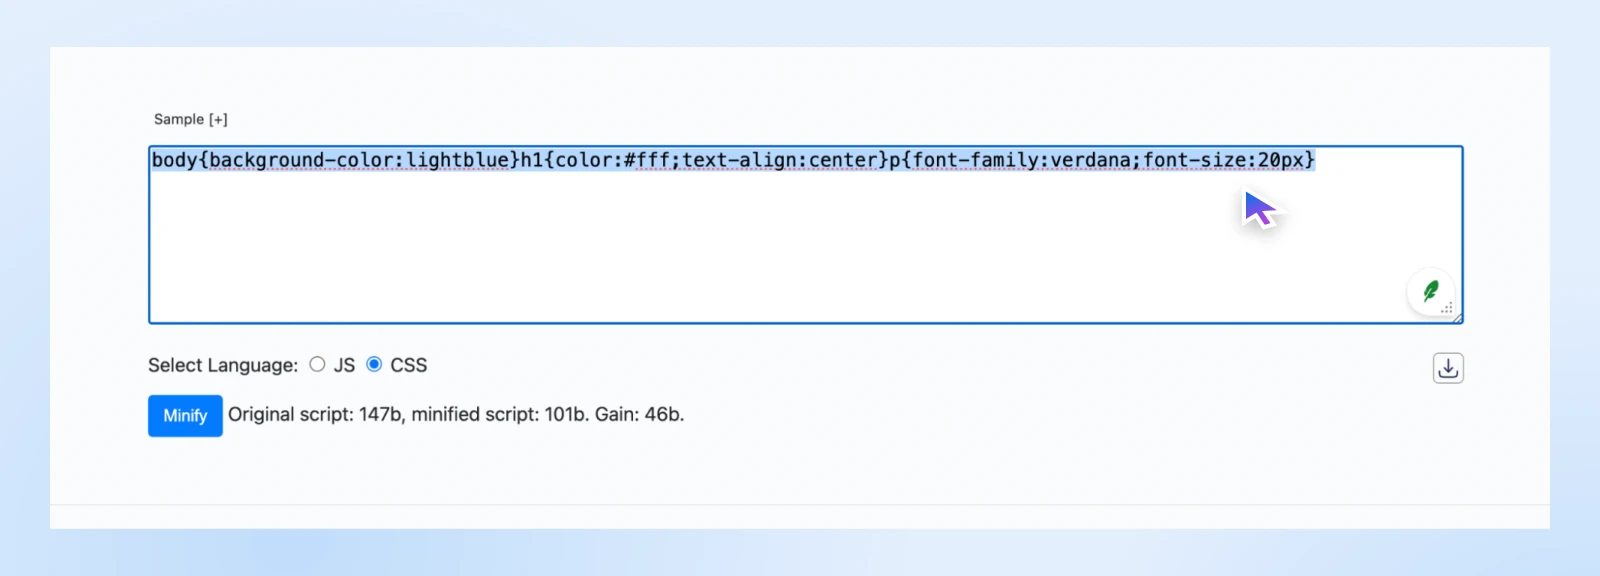
You input your CSS and select the Minify button. Then, you can copy and paste the output to download and replace your code.
Another method is to condense your JavaScript and CSS by combining the files. This is another task that the file optimization feature in WP Rocket can help with.
6. Defer Loading of JavaScript
If you’re looking to boost your FID scores, you can use the technique known as deferring the loading of JavaScript. This is another way to eliminate render-blocking elements.
This process makes your web pages load faster because it delays the loading of JavaScript. In other words, it loads other content on the page once a visitor arrives, rather than waiting for all JavaScript files to finish loading.
Your files will be forced to wait to load until everything else on your web page is ready.
Also, you can configure your site settings so that the critical CSS loads “above the fold content” more quickly. “Above the fold” refers to the elements on the web page that appear first.
You can do this by taking the content out of the main CSS file and inlining it into your code. This will help it load faster, thereby improving the UX. Some caching plugins like WP Rocket offer an Optimize CSS Delivery feature that can be helpful for this.
7. Use a Content Delivery Network
Imagine if your website had a clone of itself in every major city around the world. That’s essentially what a Content Delivery Network (CDN) does.
It distributes copies of your static assets (like images, CSS, and JavaScript files) to servers worldwide, so your visitors can download them from the nearest location.
The result? Faster load times, improved LCP scores, and a better user experience for your global audience. It can also help minimize the Time to First Byte (TTFB).
There are several third-party tools that you can leverage for your WordPress site. One of the most popular options is Cloudflare.

As with caching, some hosting providers offer built-in CDN or at least integration with CDNs. For instance, at DreamHost, we have DreamSpeed, a powerful CDN that takes advantage of our existing infrastructure and gives you blazing-fast websites with minimal effort.
8. Properly Size Images
The larger the images, the bigger the file size.
Therefore, it’s smart to make sure that you’re not using overly large images everywhere. For instance, there’s no reason to use HD images for your thumbnails. You can work with much smaller, lower-resolution images here.
To further optimize your images, you can use the srcset attribute in your HTML code. With this tag, you can specify the locations of images of different sizes, and modern browsers can automatically serve images of the correct size based on the resolution of the device, improving the LCP scores.
In addition to this, you can always specify the width and height attributes for your image tags or reserve the required space with the CSS aspect ratio to ensure that the user sees smaller images automatically.
However, we’d always suggest using a tool like Sqoosh to resize images before you even upload them.
9. Implement Lazy Loading
We also recommend that you implement lazy loading. This helps ensure that your images will load precisely when users get to that section of the web page, rather than loading at the same time as everything else on the page.
Lazy-loading images can help improve your LCP and loading speed. The best part is that it’s quite easy to implement.
Modern browsers support native lazy loading with the loading=”lazy” attribute on <img> tags.
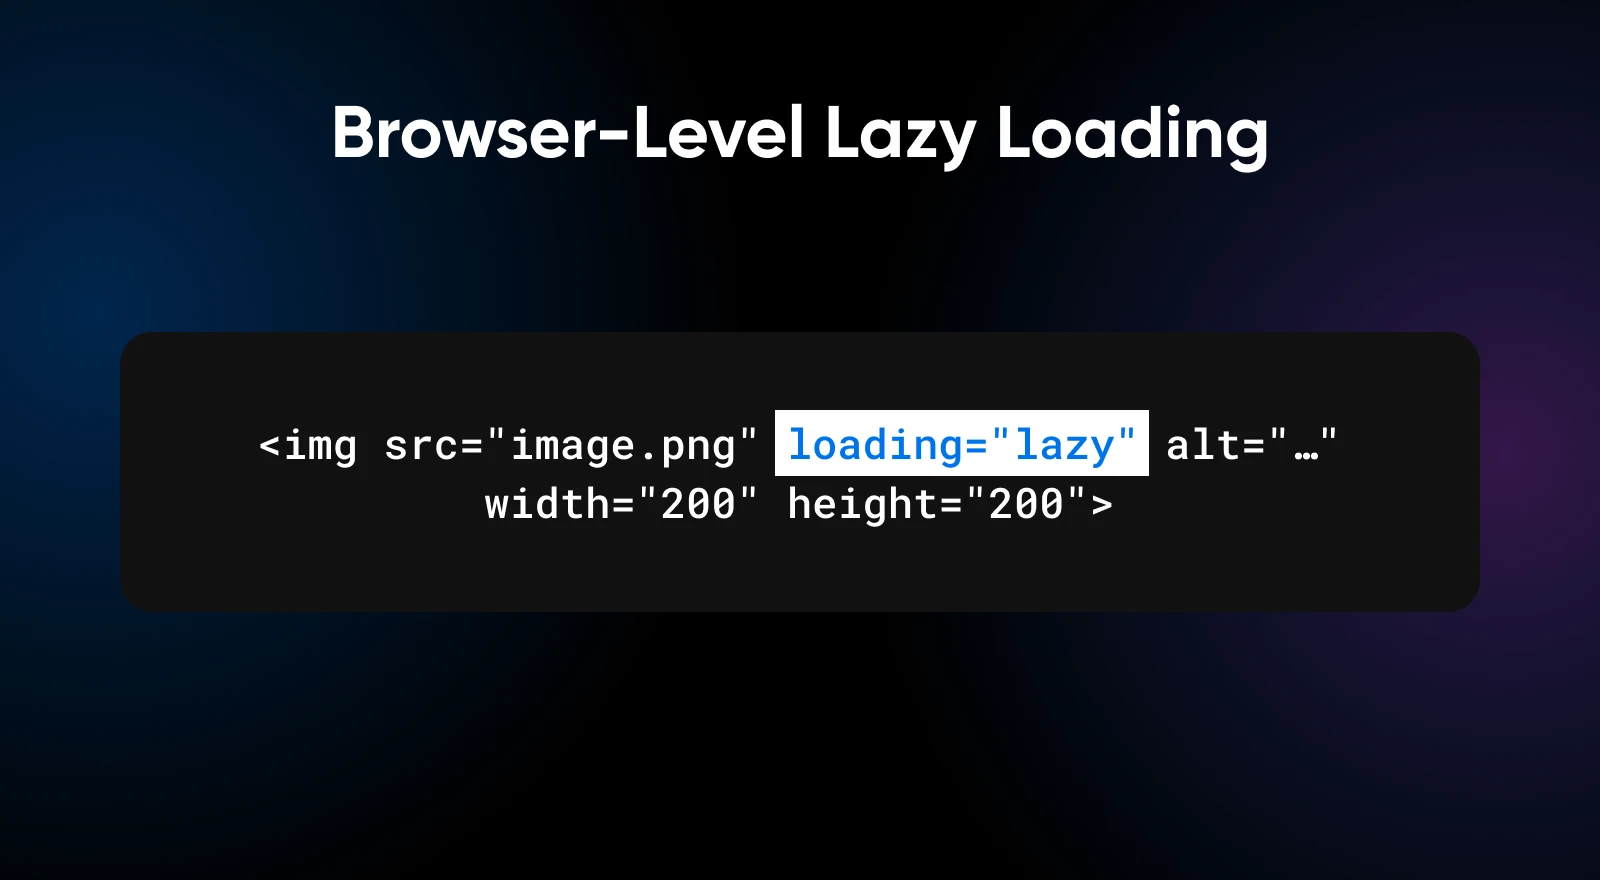
It’s as simple as adding a single attribute, and your page is ready to lazy load.
For WordPress users, you just need a plugin like Jetpack or Smush to get lazy loading enabled.
10. Upgrade Your Hosting
Sometimes, you can do everything right and still have low Core Web Vitals scores. At this point, it makes sense to look into upgrading your hosting provider plans.
For instance, if you’ve recently started receiving a lot of visitors or have added many new products with lots of images, you may be hitting the upper limits of your web host.
In such cases, if you’re on a shared hosting plan, you can move to a virtual private server (VPS) hosting or managed dedicated hosting.
For WordPress users, managed WordPress hosting can give a good boost to your site’s performance without being too expensive. For example, at DreamHost, we offer DreamPress plans aimed at WordPress site owners looking to get a high-performance site without breaking the bank.
Whichever type of hosting you go with, or are already using, the consensus is that upgrading your hosting provider or plan is the quickest way to speed up your website.
We suggest choosing a managed host with servers optimized specifically for WordPress that can handle the various technical aspects of site performance.
Enhance the User Experience and Reap the Rewards
You now have the knowledge required to join the 50.1% of websites that are already meeting the Core Web Vitals scores and offering a great experience to their visitors.
It’s true that some changes required to improve the scores can be complex — maybe even technical, requiring developer support to fully optimize your website.
If you want to offload the optimization, try DreamHost’s web development services.
Our developers work with you to optimize existing websites and can even build a website from scratch to provide an excellent user experience and boost Core Web Vitals scores.
With DreamHost, you invest in a long-term performance strategy. Our experts will:
- Audit your site’s Core Web Vitals.
- Use the latest optimization techniques.
- Build your site on a solid, scalable foundation.
- Provide ongoing support to keep your site running smoothly.
You can focus on running your business and creating great content while we optimize your site. So, if you’d like DreamHost to build or optimize your website, book a consultation or chat with us today!

Pro Services – Design
Get a Beautiful Website You’re Proud Of
Our designers will create a gorgeous website from scratch to perfectly match your brand.
Learn More
Did you enjoy this article?

