Find and Secure Your WordPress Login URL

Strong, unique passwords can help prevent unauthorized access to your small business’s WordPress website.
However, attackers have several clever ways of getting around them.
Just like relentless youngsters who seem to outsmart every childproofing tactic you throw their way, malicious actors know how to carry out brute-force attacks and find backdoors through less secure plugins.
Brute-Force Attack
A brute-force attack is a cyber assault where an attacker uses trial and error to break into an account. Malicious bots attempt to guess passwords, login credentials, or digital keys repeatedly.
Read More
And, voila, they’re inside your site stealing data faster than a toddler can pull out and empty every drawer in your kitchen (AKA, remarkably fast).
In other words, passwords often aren’t enough to properly protect your site against attacks.
Fortunately, there’s a relatively simple thing you can do to reduce the risk of hackers getting into your site — moving your WordPress login page to a new URL. This will put you in a better position to defend against hacks and attacks.
If you’re not too familiar with WordPress, this probably won’t make much sense. That’s why this article will take a closer look at why you should consider changing your WordPress login URL, how to find your login URL if you’ve lost track of it, and, most importantly — a few ways to modify it to boost security.
And if you stay tuned all the way to the end, we’re also including a list of additional tips for further strengthening your WordPress security.
Let’s get secured!
Why You Should Update a Default WordPress Login URL
Since WordPress doesn’t hide your login page, any user can find it as long as they know how WordPress structures its URLs. Considering WordPress powers close to half of all websites on the internet, it’s safe to assume a lot of folks — especially those who know how to exploit websites — are very familiar with the common WordPress layout.
The default structure for a login page usually looks something like this:
https://example.com/wp-login.php
This means when a user plugs your website URL into where it says “https://example.com/,” they should see a page in their browser prompting them to log in to the back end of your website:
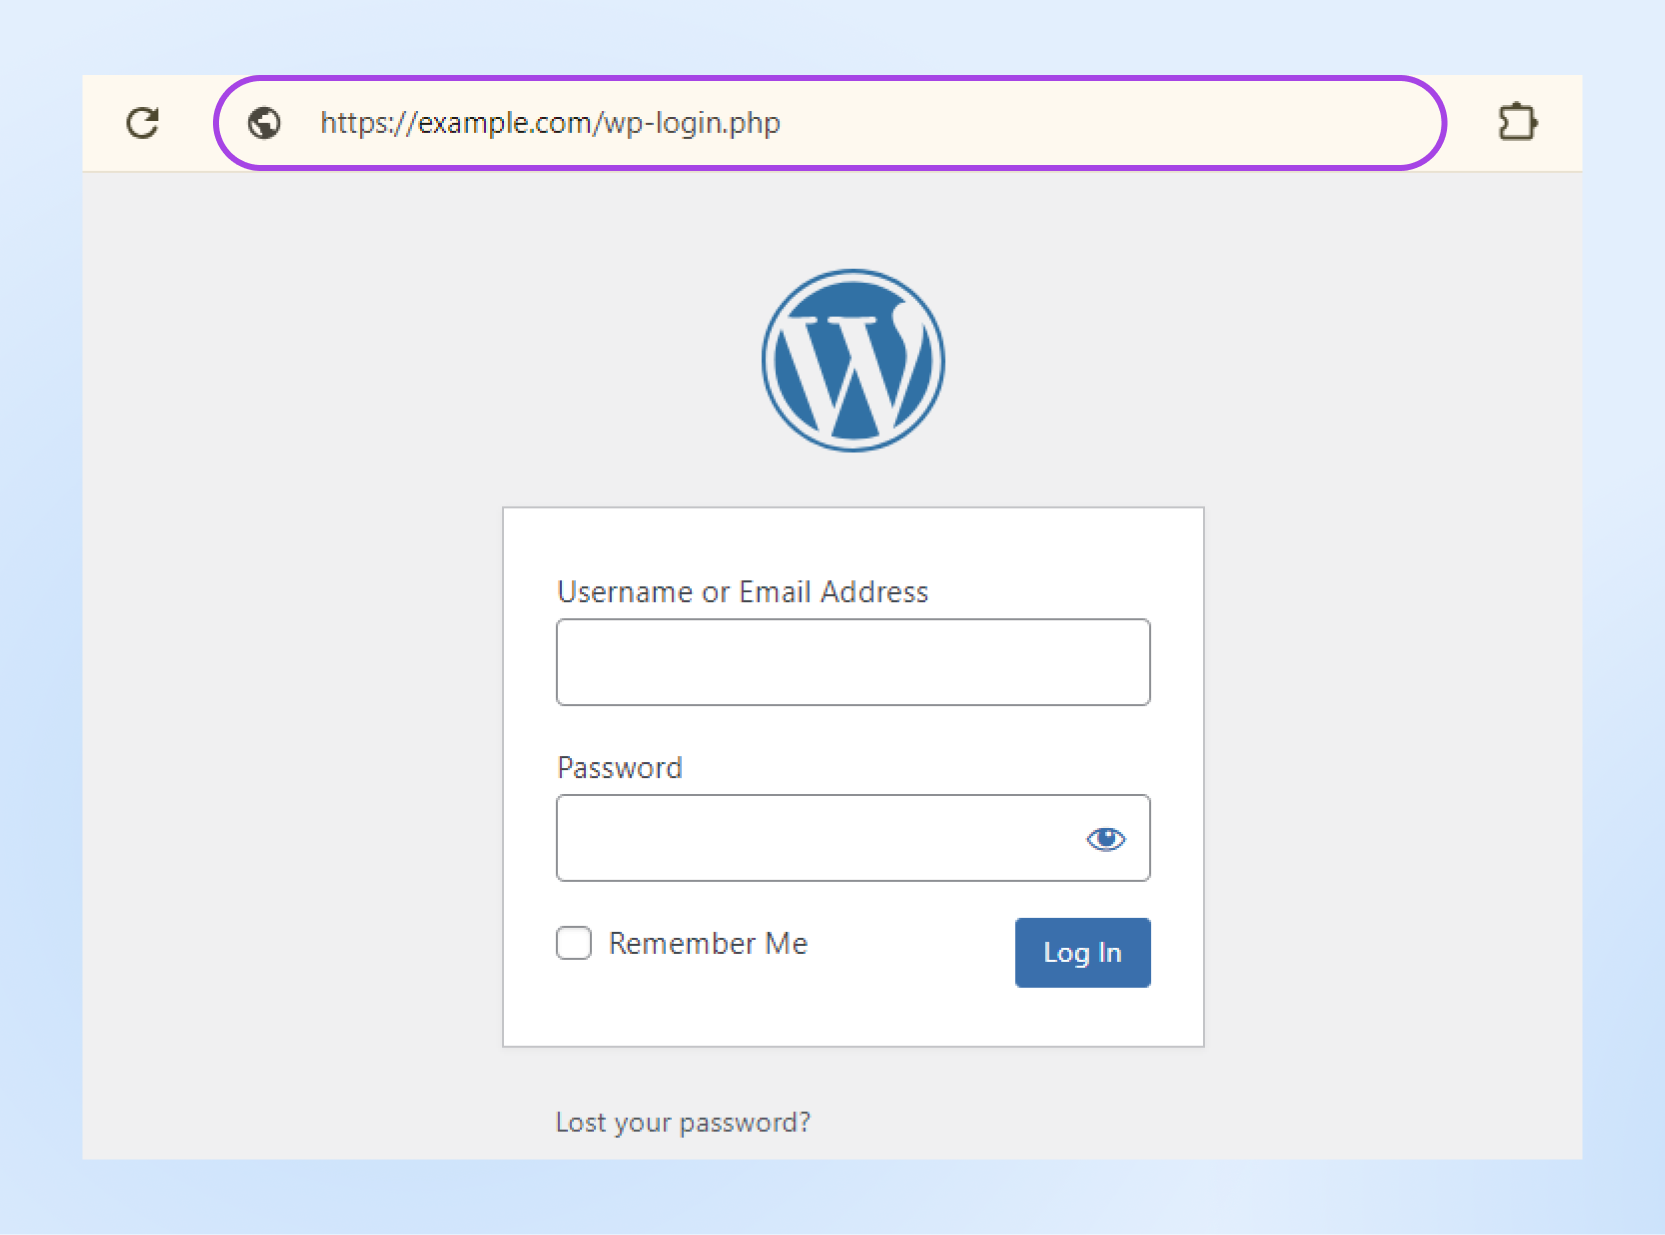
Of course, most hackers probably won’t have the login credentials they need. However, this structure is still risky if your password is common, weak, or easy to guess. Something like 123456.
Simply put, it’s an easy fix for an unnecessary vulnerability.
For simplicity’s sake, many people prefer to stick with this default wp-login structure for signing into WordPress, but leaving it as it is makes it easy for hackers to access your login area, which is like doing half of their job for them.
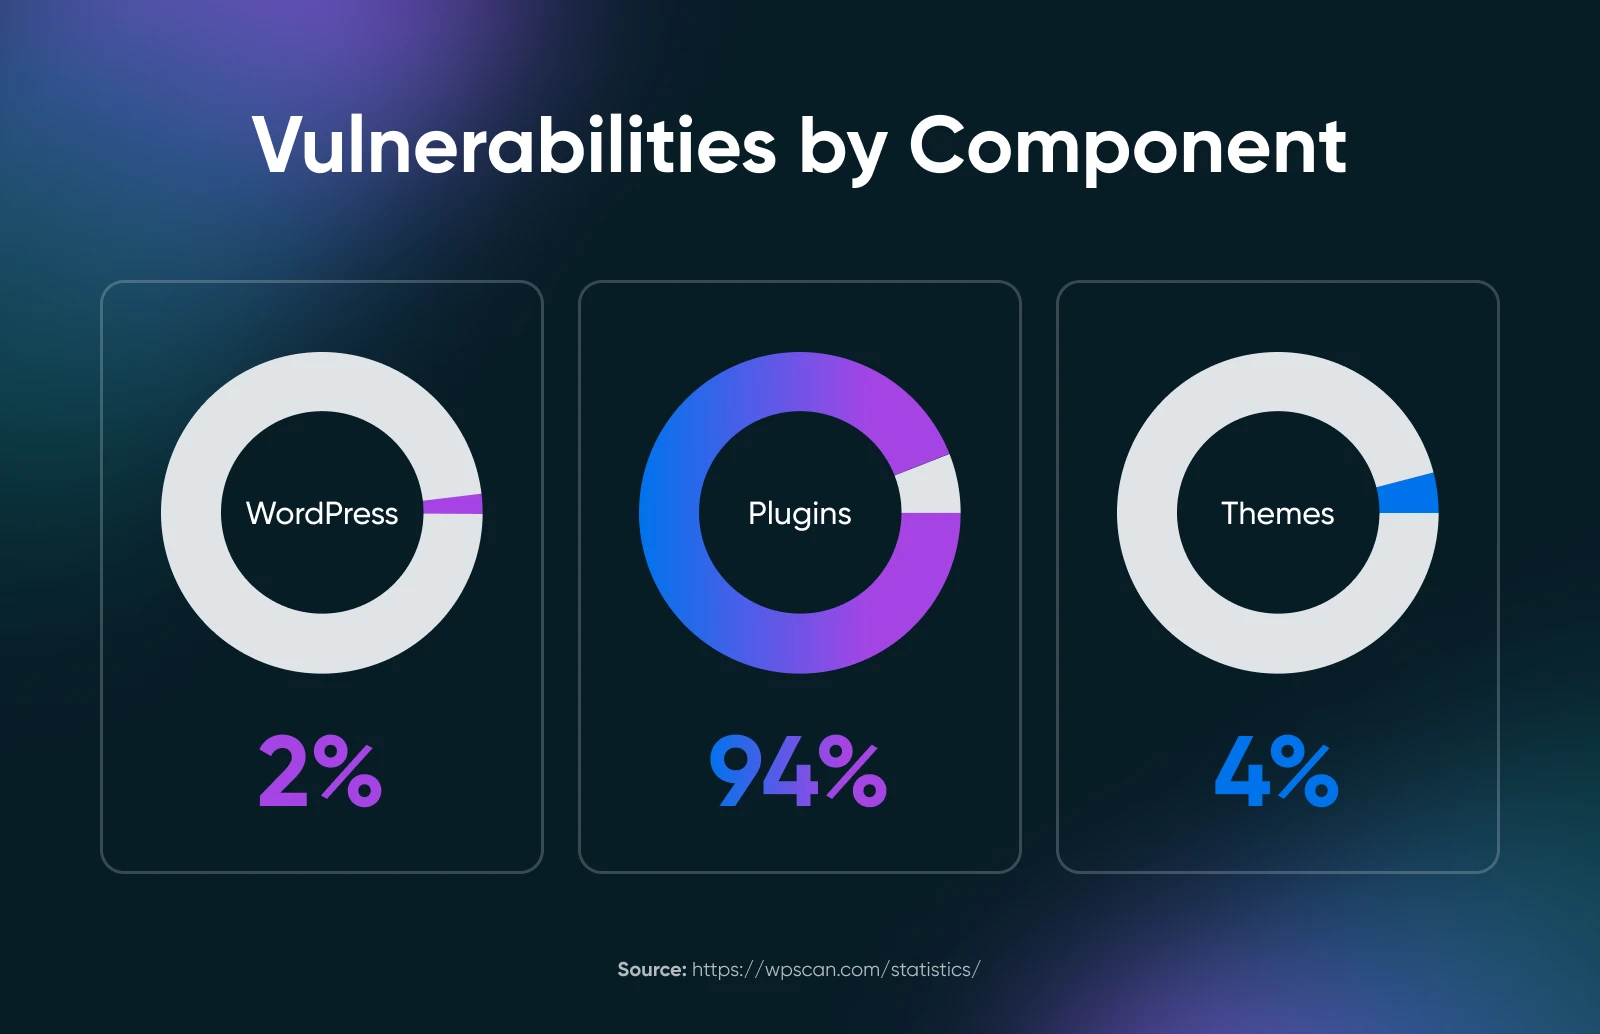
WPScan found that WordPress currently has more than 50,000 vulnerabilities in 2024. The vast majority are found in WordPress plugins, and hundreds, if not thousands more are discovered every year.
In short, it’s time to toughen up your website’s security.
An achievable way to do so is to change your WordPress login URL to prevent unauthorized access to your site and reduce the risk of brute-force attacks.
Here’s How To Find the Default WordPress Login Page
Look, we know you have a lot going on. When you’ve got a million things on your plate as a small business owner, losing track of your WordPress login URL isn’t uncommon.
As we mentioned in the previous section, WordPress uses a standard sign-in link structure that looks something like this:
https://example.com/wp-login.php
So, all you have to do is add the suffix (this part: wp-login.php) to your domain, and you should land on your login page.
You can also find your login page by trying to access your WordPress dashboard while logged out. Simply enter “yourwebsite.com/admin” or “yourwebsite.com/login” into the search bar and you should land on the same login page.
Not working? Don’t panic.
Some web hosts change your WordPress login page automatically for security reasons. So you might already have a custom login URL. If so, we’ll show you how to find it right now.
Custom Login URL? Here’s How To Locate It
If your web host has changed your login link, you can usually locate it within your control panel after logging into your hosting account.
However, if you can’t identify your custom login URL there, you can still locate it manually by connecting to your site using an SFTP client like FileZilla.
SFTP
SFTP (Secure File Transfer Protocol) is a safer way to transfer files online. Unlike FTP, SFTP uses encryption to protect your data while it’s being sent, keeping it secure from unauthorized access.
Read More
You may be able to find the credentials to do so in your hosting account or ask your website host for the details.
After installing the client and connecting using those credentials, you should land on a page that looks something like this:
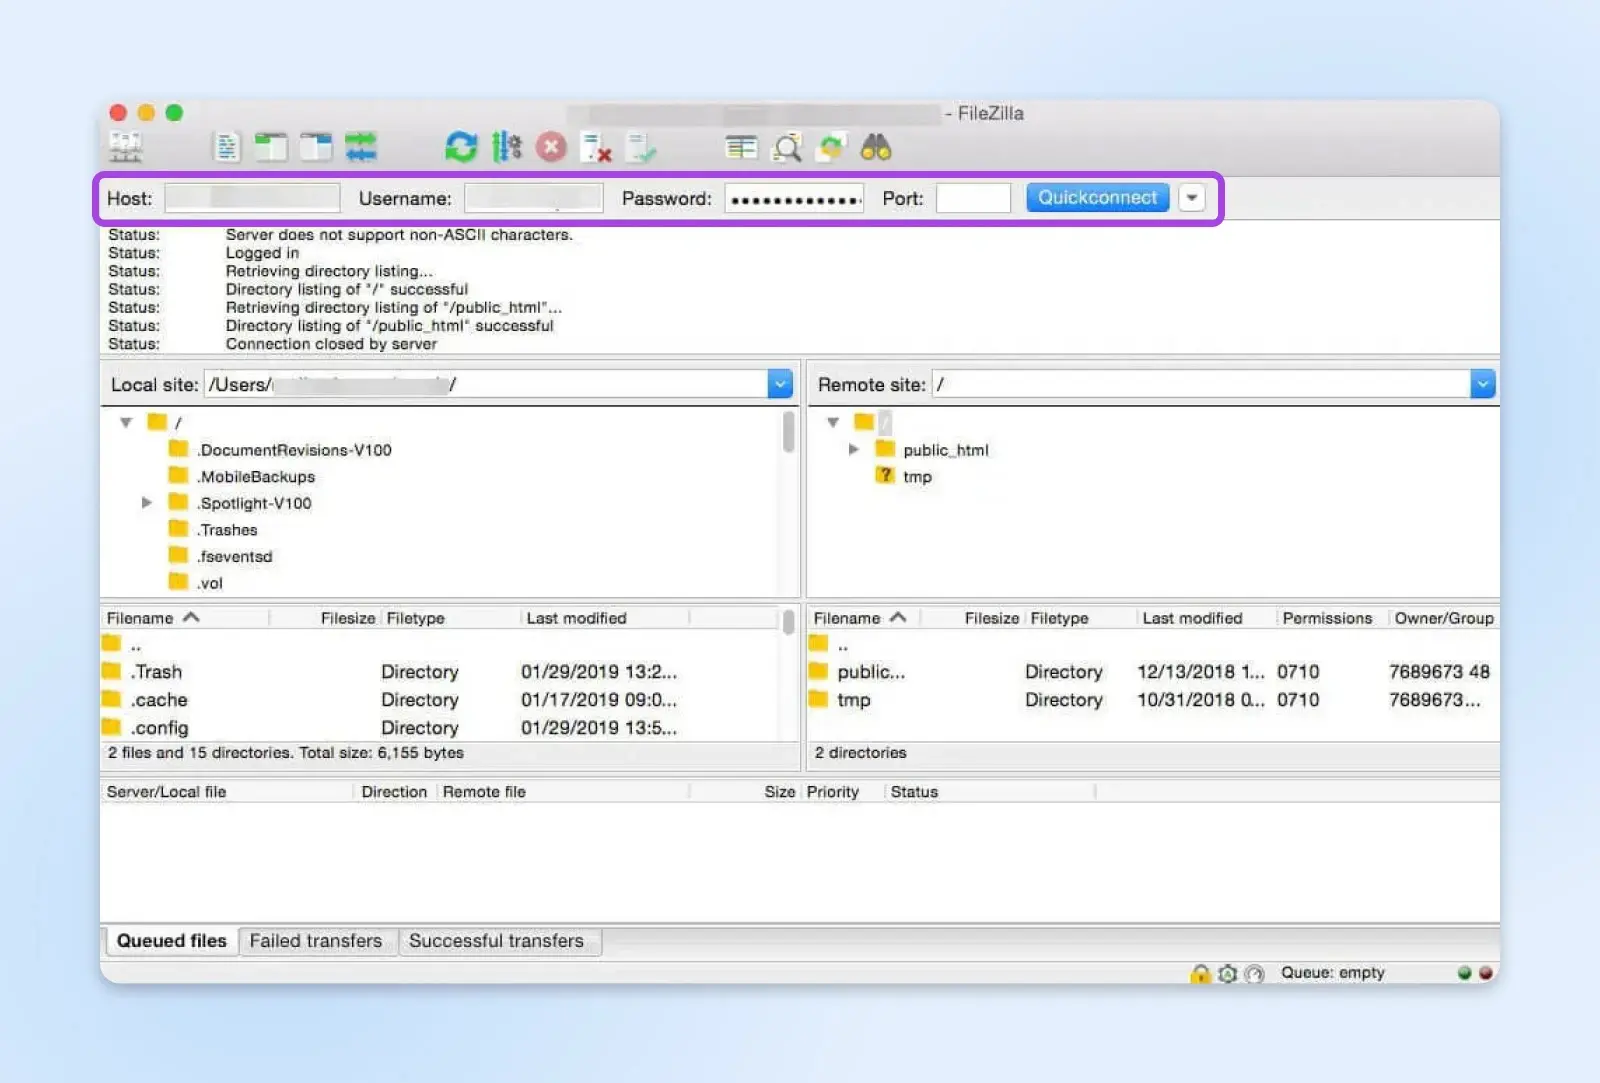
Find the root folder labeled public_html (you can see it above on the right side of the screen) and click in to locate the wp-config.php file. If you can’t find it as public_html, it may instead be listed as your domain name.
Open this file on your computer using a text editor like Visual Studio Code. It’s best to use an option that provides a search and replace tool. Use that tool to find a string of code containing site_url — this will direct you to your custom login URL.
Boom, you’ve found it! With that out of the way, let’s update this URL for better security.
Two Strategies To Change Your WordPress Login URL
Now that you know where to find the WordPress login URL, let’s take a look at two easy ways you can change it.
Method 1: Upgrade Your WordPress Login URL With a Plugin
The easiest way to change your login URL is by using a WordPress plugin. Luckily, there are plenty of these available to facilitate this.
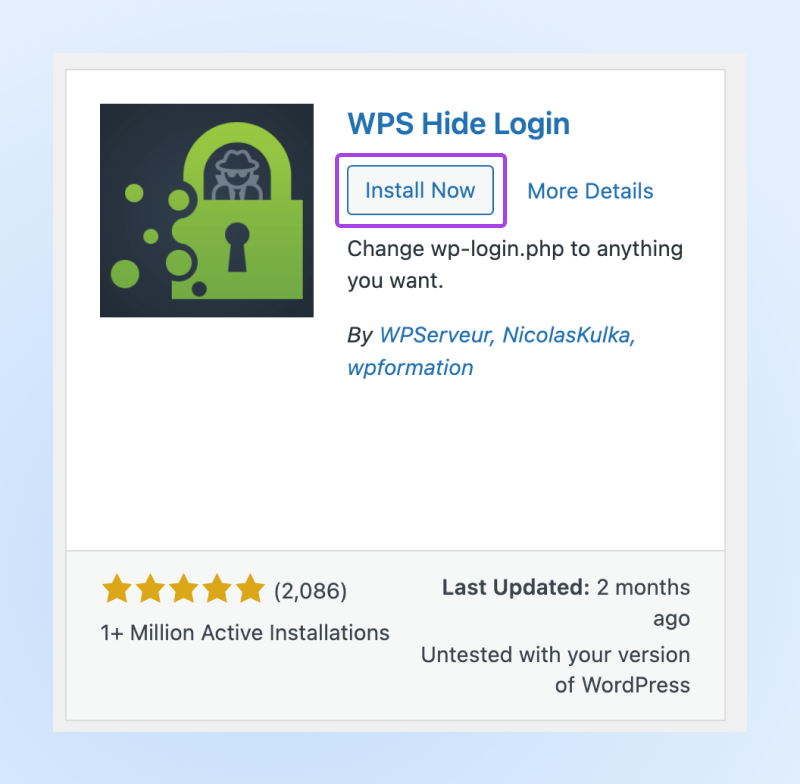
WPS Hide Login is a great option since it’s lightweight and allows you to safely change your WordPress admin login page to anything you want. Better yet, WPS Hide Login also prevents all logged-out users access to the wp-admin directory and wp-login.php.
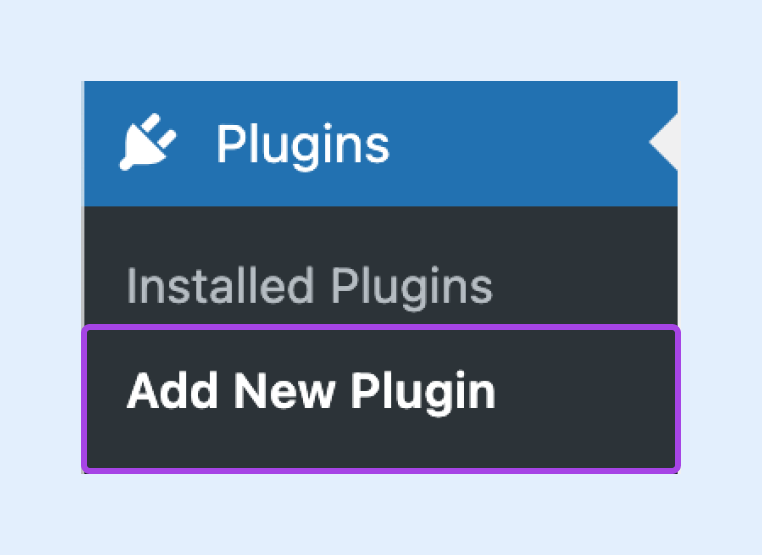
To get started, you’ll need to install and activate the plugin by going to your WordPress admin area. Click on Plugins > Add New Plugin.
Search for “WPS Hide Login” and hit the Install Now button. Stay on this page until the installation is complete, then use the Activate button.
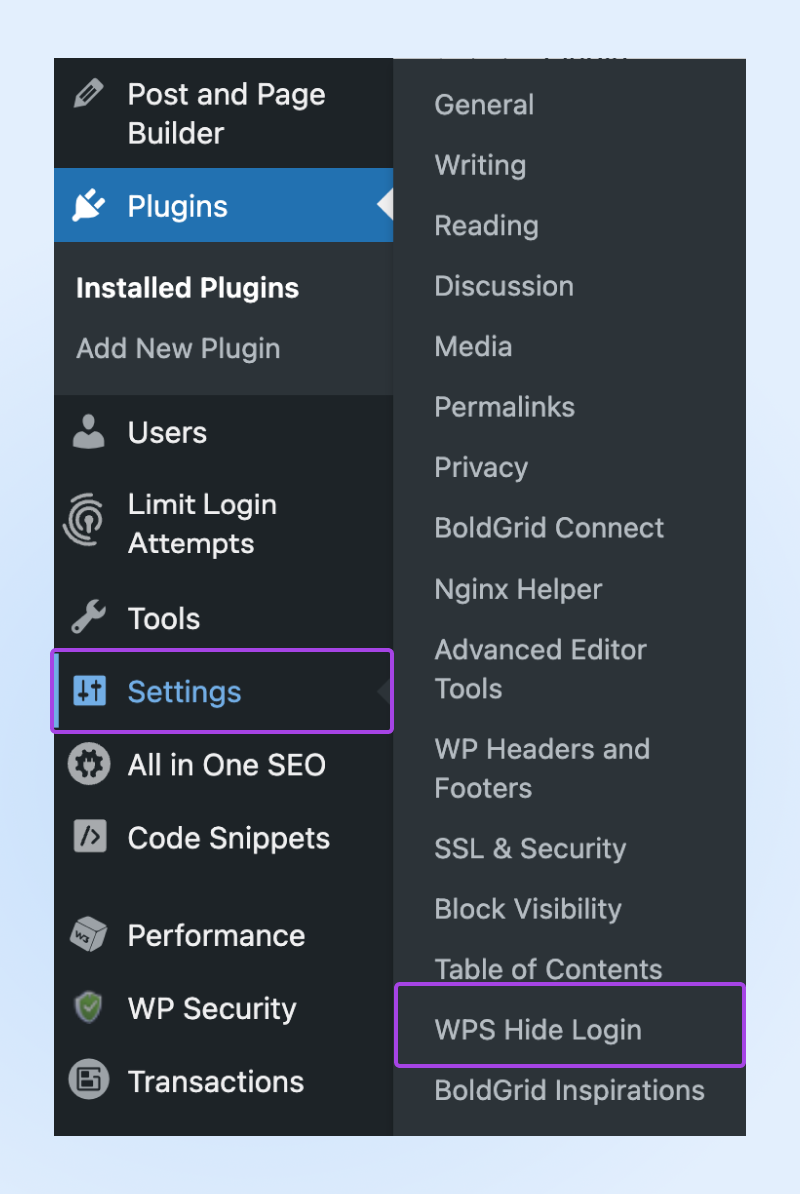
Once activated, in the sidebar of your WordPress admin, head to Settings > WPS Hide Login.
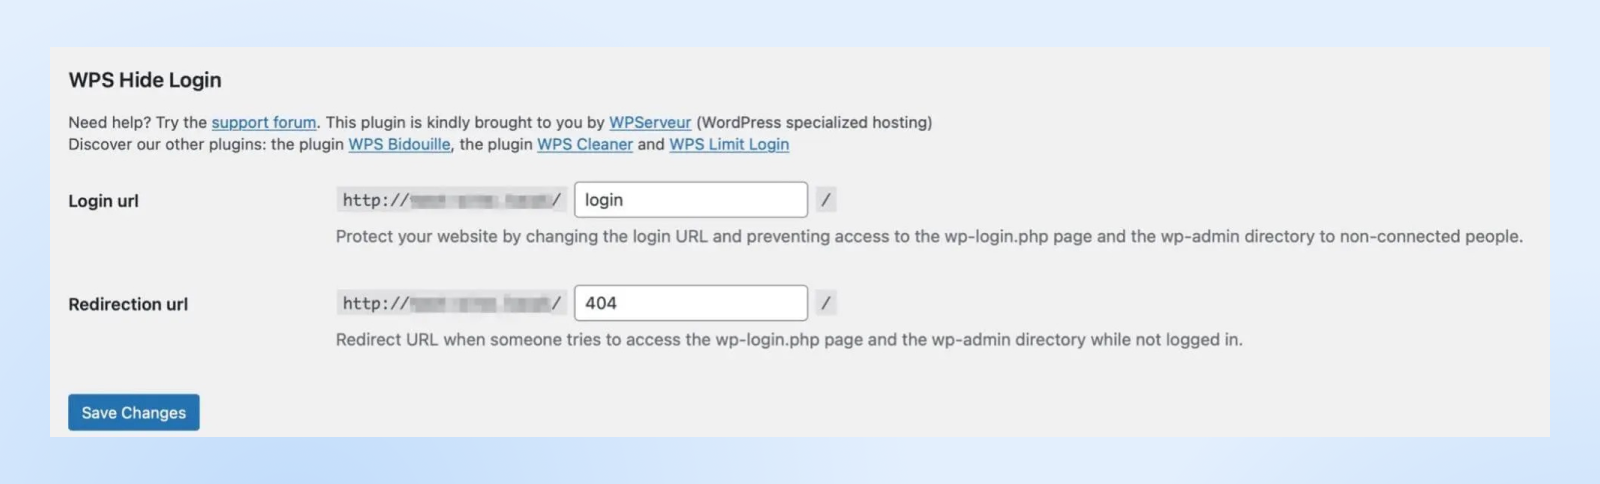
You’ll see that you can create a new login URL. Type in whatever you like and hit Save Changes.
It’s as simple as that.
Bear in mind that once this plugin is active and you make your changes, using the new URL will be the only way to access your site’s login screen.
So don’t lose this URL. And don’t share it publicly or with anyone who doesn’t absolutely need it!
Also, remember that your site will revert to using wp-admin and wp-login.php if you deactivate this plugin.
Method 2: Update Your WordPress Login URL by Editing Your wp-login.php File
This second method is a little trickier, and most likely best suitable for experienced users. Therefore, before you get started with the following steps, it’s best to make a fresh WordPress backup of your site in case anything goes wrong.
It’s also important to know that your changes may revert to their previous settings when you update your theme. If you want to avoid this issue, learn how to use a WordPress child theme.
Now, let’s dive in.
You’ll need to access your site’s files, just like we did earlier when tracking down your custom login URL. You’ll be able to do this via your website host admin panel, or SFTP.
If it’s the latter, use your credentials to connect to your site via your SFTP client of choice, and again, locate the public_html file (again, it might be listed as your domain name instead.) Inside, find the wp-login.php folder. The code behind your site’s login page lives here.
Open the file using your text editor again.
Use the search tool to find every instance of wp_login_url, which will look something like this:
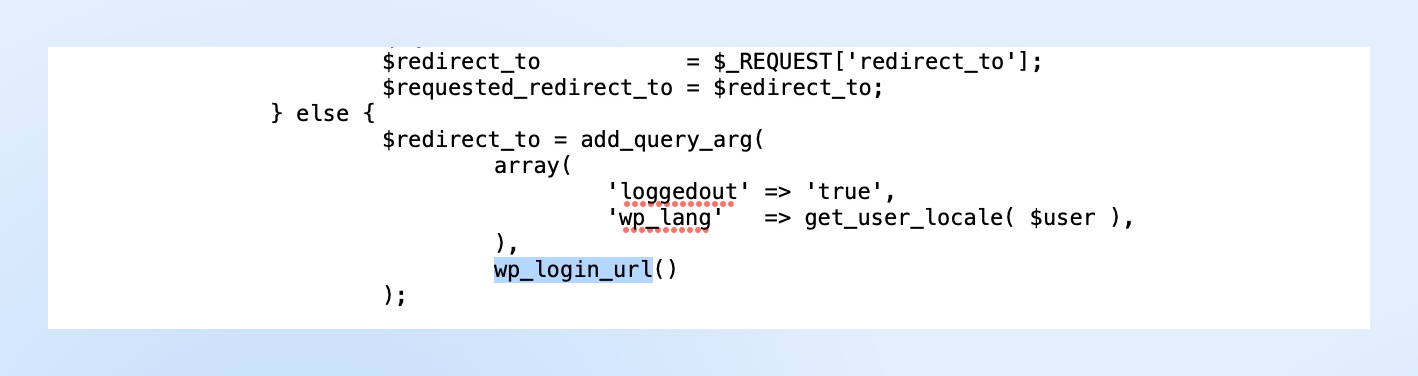
The strings following the wp_login_url will contain your current login URL. Change each to the new login URL that you’d like to use.
Remember, you can keep it straightforward so long as it’s original (and different from the default). For example, you might prefer something like “access.php” or “wp-new-login.”
Once you’re happy with your changes, save them, and close the editor. Then, rename the file after the new URL that you chose (such as “access.php”).
Note: You can technically name the file whatever you’d like, but it’s easier to track and remember if you name it after the new URL you plan to use.
Drag the file from your desktop into the public_html file.
Now, you can upload the new file to your root directory using your FTP client or your web host’s file manager. We’ll show you how to do this using the WordPress “login_url” filter hook.
Start by navigating to wp-content > themes, selecting your active theme, and opening the functions.php file (preferably under a child theme.) This is telling WordPress where the new login file “lives.”
Here, you can paste the following line of code into the file:
/*
*Change WP Login file URL using “login_url” filter hook
*https://developer.wordpress.org/reference/hooks/login_url/
*/
add_filter( ‘login_url’, ‘custom_login_url’, PHP_INT_MAX );
function custom_login_url( $login_url ) {
$login_url = site_url( ‘wp-your-new-login-file-name.php’, ‘login’ );
return $login_url;
}
Replace wp-your-new-login-file-name with the name of the file you just created. Then, save your changes and test your new login.
You’ll need to type in your site’s domain with your new login URL at the end.
For example: “https://example.com/access.php.”
If you’re able to access the login page for your WordPress site, it’s worked!
And now, you can delete the original wp-login.php file, because the new file you’ve added has replaced it.
Something to remember – once you’ve updated your login page, you need to update the pages that reference the wp-login.php file we just deleted. Specifically, you need to update the logout_url filter and the lostpassword_url filter.
4 More Ways To Secure the WordPress Login Process
Changing your WordPress login URL is great for tightening up your site’s security. However, it’s not all you can do.
Here are some additional ways to further secure your WordPress login process:
1. Limit Login Attempts
When you limit login attempts, you can stop hackers and bots that attempt to access your site by trying hundreds of usernames and passwords. In other words, a brute-force attack.
The easiest way to do this is by using a plugin like Limit Login Attempts Reloaded.
This plugin gets to work as soon as it’s activated on your site. By default, users have four chances to log in before they get locked out of WordPress.
However, you can play around with the settings, changing the number of retries, the length of the lockouts, and more. The plugin’s admin dashboard can show you how many brute-force attacks have been blocked by the plugin.
And in the “Logs” tab, you can even manually blocklist specific IP addresses.
2. Implement Two-Factor (2FA) Authentication
2FA is one of the most widely used security features WordPress users deploy.
In this process, users have to submit more than just their login credentials. Before logging in, users must also generate a second credential. This is often a code sent via text message, email, or an app.
Since bots and hackers are unable to produce the second required credential, this is a great way to prevent unauthorized access to your site. One of the best ways to add this functionality to your site is by using a plugin like miniOrange.
Once activated, head to the new miniOrange two-factor link in your WordPress admin sidebar > My Account.
Here, you’ll have to register for an account. Then, you’ll receive a code that enables you to verify your email.
Next, we recommend following along with the plugin’s helpful “Setup Wizard” to make sure you have 2FA fully set up for anyone who uses your site.
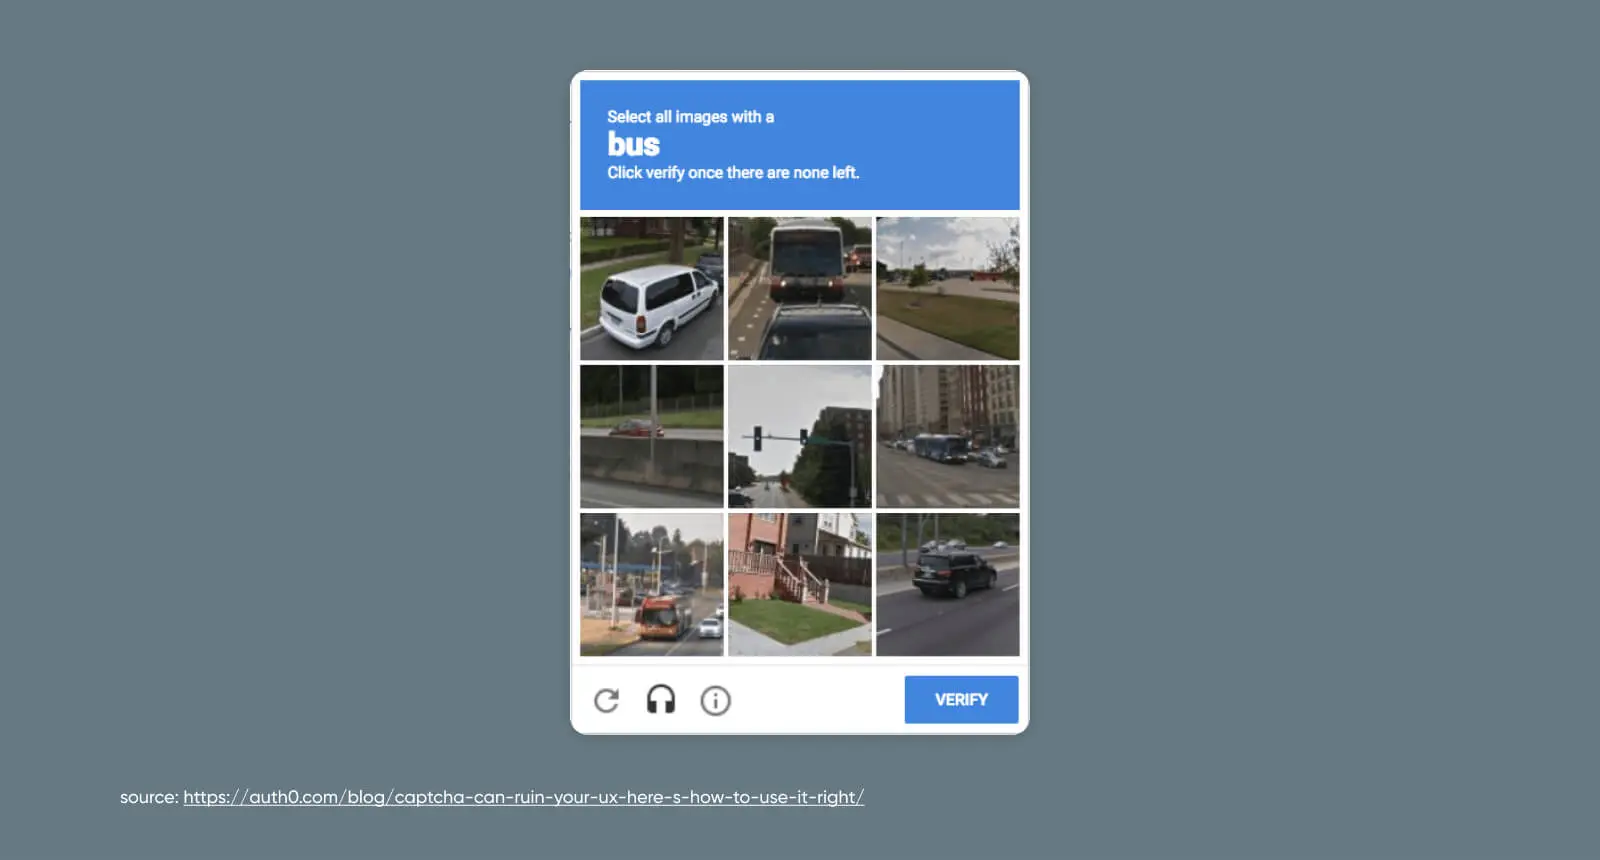
3. Use CAPTCHA
CAPTCHA or reCAPTCHA from Google provides an extra layer of security for your website.
Typically, it’s used to control access to sensitive pages. What’s more? This can prevent bots from creating spam or accessing personal information on your website via order forms or login forms.
Again, a plugin is the easiest way to enable this functionality on your site. In our guide to reCAPTCHA, we walk you through how to get it up and running via a plugin in just six steps.
If you’d rather do it manually, that’s also an option!
4. Enforce Strong Passwords
Of course, changing the login URL for your WordPress site is a great idea, so you’re not using the easily-guessable “admin” suffix. However, your efforts are wasted if you continue using weak or repeat passwords that put your account at a greater risk of attack.
Only 13% of people use a password generator to create unique, highly secure phrases for different websites. The majority instead use numbers and words that are significant to them, making these more obvious to hackers.
We recommend using Solid Security, a WordPress plugin that can nudge users into using strong passwords. If you’re worried about a password being part of a data breach, you can also use Passwords Evolved, which sends an alert if any user passwords are compromised
Right now, it’s best to reset your password on WordPress if it’s re-used or easily guessed. Going forward, opt for lengthy passwords with upper and lowercase letters combined with numbers and special characters. We’d also recommend using a password manager like 1Password for some extra peace of mind.
Plus, it’s important to encourage strong passwords from users with access to your website. You can clarify this in the welcome email users receive upon registering to your site.
Bonus: Even More Tips for Boosting WordPress Security
As the most popular content management system (CMS) on the market, WordPress is understandably also one of the most often attacked.
We don’t say that to scare you away from using it, but just to make you aware of the importance of securing your WordPress site on all fronts.
For overall security beyond the login phase, we recommend yet another powerful plugin for automating the process: Jetpack.
Jetpack
Jetpack is a WordPress plugin created by Automattic, the company behind WordPress.com. It’s a plugin that gives you access to features that are usually only available on WordPress.com sites.
Read More
Ensuring your SSL/TLS certificate is up to date is the best way to ensure your important site and user data is encrypted. This often has a positive impact on search engine optimization (SEO) for your website as well.
Learn how to use the Really Simple SSL WordPress plugin here.
Feeling ready to go even deeper into WordPress security? Check out our guide to Everything You Need To Know About WordPress Security for even more website-hardening methods.
Build an Impenetrable Business With the Best WordPress Host
One final, but excellent way to tighten up your WordPress security for good?
Partnering with an experienced, committed web host.
At DreamHost, we offer a range of solutions to suit all kinds of users, websites, and security needs.
Our managed WordPress hosting packages are great for hands-off small biz owners and operators, and our managed VPS hosting options are ideal for when you’re ready to scale.
Explore all of our hosting plans to choose the best fit for you! And while you’re at it, check out DreamCare to get professional security monitoring, reporting, and maintenance, so you can check that off your business to-do list.

DreamShield
Protect Your Website with DreamShield
Our premium security add-on scans your site weekly to ensure it is free of malicious code.
Enable DreamShield
This page contains affiliate links. This means we may earn a commission if you purchase services through our link without any extra cost to you.
